Photography & Image processing notes
Canon EOS DSLR Autofocus Explained
Exposure value
How to Use Leading Lines in Photography – 2023
What is an Exposure Stop? How does it affect my Photography?
What is an Exposure Stop
The “stop” is a unit of measurement used in all aspects of photography. It is used by photographers to determine proper exposures, it is integral to selecting settings on your camera and it makes communication between photographers much easier.
Definition:
An exposure stop is a doubling of a halving of the amount of light one is working with during a particular exposure. It could be the amount of ambient light in a room, it could be the amount of light we are adding to a scene using strobes, it could be the amount of light being allowed to enter the camera.
It is important to note that a stop is not an absolute unit of measure, like a foot, a meter, a gallon, an ounce, etc but rather a stop is a relative unit of measure. It varies dependent on the values we start with. The increase in available light for your photo’s exposure between one wax candle and an additional identical wax candle is a single stop of light, yet the increase between 1 sun and an additional identical sun s is also just a single stop. See? It’s relative to the amount of light we started with.
Example: Here is a working example. Let us pretend we were to be sitting in a completely black room void of light. Now I will lite a single candle.
If I asked you to raise the ambient light in the room by 1 stop, what could you do? You could lite one more identical candle. That would double the amount of ambient light in the room thus raising the available light for our camera by 1 stop.
Now if we wish to raise the exposure of your photograph by 1 stop we have additional options.
Ambient Light: We could still lite the additional candle (or add the exact same amount of light as 1 candle using any kind of light source). That would increase our photo’s exposure by 1 stop.
BUT we could also change the amount of light entering the camera itself (instead of changing the available ambient light in the room). This can be done by manipulating camera settings.
Shutter Speed: We could double the length of time that our shutter is open. (for example 100th/sec to 50th/sec . That would double the amount of light entering the camera and thus increase our photo’s exposure by 1 stop.
Aperture: We could increase the aperture size within our lens by 1 stop. (see below for more on aperture settings). Thus changing the aperture from f/4 to f/2.8 would double the amount of light entering the camera and thus increase our photo’s exposure by 1 stop.
ISO: We could increase the ISO setting by 1 stop (see below for more on ISO settings). Thus changing the ISO from 100 to 200 could double the sensitivity of the camera’s sensor and thus increase our photo’s exposure by 1 stop.
Camera EV (Exposure Value) Settings:
When making exposure value changes (EV) we use stops as our unit of change. In most cases cameras make changes in increments of 1/3 stops; however, this can usually be changed within your camera settings to ½ or 1/1 (full stop) increments. 1/3 provides the most control over your exposure.
The following lists the values you will see when making FULL stop incremental changes for each of our three camera exposure options (aperture, shutter speed, iso)
A change between any of these numbers below will result in a doubling or halving of the light being recorded in our image.
Aperture (measured in “f / stops”):
1.4 2.0 2.8 4.0 5.6 8.0 11 16 22
Shutter speed: (measured in fractions of a second):
8th 15th 30th 60th 125th 250th 500th 1,000th
ISO:
100 200 400 800 1600 3200 6400 12800
You will probably recognize these numbers form your camera.
ISO and Shutter speed values are very easy to remember. Just double or halve the starting number (note some very small variations to the rule within shutter speed for example 8th to 15th is not quite a perfect doubling of the number). They are basically intuitive.
Aperture on the other hand, you will just have to commit these numbers to memory as they do not make intuitive sense. The numbers used for are called f-Stops.
Is an “F Stop” the same thing?
No. An f stop (often written as f-stop) is a numerical value that represents the ratio of the lens focal length to the diameter of the entrance pupil. ACK! yes I know. Suffice to say that photographers use these f-stop values to represent changes in “expo
Source: What is an Exposure Stop? How does it affect my Photography?
Stopping down

Increasing f-stop decreases the aperture of a lens
In photography, stopping down refers to increasing the numerical f-stop number (for example, going from f/2 to f/4), which decreases the size (diameter) of the aperture of a lens, resulting in reducing the amount of light entering the iris of a lens.[1][2]: 112
Reducing the aperture size increases the depth of field of the image. In the case of film cameras, this allows less light to reach the film plane – to achieve the same exposure after stopping down, it is necessary to compensate for the reduced light by either increasing the exposure time, or using a photographic film with a higher speed. In the case of digital cameras, stopping down the aperture allows less light to reach the image sensor – to achieve the same exposure, it is necessary to compensate for the reduced light by either increasing the exposure time, or increasing the signal gain of the sensor by increasing the camera’s ISO setting. Alternatively, more light can be added to the scene by increasing the amount of light illuminating the scene, such as by using or increasing the strength of electronic flash or other light sources.[3]
As a lens is stopped down from its maximum (widest) aperture, most lens aberrations (spherical aberration, coma and astigmatism) are decreased, but lens diffraction increases. The effect is that for most lenses, the balance between the decreasing aberrations and the increasing diffraction effects of stopping down the lens means that lenses have an optimum aperture for best results, often about three stops closed down from maximum aperture, so for a lens with a maximum aperture of ƒ/2.8, ƒ/8 would be the optimum aperture.[2]: 180
Exposure triangle – aperture, shutter speed and ISO
Canon EOS 1100D Filter Removal – DIY Astronomer
Camera Field of View Calculator (FoV)
Master the Modes: Breaking Down Frame Rates + Night Modes on HERO10 Black
Multiple exposure
Got an Old Canon Point-and-Shoot Camera? Hack It – IEEE Spectrum
A decade is a long time in technology—long enough for a technology to go from hot product to conspicuously obsolete to retro cool. In 2010, IEEE Spectrum’s David Schneider wrote about a hack to supplant the firmware in Canon point-and-shoot cameras and add new features, such as motion detection. As it turns out, at the time point-and-shoot cameras were near their zenith of popularity. Since then, while compact stand-alone digital cameras are still being made, their sales have shrunk dramatically. As the smartphone camera became the most ubiquitous type of camera on the planet, point-and-shoot cameras found themselves relegated to the back of the closet.
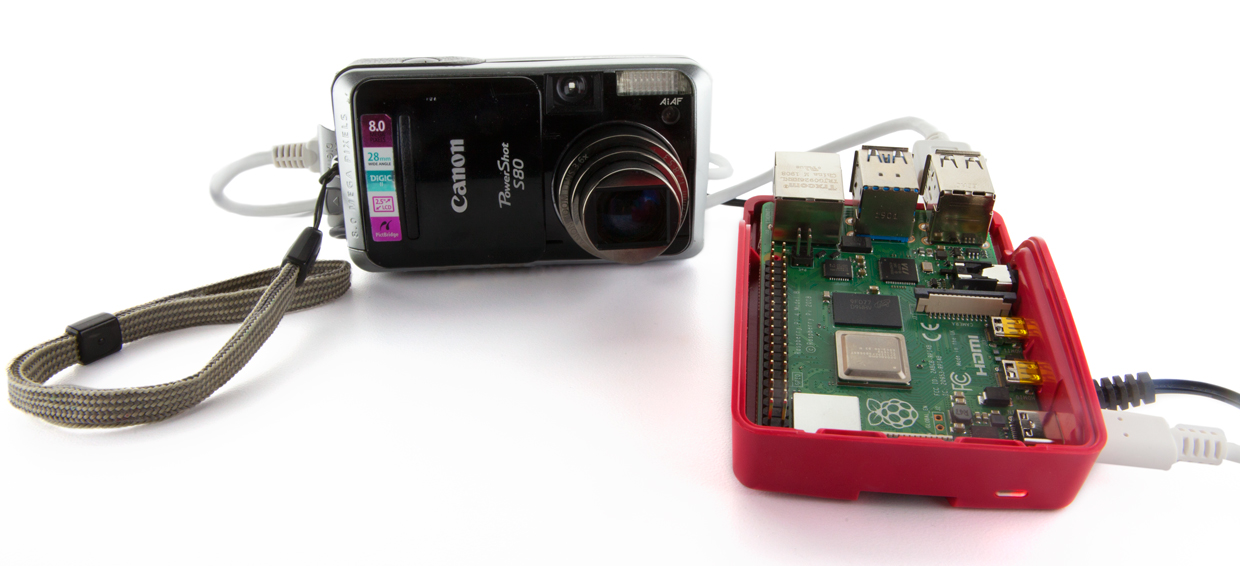
That was certainly the case with our Canon PowerShot S80. My wife bought it in 2008 primarily to document her paintings in between professional photo shoots, and a few years later we replaced it with a mirrorless Nikon 1 J-1 with interchangeable lenses. So when I found the S80 while decluttering recently, I wondered: Was it just e-waste now, or could it be combined with today’s technology to do interesting things?
I decided the perfect test case for my S80 was variable time-lapse photography. This is a task for which even an 11-year-old digital camera, with its larger optics, can compete with today’s smartphones on image quality. This scenario makes mobility a moot point, but the task also requires more sophistication than even CHDK—the open-source firmware replacement David Schneider wrote about in 2010—can easily offer alone.
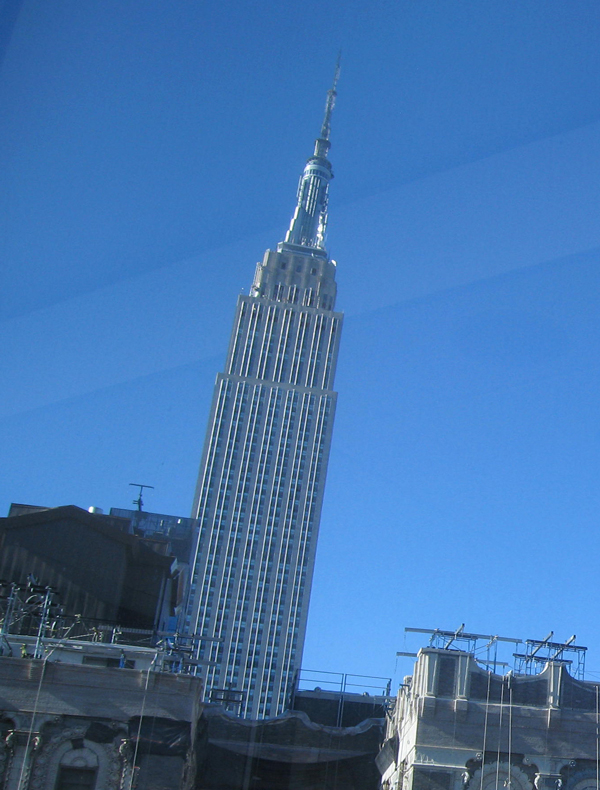
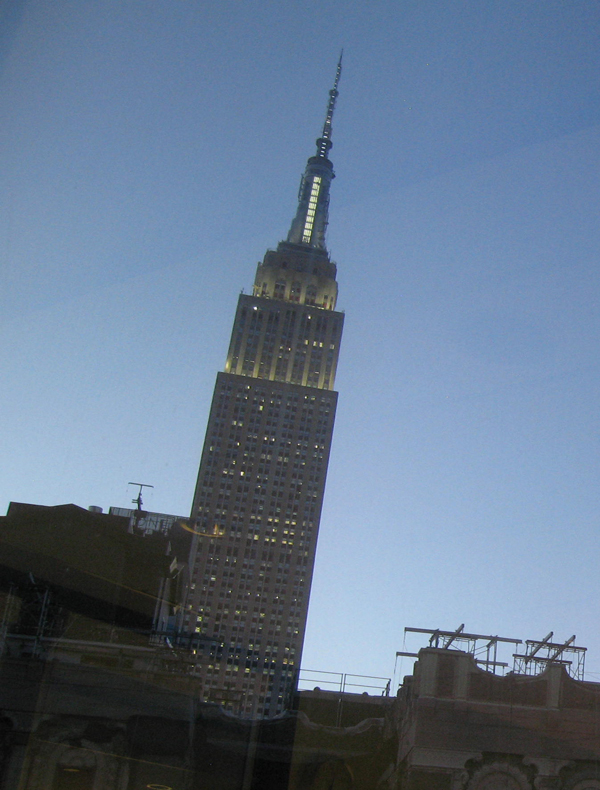
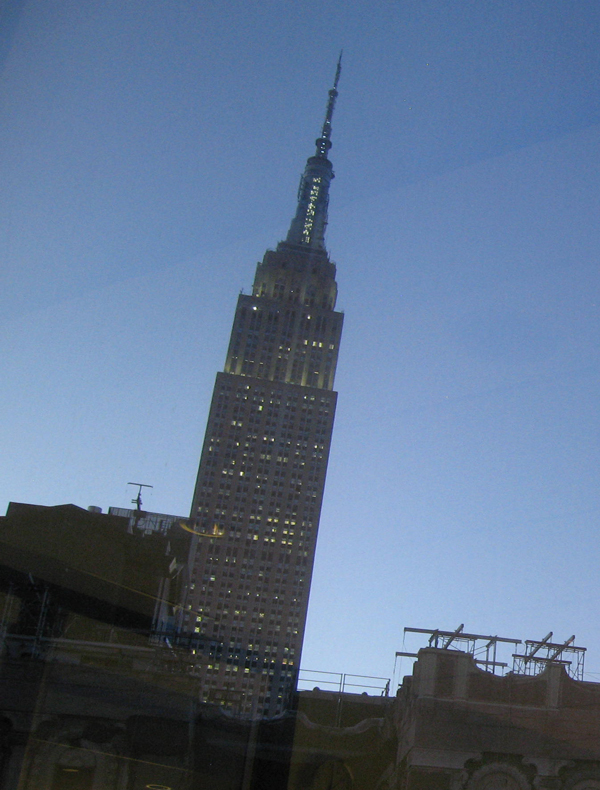
My S80’s original firmware had a function that would take a photograph at fixed intervals of between 1 and 60 minutes, in 1-minute increments. CHDK provides a script that allows a more fine-grained increment of 1 second, but I wanted to try time-lapse photography of the Empire State Building, which we happen to have a good view of from Spectrum’s New York office. During the day, the light changes slowly, so I wanted to shoot one photo every few minutes. At dusk, however, the lighting on and around the building changes more dramatically, so I wanted photos taken at a faster rate.
The first thing was to test my camera. It’s a credit to Canon that despite years of disuse, all the parts sprang to life. The only problem was on the battery side. I had three batteries, one of which refused to charge at all, and two others I no longer trusted for a long-duration experiment, so I found a DC adapter on eBay that powers the camera from a wall socket.
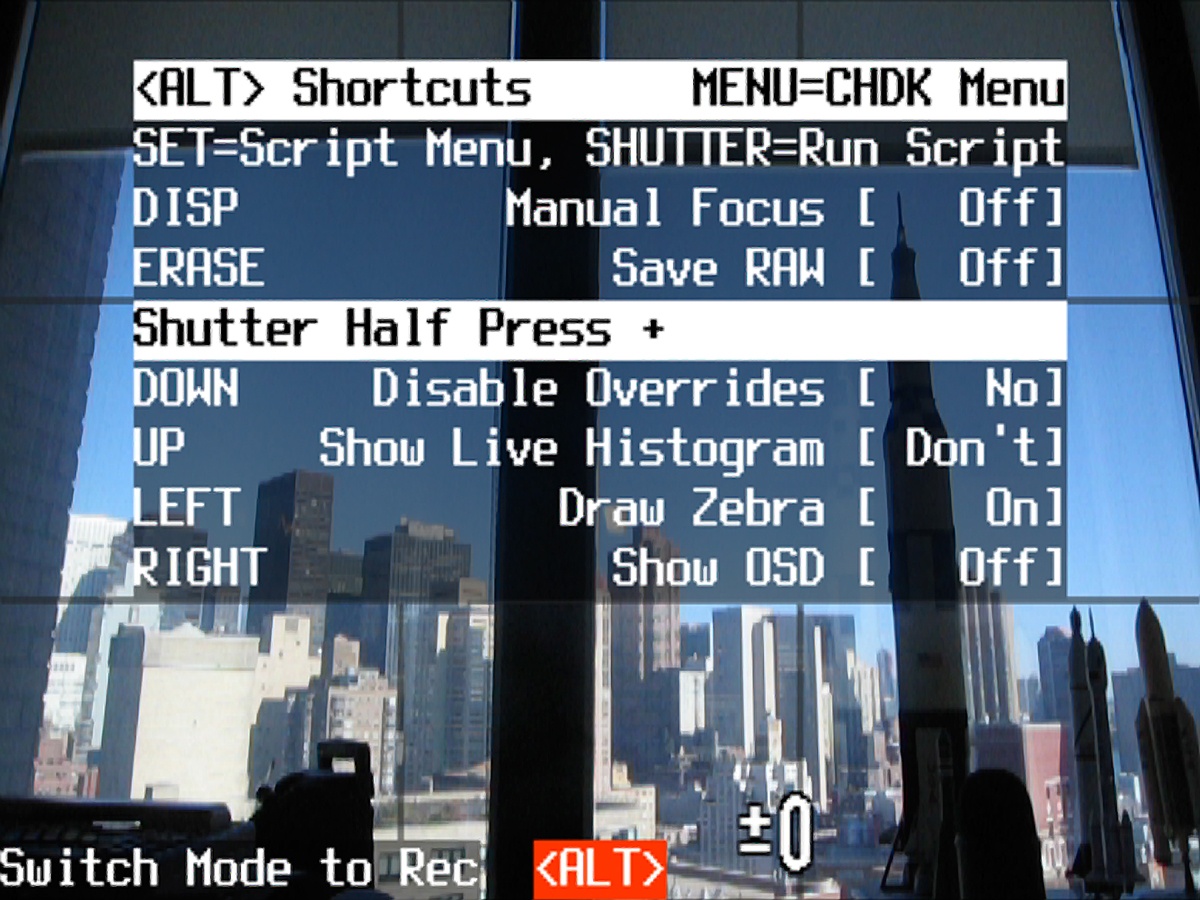
Then I installed CHDK. Fortunately, this is one of those rare pieces of open-source software for which the documentation is a comprehensive and intelligible wiki. Looking up the instructions for my S80, I determined its current firmware, which turned out to be 1.00f. Only the 1.00g version is compatible with CHDK, so I followed the instructions to upgrade the factory firmware, the biggest obstacle to which was finding the right utility software to open the 7z format that the firmware file was compressed with.
A cross-platform tool called Stick makes finishing the CHDK install easy: Drop a photo taken with a camera onto the tool’s interface and it analyzes the metadata and downloads the exact version of CHDK required onto a SD card. Launching CHDK on my camera just requires putting the prepared card in and pressing the S80’s “shortcut” button.
CHDK provides an interface for remote control of the camera via the USB link normally used to download photographs directly to a PC. A number of programs can use this PTP standard, including chdkptp, which offers both a command line version and a graphical user interface (GUI) version that lets you see what is being displayed in the viewfinder screen live. One of the nice things about chdkptp is that a precompiled binary, bundled with required supporting libraries, is available for the Raspberry Pi, thus eliminating dependency hell.
I ran into two problems, which were resolved after searches of CHDK’s user forums. The first was that chdkptp couldn’t connect to the S80—a helper process on the Pi was grabbing the connection, assuming I wanted to download photos. The simplest solution was to find the offending process using a “ps -ax | grep gphoto2” command, and “kill -9” it. (This works only on a per-session basis; if you want to permanently disable the helper, you’ll have to edit some deep configuration files.)
My camera and chdkptp could now connect, but I still couldn’t actually take a photo. This was solved by writing a script with some mode commands I found on a forum. CHDK runs the script when I press the camera’s shutter, and then it is happy to accept remote commands.
To implement my variable time-lapse schedule, I wrote a short Python program on the Pi. I looked up the time of the sunset and set the Python program to check the clock. Outside a half-hour window around sunset it would take a photo every 10 minutes, and one every 30 seconds inside the window. To control the S80, I just issued an OS call to the chdkptp command line tool that connected and triggered the shutter—that is, os.system(“./chdkptp.sh -c -eshoot”).
I left the system running from the early afternoon till dusk, and when I returned I had 113 images, which I dumped into iMovie to make a time-lapse video. Ta-da!
Now that I have my proof of concept, it would be a straightforward task to write a Python script that could download the times of sunrise and sunset and adjust itself automatically. I can also save images directly to the Pi. Then I could access and download these images remotely over a wireless network, allowing for the option of leaving the camera and Pi in place for long periods of time for truly epic time-lapse movies.
This article appears in the December 2019 print issue as “Hack Your Old Point-and-Shoot.”
Source: Got an Old Canon Point-and-Shoot Camera? Hack It – IEEE Spectrum