http://electronics.stackexchange.com/questions/41938/230v-ac-to-5v-dc-converter-lossless
Engineering and technology notes
Can’t do a release upgrade from 14.04: It was not possible to authenticate some packages – Ask Ubuntu
Trying to do a release upgrade on Ubuntu 14.04 with:
do-release-upgrade
I get the following error:
It was not possible to authenticate some packages. This may be a transient
network problem. You may want to try again later. See below for a list of
unauthenticated packages.

libxkbcommon-x11-0
What is this about? I did
sudo apt-get update && sudo apt-get dist-upgrade
before and deactivated all ppas. What else could I do?
Answer:
run this command
sudo sh -c 'printf "[Distro]\nAllowUnauthenticated=yes" > /etc/update-manager/release-upgrades.d/unauth.cfg'
this will fix your issue
and after the upgrade run sudo rm /etc/update-manager/release-upgrades.d/unauth.cfg
Error: “could not initailize master info structure” while doing Master Slave Replication in MySQL – Stack Overflow
TRY TO RESET IT, IT DOES MAGIC! ON SLAVE THE SLAVE MYSQL COMMAND TYPE:
RESET SLAVE;THEN TRY AGAIN:
CHANGE MASTER TO MASTER_HOST='10.1.100.1', MASTER_USER='slave_user', MASTER_PASSWORD='slave_password', MASTER_LOG_FILE='mysql-bin.000001', MASTER_LOG_POS=451228;
mysql> START SLAVE;How To Set Up MySQL Master-Master Replication
Intro
This second installment of “Scaling Web Applications” will list out the steps necessary for scaling a mysql deployment over two VPS.
The first article in this series laid out the steps needed to load-balance nginx over two VPS, and it is recommended that you read that article first.
MySQL replication is the process by which a single data set, stored in a MySQL database, will be live-copied to a second server. This configuration, called “master-slave” replication, is a typical setup. Our setup will be better than that, because master-master replication allows data to be copied from either server to the other one. This subtle but important difference allows us to perform mysql read or writes from either server. This configuration adds redundancy and increases efficiency when dealing with accessing the data.
The examples in this article will be based on two VPS, named Server C and Server D.
Server C: 3.3.3.3
Server D: 4.4.4.4
Step 1 – Install and Configure MySQL on Server C
The first thing we need to do is to install the mysql-server and mysql-client packages on our server. We can do that by typing the following:
sudo apt-get install mysql-server mysql-client
By default, the mysql process will only accept connections on localhost (127.0.0.1). To change this default behavior and change a few other settings necessary for replication to work properly, we need to edit /etc/mysql/my.cnf on Server C. There are four lines that we need to change, which are currently set to the following:
#server-id              = 1
#log_bin                = /var/log/mysql/mysql-bin.log
#binlog_do_db           = include_database_name
bind-address            = 127.0.0.1
The first of those lines is to uniquely identify our particular server, in our replication configuration. We need to uncomment that line, by removing the “#” before it. The second line indicates the file in which changes to any mysql database or table will be logged.
The third line indicates which databases we want to replicate between our servers. You can add as many databases to this line as you’d like. The article will use a single database named “example” for the purposes of simplicity. And the last line tells our server to accept connections from the internet (by not listening on 127.0.0.1).
server-id               = 1
log_bin                 = /var/log/mysql/mysql-bin.log
binlog_do_db            = example
# bind-address            = 127.0.0.1
Now we need to restart mysql:
sudo service mysql restart
We next need to change some command-line settings within our mysql instance. Back at our shell, we can get to our root mysql user by typing the following:
mysql -u root -p
Please note that the password this command will prompt you for is that of the root mysql user, not the root user on our droplet. To confirm that you are logged in to the mysql shell, the prompt should look like the following.
mysql>
Once we are logged in, we need to run a few commands.
We need to create a pseudo-user that will be used for replicating data between our two VPS. The examples in this article will assume that you name this user “replicator”. Replace “password” with the password you wish to use for replication.
create user 'replicator'@'%' identified by 'password';
Next, we need to give this user permissions to replicate our mysql data:
grant replication slave on *.* to 'replicator'@'%';
Permissions for replication cannot, unfortunately, be given on a per-database basis. Our user will only replicate the database(s) that we instruct it to in our config file.
For the final step of the initial Server C configuration, we need to get some information about the current MySQL instance which we will later provide to Server D.
The following command will output a few pieces of important information, which we will need to make note of:
show master status;
The output will looking similiar to the following, and will have two pieces of critical information:
+------------------+----------+--------------+------------------+
| File             | Position | Binlog_Do_DB | Binlog_Ignore_DB |
+------------------+----------+--------------+------------------+
| mysql-bin.000001 |      107 | example      |                  |
+------------------+----------+--------------+------------------+
1 row in set (0.00 sec)
We need to make a note of the file and position which will be used in the next step.
Step 2 – Install and Configure MySQL on Server D
We need to repeat the same steps that we followed on Server C. First we need to install it, which we can do with the following command:
sudo apt-get install mysql-server mysql-client
Once the two packages are properly installed, we need to configure it in much the same way as we configured Server C. We will start by editing the /etc/mysql/my.cnf file.
sudo nano /etc/mysql/my.cnf
We need to change the same four lines in the configuration file as we changed earlier.
The defaults are listed below, followed by the changes we need to make.
#server-id              = 1
#log_bin                = /var/log/mysql/mysql-bin.log
#binlog_do_db           = include_database_name
bind-address            = 127.0.0.1
We need to change these four lines to match the lines below. Please note, that unlike Server C, the server-id for Server D cannot be set to 1.
server-id              = 2
log_bin                = /var/log/mysql/mysql-bin.log
binlog_do_db           = example
# bind-address            = 127.0.0.1
After you save and quit that file, you need to restart mysql:
sudo service mysql restart
It is time to go into the mysql shell and set some more configuration options.
mysql -u root -p
First, just as on Server C, we are going to create the pseudo-user which will be responsible for the replication. Replace “password” with the password you wish to use.
create user 'replicator'@'%' identified by 'password';
Next, we need to create the database that we are going to replicate across our VPS.
create database example;
And we need to give our newly created ‘replication’ user permissions to replicate it.
grant replication slave on *.* to 'replicator'@'%';
The next step involves taking the information that we took a note of earlier and applying it to our mysql instance. This will allow replication to begin. The following should be typed at the mysql shell:
slave stop;
CHANGE MASTER TO MASTER_HOST = '3.3.3.3', MASTER_USER = 'replicator', MASTER_PASSWORD = 'password', MASTER_LOG_FILE = 'mysql-bin.000001', MASTER_LOG_POS = 107;
slave start;
You need to replace ‘password’ with the password that you have chosen for replication. Your values for MASTER_LOG_FILE and MASTER_LOG_POS may differ than those above. You should copy the values that “SHOW MASTER STATUS” returns on Server C.
The last thing we have to do before we complete the mysql master-master replication is to make note of the master log file and position to use to replicate in the other direction (from Server D to Server C).
We can do that by typing the following:
SHOW MASTER STATUS;
The output will look similiar to the following:
+------------------+----------+--------------+------------------+
| File             | Position | Binlog_Do_DB | Binlog_Ignore_DB |
+------------------+----------+--------------+------------------+
| mysql-bin.000004 |      107 | example      |                  |
+------------------+----------+--------------+------------------+
1 row in set (0.00 sec)
Take note of the file and position, as we will have to enter those on server C, to complete the two-way replication.
The next step will explain how to do that.
Step 3 – Completing Replication on Server C
Back on Server C, we need to finish configuring replication on the command line. Running this command will replicate all data from Server D.
slave stop;
CHANGE MASTER TO MASTER_HOST = '4.4.4.4', MASTER_USER = 'replicator', MASTER_PASSWORD = 'password', MASTER_LOG_FILE = 'mysql-bin.000004', MASTER_LOG_POS = 107;
slave start;
Keep in mind that your values may differ from those above. Please also replace the value of MASTER_PASSWORD with the password you created when setting up the replication user.
The output will look similiar to the following:
Query OK, 0 rows affected (0.01 sec)
The last thing to do is to test that replication is working on both VPS. The last step will explain an easy way to test this configuration.
Step 4 – Testing Master-Master Replication
Now that have all the configuration set up, we are going to test it now. To do this, we are going to create a table in our example database on Server C and check on Server D to see if it shows up. Then, we are going to delete it from Server D and make sure it’s no longer showing up on Server C.
We now need to create the database that will be replicated between the servers. We can do that by typing the following at the mysql shell:
create database example;
Once that’s done, let’s create a dummy table on Server C:
create table example.dummy (`id` varchar(10));
We now are going to check Server D to see if our table exists.
show tables in example;
We should see output similiar to the following:
+-------------------+
| Tables_in_example |
+-------------------+
| dummy             |
+-------------------+
1 row in set (0.00 sec)
The last test to do is to delete our dummy table from Server D. It should also be deleted from Server C.
We can do this by entering the following on Server D:
DROP TABLE dummy;
To confirm this, running the “show tables” command on Server C will show no tables:
Empty set (0.00 sec)
And there you have it! Working mysql master-master replication. As always, any feedback is more than welcome.
How To Set Up Master Slave Replication in MySQL
About MySQL replication
MySQL replication is a process that allows you to easily maintain multiple copies of a MySQL data by having them copied automatically from a master to a slave database. This can helpful for many reasons including facilating a backup for the data,a way to analyze it without using the main database, or simply as a means to scale out.
This tutorial will cover a very simple example of mysql replication—one master will send information to a single slave. For the process to work you will need two IP addresses: one of the master server and and one of the slave.
This tutorial will use the following IP addresses:
12.34.56.789- Master Database
12.23.34.456- Slave Database
Setup
This article assumes that you have user with sudo privileges and have MySQL installed. If you do not have mysql, you can install it with this command:
sudo apt-get install mysql-server mysql-client
Step One—Configure the Master Database
Open up the mysql configuration file on the master server.
sudo nano /etc/mysql/my.cnf
Once inside that file, we need to make a few changes.
The first step is to find the section that looks like this, binding the server to the local host:
bind-address = 127.0.0.1
Replace the standard IP address with the IP address of server.
bind-address = 12.34.56.789
The next configuration change refers to the server-id, located in the [mysqld] section. You can choose any number for this spot (it may just be easier to start with 1), but the number must be unique and cannot match any other server-id in your replication group. I’m going to go ahead and call this one 1.
Make sure this line is uncommented.
server-id = 1
Move on to the log_bin line. This is where the real details of the replication are kept. The slave is going to copy all of the changes that are registered in the log. For this step we simply need to uncomment the line that refers to log_bin:
log_bin = /var/log/mysql/mysql-bin.log
Finally, we need to designate the database that will be replicated on the slave server. You can include more than one database by repeating this line for all of the databases you will need.
binlog_do_db = newdatabase
After you make all of the changes, go ahead and save and exit out of the configuration file.
Refresh MySQL.
sudo service mysql restart
The next steps will take place in the MySQL shell, itself.
Open up the MySQL shell.
mysql -u root -p
We need to grant privileges to the slave. You can use this line to name your slave and set up their password. The command should be in this format:
GRANT REPLICATION SLAVE ON *.* TO 'slave_user'@'%' IDENTIFIED BY 'password';
Follow up with:
FLUSH PRIVILEGES;
The next part is a bit finicky. To accomplish the task you will need to open a new window or tab in addition to the one that you are already using a few steps down the line.
In your current tab switch to “newdatabase”.
USE newdatabase;
Following that, lock the database to prevent any new changes:
FLUSH TABLES WITH READ LOCK;
Then type in:
SHOW MASTER STATUS;
You will see a table that should look something like this:
mysql> SHOW MASTER STATUS;
+------------------+----------+--------------+------------------+
| File             | Position | Binlog_Do_DB | Binlog_Ignore_DB |
+------------------+----------+--------------+------------------+
| mysql-bin.000001 |      107 | newdatabase  |                  |
+------------------+----------+--------------+------------------+
1 row in set (0.00 sec)
This is the position from which the slave database will start replicating. Record these numbers, they will come in useful later.
If you make any new changes in the same window, the database will automatically unlock. For this reason, you should open the new tab or window and continue with the next steps there.
Proceeding the with the database still locked, export your database using mysqldump in the new window (make sure you are typing this command in the bash shell, not in MySQL).
mysqldump -u root -p --opt newdatabase > newdatabase.sql
Now, returning to your your original window, unlock the databases (making them writeable again). Finish up by exiting the shell.
UNLOCK TABLES;
QUIT;
Now you are all done with the configuration of the the master database.
Step Two—Configure the Slave Database
Once you have configured the master database. You can put it aside for a while, and we will now begin to configure the slave database.
Log into your slave server, open up the MySQL shell and create the new database that you will be replicating from the master (then exit):
CREATE DATABASE newdatabase;
EXIT;
Import the database that you previously exported from the master database.
mysql -u root -p newdatabase < /path/to/newdatabase.sql
Now we need to configure the slave configuration in the same way as we did the master:
sudo nano /etc/mysql/my.cnf
We have to make sure that we have a few things set up in this configuration. The first is the server-id. This number, as mentioned before needs to be unique. Since it is set on the default (still 1), be sure to change it’s something different.
server-id = 2
Following that, make sure that your have the following three criteria appropriately filled out:
relay-log = /var/log/mysql/mysql-relay-bin.log
log_bin = /var/log/mysql/mysql-bin.log
binlog_do_db = newdatabase
You will need to add in the relay-log line: it is not there by default. Once you have made all of the necessary changes, save and exit out of the slave configuration file.
Restart MySQL once again:
sudo service mysql restart
The next step is to enable the replication from within the MySQL shell.
Open up the the MySQL shell once again and type in the following details, replacing the values to match your information:
CHANGE MASTER TO MASTER_HOST='12.34.56.789',MASTER_USER='slave_user', MASTER_PASSWORD='password', MASTER_LOG_FILE='mysql-bin.000001', MASTER_LOG_POS= 107;
This command accomplishes several things at the same time:
- It designates the current server as the slave of our master server.
- It provides the server the correct login credentials
- Last of all, it lets the slave server know where to start replicating from; the master log file and log position come from the numbers we wrote down previously.
With that—you have configured a master and slave server.
Activate the slave server:
START SLAVE;
You be able to see the details of the slave replication by typing in this command. The \G rearranges the text to make it more readable.
SHOW SLAVE STATUS\G
If there is an issue in connecting, you can try starting slave with a command to skip over it:
SET GLOBAL SQL_SLAVE_SKIP_COUNTER = 1; SLAVE START;
All done.
Source: How To Set Up Master Slave Replication in MySQL | DigitalOcean
How To Upgrade to PHP 7 on Ubuntu 14.04
Ten Equations That Changed the World
Upgrading Your ownCloud Server — ownCloud 8.0 Server Administration Manual 8.0 documentation
Manual Upgrade Procedure
Always start by making a fresh backup.
If you are upgrading to a major release, for example from 8.1.3 to 8.2, you must review all third party applications (not core apps) for compatibility with your new ownCloud version. Then disable all of them before starting the upgrade.
Next put your server in maintenance mode. This prevents new logins, locks the sessions of logged-in users, and displays a status screen so users know what is happening. There are two ways to do this, and the preferred method is to use the occ command, which you must run as your HTTP user. This example is for Ubuntu Linux:
$ sudo -u www-data php occ maintenance:mode --on
The other way is by entering your config.php file and changing 'maintenance' => false, to 'maintenance' =>true,.
- Back up your existing ownCloud Server database, data directory, and
config.phpfile. (See Backing up ownCloud.) - Download and unpack the latest ownCloud Server release (Archive file) from owncloud.org/install/ into an empty directory outside of your current installation. For example, if your current ownCloud is installed in
/var/www/owncloud/you could create a new directory called/var/www/owncloud2/
To unpack your new tarball:: tar xjf owncloud-latest.tar.bz2
- Stop your Web server.
- Rename or move your current ownCloud directory (named
owncloud/if installed using defaults) to another location. - This creates a new
owncloud/directory populated with your new server files. Copy this directory and its contents to the original location of your old server, for example/var/www/, so that once again you have/var/www/owncloud. - Copy and paste the
config.phpfile from your old version of ownCloud to your new ownCloud version. - If you keep your
data/directory in yourowncloud/directory, copy it from your old version of ownCloud to theowncloud/directory of your new ownCloud version. If you keep it outside ofowncloud/then you don’t have to do anything with it, because its location is configured in your originalconfig.php, and none of the upgrade steps touch it.
We recommend storing your data/ directory in a location other than your owncloud/ directory.
-
Restart your Web server.
-
- Now you should be able to open a Web browser to your ownCloud server and
-
log in as usual. You have a couple more steps to go: You should see a Start Update screen, just like in theUpgrading With Your Linux Package Manager section, above. Review the prerequisites, and if you have followed all the steps click the Start Update button.
If you are running a large installation with a lot of files and users, you should launch the upgrade from the command line using
occto avoid PHP timeouts, like this example on Ubuntu Linux:$ sudo -u www-data php occ upgrade
The
occcommand does not download ownCloud updates. You must first download and install the updated code (steps 1-3), and thenoccperforms the final upgrade steps. -
The upgrade operation takes a few minutes to a few hours, depending on the size of your installation. When it is finished you will see a success message, or an error message that will tell where it went wrong.
Assuming your upgrade succeeded, take a look at the bottom of your Admin page to verify the version number. Check your other settings to make sure they’re correct. Go to the Apps page and review the core apps to make sure the right ones are enabled. Re-enable your third-party apps. Then apply strong permissions to your ownCloud directories (Setting Strong Directory Permissions).
Source: Upgrading Your ownCloud Server — ownCloud 8.0 Server Administration Manual 8.0 documentation
package management – How can I tell, from the command line, whether the machine requires a reboot? – Ask Ubuntu
|
When you install certain updates (e.g. a new kernel) in Ubuntu Desktop, you get an indication that a reboot is required (in Lucid, the logout icon turns red). How can I check, from the command line, whether an Ubuntu server requires a reboot? I could grep for ‘System restart required’ in |
|||||
|
|
You can simply check if the file For example, any of these would tell you “no such file” or “file not found” if you do not need to reboot, otherwise (if you need to reboot) the file would exist and these commands would show information about the file: In a bash script, you can use: |
|||||||||||||||||||||
|


|
In the package debian-goodies is a command named checkrestart which is quite useful. Its output can help you avoid a full reboot. |
|||||||||||||
|
|
Normally if the file exists you should reboot. You can see if this file is there by using this simple command in gnome-terminal. |
||||
|
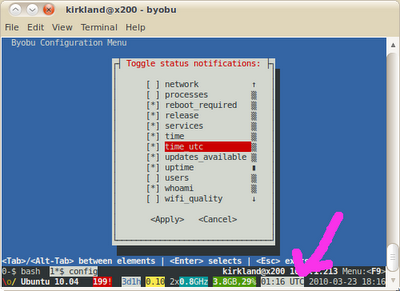
Aswell as the most direct methods written by others there is a handy indication if you use byobu – a set of scripts to make GNU screen a little more user friendly. It shows a set of information at the bottom of the screen, and that can include whether a reboot is required – along with whether updates are available, the time, uptime, memory used … In this screenshot you can see from the If a reboot is required then this will be indicated by the symbol
|
||||
|
The You can check the content of this file in terminal by using |
||||
|
If you have the reboot-notifier or update-notifier-common packages installed, then you get the files /var/run/reboot-required and /var/run/reboot-required.pkgs reboot-notifier is newer in Ubuntu Wily and Xenial. Debian stretch, but in jessie-backports update-notifier-common Is older, in all Ubuntu versions including Xenial and Debian Wheezy. Not in Debian Stretch or Jessie. ( There is some background to the reboot-notifier package athttps://feeding.cloud.geek.nz/posts/introducing-reboot-notifier/ ) If you don’t have these packages installed then you can compare the version of the linux package installed, with the version running: You can see here that the latest installed kernel is 3.16.7-ckt20-1+deb8u4 but the kernel running is 3.16.7-ckt20-1+deb8u3. So this system needs a reboot. The u4 vs u3 right at the end. You might need to scroll the box above. In the /proc/version, it is the version near the end of the line that matters. The very minor version code change is typical of a Debian security kernel update |
Why is “No new release found” when upgrading from a LTS to the next? – Ask Ubuntu
|
I’m following the upgrade instructions on Ubuntu’s website, but on launching the upgrade tool I get this response: Am I doing something wrong? Is there a workaround? Here’s my |
|||||
|
|
According to Ubuntu Engineering Foundations team manager Steve Langasek:
If you choose to upgrade before then, you can pass the This question explains the justification for waiting for the prompt. |
|||||||||||||||||||||
|

|
If one has no access to a GUI and wants the update on terminal:
That way I could upgrade a 12.04 to 12.10. For the
|
|||||
|
Source: Why is “No new release found” when upgrading from a LTS to the next? – Ask Ubuntu