dm-crypt

dm-crypt is a transparent block device encryption subsystem in Linux kernel versions 2.6 and later and in DragonFly BSD. It is part of the device mapper (dm) infrastructure, and uses cryptographic routines from the kernel’s Crypto API. Unlike its predecessor cryptoloop, dm-crypt was designed to support advanced modes of operation, such as XTS, LRW and ESSIV (see disk encryption theory for further information), in order to avoid watermarking attacks. In addition to that, dm-crypt addresses some reliability problems of cryptoloop.

dm-crypt is implemented as a device mapper target and may be stacked on top of other device mapper transformations. It can thus encrypt whole disks (including removable media), partitions, software RAID volumes, logical volumes, as well as files. It appears as a block device, which can be used to back file systems, swap or as an LVM physical volume.

Some Linux distributions support the use of dm-crypt on the root file system. These distributions use initrd to prompt the user to enter a passphrase at the console, or insert a smart card prior to the normal boot process.
Source: dm-crypt – Wikipedia

dm-crypt was last modified: January 17th, 2023 by Jovan Stosic

[ubuntu] Zoneminder upgrade – 1.26 to 1.32

Thanks! as it turns out, I did indeed install 16.04 of ubuntu … however, I ended up right back where I was. I actually ended up removing ZM and totally reinstalling (dropping the database etc). As it turns out, the whole problem was the typical path issue. Unfortunately, EVERY REFERENCE I COULD FIND re: how to ensure that the script alias and PATH_ZMS variable was set correctly, referred to a console OPTIONS ==> PATH setting that is NO LONGER present on 1.32 of ZM. which brings up a curious problem as to how to ensure folks new to this level of support can possibly find the correct answers online without having to actually make a post. When the actual functionality of the product changes like this, and the old docs are still readily accessible.. it makes it difficult to keep from pulling out your hair. I was unable to figure this out until I actually SEARCHED GOOGLE for “ZONEMINDER MISSING PATH_ZMS” at which point, i found the handy site that explained as how these path variables are now in zmcustom.conf as noted here (if this is allowed https://forums.zoneminder.com/viewto…=27722#p108059

Once I realized that the path variables are now in zmcustom.conf in /etc/zm/conf.d the world was a much better place, and immediately the camera i had defined started working. I simply had to insert “/zm” in front of the default setting there. Getting a few other cameras to work was very difficult due to odd FOSCAM HD camera settings, but I finally got there. We’re back in business – though i do have to re map my zone on the motion detection camera.

Source: [ubuntu] Zoneminder upgrade – 1.26 to 1.32

[ubuntu] Zoneminder upgrade – 1.26 to 1.32 was last modified: August 2nd, 2021 by Jovan Stosic

DNS on Ubuntu 18.04

For years it’s been simple to set up DNS on a Linux machine. Just add a couple of entries to /etc/resolv.conf and you’re done.

# Use Google's public DNS servers.
nameserver 8.8.4.4
nameserver 8.8.8.8

But things change and now it’s not that simple. If you now edit /etc/resolv.conf on Ubuntu you’ll find that the edits are ephemeral. If you restart (or even hibernate) your machine then they’ll be overwritten by default content.

nameserver 127.0.0.53
search Home

This is pretty simple to fix though.

  1. Install the resolvconf package.
sudo apt install resolvconf
  1. Edit /etc/resolvconf/resolv.conf.d/head and add the following:
# Make edits to /etc/resolvconf/resolv.conf.d/head.
nameserver 8.8.4.4
nameserver 8.8.8.8
  1. Restart the resolvconf service.
sudo service resolvconf restart

Fix should be permanent.


Source: DNS on Ubuntu 18.04 – datawookie

DNS on Ubuntu 18.04 was last modified: July 16th, 2021 by Jovan Stosic

Configure LDAP Client on Ubuntu 20.04|18.04|16.04 | ComputingForGeeks

Configure LDAP Client on Ubuntu 20.04|18.04|16.04

62725
2
You can support us by downloading this article as PDF from the Link below.Download the guide as PDF

This is a guide on how to configure an Ubuntu 20.04|18.04 & Ubuntu 16.04 LTS servers to authenticate against an LDAP directory server. LDAP is a lightweight client-server protocol for accessing directory services, specifically X.500-based directory services.

I expect you already have a running LDAP server, if not, use our guides below to set it up:

How to Install and configure OpenLDAP on Ubuntu LTS

Once you have LDAP server configured and user accounts added, you can proceed to install and configure LDAP client.

Install and Configure LDAP Client on Ubuntu 20.04|18.04 & Ubuntu 16.04 LTS

Add LDAP server address to /etc/hosts file if you don’t have an active DNS server in your network.

$ sudo vim /etc/hosts
192.168.18.50 ldap.example.com

Install LDAP client utilities on your Ubuntu system:

sudo apt -y install libnss-ldap libpam-ldap ldap-utils

Begin configuring the settings to look like below

1. Set LDAP URI- This can be IP address or hostname

ldap client ubuntu 18.04 add uri min

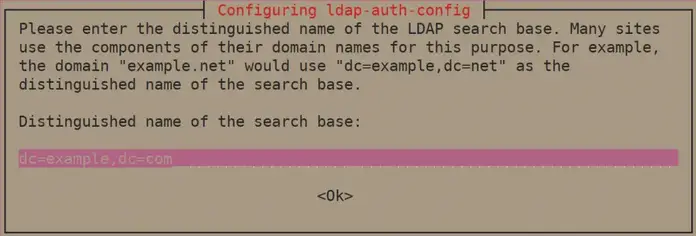
2. Set a Distinguished name of the search base

ldap client ubuntu 18.04 set search base distinguished name min

3. Select LDAP version 3

ldap client ubuntu 18.04 set ldap version min

4. Select Yes for Make local root Database admin

ldap client ubuntu 18.04 make local root database admin min

5. Answer No for Does the LDAP database require login?

ldap client ubuntu 18.04 does ldap require login no min

6. Set LDAP account for root, something like cn=admin,cd=example,cn=com

ldap client ubuntu 18.04 set admin ldap account min

7. Provide LDAP root account Password

ldap client ubuntu 18.04 enter ldap admin pass min

After the installation, edit /etc/nsswitch.confand add ldap authentication to passwd and group lines.

passwd: compat systemd ldap
group: compat systemd ldap
shadow: compat

Modify the file /etc/pam.d/common-password. Remove use_authtok on line 26 to look like below.

password [success=1 user_unknown=ignore default=die] pam_ldap.so try_first_pass

Enable creation of home directory on first login by adding the following line to the end of file /etc/pam.d/common-session

session optional pam_mkhomedir.so skel=/etc/skel umask=077

See below screenshot:

ldap client enable home creation min

Test by switching to a user account on LDAP

root@server1:~# su - jmutai
Creating directory '/home/jmutai'.
jmutai@server1:~$ id
uid=10000(jmutai) gid=10000(sysadmins) groups=10000(sysadmins)

That’s all. If you need advanced centralized user management platform, see

Source: Configure LDAP Client on Ubuntu 20.04|18.04|16.04 | ComputingForGeeks

Configure LDAP Client on Ubuntu 20.04|18.04|16.04 | ComputingForGeeks was last modified: April 24th, 2021 by Jovan Stosic

DNS not working after upgrade to 18.04

Usually systemd-resolved gets the DNS servers from the DHCP handshake. Does your DHCP server give out the DNS addresses?

Also you can edit /etc/systemd/resolved.conf and add the IP address(es) of your server(s) on the DNS and FallbackDNS lines.

Code:
[Resolve]
DNS=192.168.100.100
FallbackDNS=8.8.8.8
[etc.]

192.168.100.100 is a local server on my network. You need to run “sudo systemctl restart systemd-resolved” after making any changes.

Source: [SOLVED] DNS not working after upgrade to 18.04

DNS not working after upgrade to 18.04 was last modified: April 16th, 2021 by Jovan Stosic