sudo crontab -eAdd line to file (here a python script):
@reboot python3 /home/pi/Desktop/exemple.py &https://raspberrypi.stackexchange.com/questions/8734/execute-script-on-start-up
sudo crontab -eAdd line to file (here a python script):
@reboot python3 /home/pi/Desktop/exemple.py &https://raspberrypi.stackexchange.com/questions/8734/execute-script-on-start-up
High availability (HA) ensures your architecture can handle failures. Imagine you’re responsible for a system that must be always fully operational. Failures can and will happen, so how do you ensure that your system can remain online when something goes wrong? How do you perform maintenance without service interruption?
Here, you’ll learn the need for high availability, evaluate application high-availability requirements, and see how the Azure platform helps you meet your availability goals.
A highly-available service is a service that absorbs fluctuations in availability, load, and temporary failures in dependent services and hardware. The application remains online and available (or maintains the appearance of it) while performing acceptably. This availability is often defined by business requirements, service-level objectives, or service-level agreements.
High availability is ultimately about the ability to handle the loss or severe degradation of a component of a system. This might be due to a virtual machine that’s hosting an application going offline because the host failed. It could be due to planned maintenance for a system upgrade. It could even be caused by the failure of a service in the cloud. Identifying the places where your system can fail, and building in the capabilities to handle those failures, will ensure that the services you offer to your customers can stay online.
High availability of a service typically requires high availability of the components that make up the service. Think of a website that offers an online marketplace to purchase items. The service that’s offered to your customers is the ability to list, buy, and sell items online. To provide this service, you’ll have multiple components: a database, web servers, application servers, and so on. Each of these components could fail, so you have to identify how and where your failure points are, and determine how to address these failure points in your architecture.
There are three steps to evaluate an application for high availability:
Let’s explore these steps in detail.
A service-level agreement (SLA) is an agreement between a service provider and a service consumer in which the service provider commits to a standard of service based on measurable metrics and defined responsibilities. SLAs can be strict, legally bound, contractual agreements, or assumed expectations of availability by customers. Service metrics typically focus on service throughput, capacity, and availability, all of which can be measured in various ways. Regardless of the specific metrics that make up the SLA, failure to meet the SLA can have serious financial ramifications for the service provider. A common component of service agreements is guaranteed financial reimbursement for missed SLAs.
Service-level objectives (SLO) are the values of target metrics that are used to measure performance, reliability, or availability. These could be metrics defining the performance of request processing in milliseconds, the availability of services in minutes per month, or the number of requests processed per hour. By evaluating the metrics exposed by your application and understanding what customers use as a measure of quality, you can define the acceptable and unacceptable ranges for these SLOs. By defining these objectives, you clearly set goals and expectations with both the teams supporting the services and customers who are consuming these services. These SLOs will be used to determine if your overall SLA is being met.
The following table shows the potential cumulative downtime for various SLA levels.
Of course, higher availability is better, everything else being equal. But as you strive for more 9s, the cost and complexity to achieve that level of availability grows. An uptime of 99.99% translates to about 5 minutes of total downtime per month. Is it worth the additional complexity and cost to reach five 9s? The answer depends on the business requirements.
Here are some other considerations when defining an SLA:
Identifying SLAs is an important first step when determining the high availability capabilities that your architecture will require. These will help shape the methods you’ll use to make your application highly available.
To evaluate the HA capabilities of your application, perform a failure analysis. Focus on single points of failure and critical components that would have a large impact on the application if they were unreachable, misconfigured, or started behaving unexpectedly. For areas that do have redundancy, determine whether the application is capable of detecting error conditions and self-healing.
You’ll need to carefully evaluate all components of your application, including the pieces designed to provide HA functionality, such as load balancers. Single points of failure will either need to be modified to have HA capabilities integrated, or will need to be replaced with services that can provide HA capabilities.
You’ll need to understand not only your application’s SLA requirements to your consumer, but also the provided SLAs of any resource that your application may depend on. If you are committing an uptime to your customers of 99.9%, but a service your application depends on only has an uptime commitment of 99%, this could put you at risk of not meeting your SLA to your customers. If a dependent service is unable to provide a sufficient SLA, you may need to modify your own SLA, replace the dependency with an alternative, or find ways to meet your SLA while the dependency is unavailable. Depending on the scenario and the nature of the dependency, failing dependencies can be temporarily worked around with solutions like caches and work queues.
The Azure cloud platform has been designed to provide high availability throughout all its services. Like any system, applications may be affected by both hardware and software platform events. The need to design your application architecture to handle failures is critical, and the Azure cloud platform provides you with the tools and capabilities to make your application highly available. There are several core concepts when considering HA for your architecture on Azure:
Availability sets are a way for you to inform Azure that VMs that belong to the same application workload should be distributed to prevent simultaneous impact from hardware failure and scheduled maintenance. Availability sets are made up of update domains and fault domains.
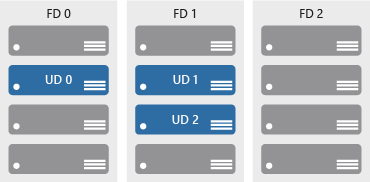
Update domains ensure that a subset of your application’s servers always remain running when the virtual machine hosts in an Azure datacenter require downtime for maintenance. Most updates can be performed with no impact to the VMs running on them, but there are times when this isn’t possible. To ensure that updates don’t happen to a whole datacenter at once, the Azure datacenter is logically sectioned into update domains (UD). When a maintenance event, such as a performance update and critical security patch that needs to be applied to the host, the update is sequenced through update domains. The use of sequencing updates using update domains ensures that the whole datacenter isn’t unavailable during platform updates and patching.
While update domains represent a logical section of the datacenter, fault domains (FD) represent physical sections of the datacenter and ensure rack diversity of servers in an availability set. Fault domains align to the physical separation of shared hardware in the datacenter. This includes power, cooling, and network hardware that supports the physical servers located in server racks. In the event the hardware that supports a server rack has become unavailable, only that rack of servers would be affected by the outage. By placing your VMs in an availability set, your VMs will be automatically spread across multiple FDs so that in the event of a hardware failure only part of your VMs will be impacted.
With availability sets, you can ensure your application remains online if a high-impact maintenance event is required or hardware failures occur.
Availability zones are independent physical datacenter locations within a region that include their own power, cooling, and networking. By taking availability zones into account when deploying resources, you can protect workloads from datacenter outages while retaining presence in a particular region. Services like virtual machines are zonal services and allow you to deploy them to specific zones within a region. Other services are zone-redundant services and will replicate across the availability zones in the specific Azure region. Both types ensure that within an Azure region there are no single points of failure.
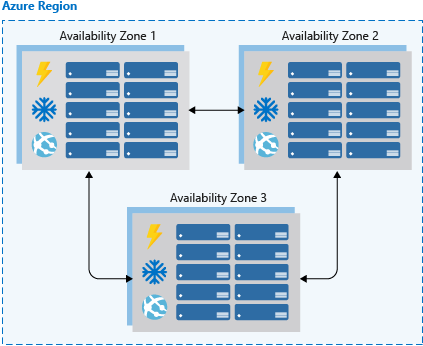
Supported regions contain a minimum of three availability zones. When creating zonal service resources in those regions, you’ll have the ability to select the zone in which the resource should be created. This will allow you to design your application to withstand a zonal outage and continue to operate in an Azure region before having to evacuate your application to another Azure region.
Availability zones are a newer high availability configuration service for Azure regions and are currently available for certain regions. It’s important to check the availability of this service in the region that you’re planning to deploy your application if you want to consider this functionality. Availability zones are supported when using virtual machines, as well as several PaaS services. Availability zones are mutually exclusive with availability sets. When using availability zones you no longer need to define an availability set for your systems. You’ll have diversity at the data center level, and updates will never be performed to multiple availability zones at the same time.
Load balancers manage how network traffic is distributed across an application. Load balancers are essential in keeping your application resilient to individual component failures and to ensure your application is available to process requests. For applications that don’t have service discovery built in, load balancing is required for both availability sets and availability zones.
Azure possesses three load balancing technology services that are distinct in their abilities to route network traffic:
One or a combination of all three Azure load-balancing technologies can ensure you have the necessary options available to architect a highly available solution to route network traffic through your application.
PaaS services come with high availability built in. Services such as Azure SQL Database, Azure App Service, and Azure Service Bus include high availability features and ensure that failures of an individual component of the service will be seamless to your application. Using PaaS services is one of the best ways to ensure that your architecture is highly available.
When architecting for high availability, you’ll want to understand the SLA that you’re committing to your customers. Then evaluate both the HA capabilities that your application has, and the HA capabilities and SLAs of dependent systems. After those have been established, use Azure features, such as availability sets, availability zones, and various load-balancing technologies, to add HA capabilities to your application. Any PaaS services you should choose to use will have HA capabilities built in.
ou can use the below command to find out the values of Ldap attributes – pwdMaxAge, pwdMaxFailure
ldapsearch -H ldap://localhost:10389 -x -D "cn=manager,dc=apigee,dc=com" -W -b "cn=default,ou=pwpolicies,dc=apigee,dc=com"
Here’s the sample output for the above command:
# extended LDIF
#
# LDAPv3
# base <cn=default,ou=pwpolicies,dc=apigee,dc=com> with scope subtree
# filter: (objectclass=*)
# requesting: ALL
#
# default, pwpolicies, apigee.com
dn: cn=default,ou=pwpolicies,dc=apigee,dc=com
objectClass: person
objectClass: pwdPolicy
objectClass: top
cn: default
pwdAttribute: userPassword
sn: dummy value
pwdExpireWarning: 604800
pwdInHistory: 3
pwdLockoutDuration: 300
pwdFailureCountInterval: 300
pwdMaxFailure: 3
pwdMinLength: 8
pwdMaxAge: 0
pwdLockout: FALSE
# search result
search: 2
result: 0 Success
# numResponses: 2
# numEntries: 1
This script will browse the LDAP directory a look for entries that uses password policy. If the user’s password will expire soon, a mail is sent. It was only tested with OpenLDAP (ppolicy overlay).
This shell script must be run as a cronjob. You can run it daily.
It requires :
It was tested for GNU/Linux and SunOS 5.8.
There is no command line parameter:
sh checkLdapPwdExpiration.sh
Logs are sent through STDOUT and STDERR:
sh checkLdapPwdExpiration.sh 1>result.log 2>audit.log
Sample log files:
--- Statistics ---
Users checked: 5
Account expired: 1
Account in warning: 1
No password policy for coudot
Password expired for sbahloul
No password change date for tchemineau
No password change date for rouazana
Mail sent to user farmand (farmand@example.com)
Edit the script to adapt configuration:
MY_LDAP_HOSTURI: LDAP URIMY_LDAP_ROOTDN (optional): DN to use to bind. No DN means anonymousMY_LDAP_ROOTPW: PasswordMY_LDAP_DEFAULTPWDPOLICYDN: Default password policy DN. Do not set if no default policy is used. In this case, the script will ony affect users with password policy in their entry (pwdPolicySubentry)MY_LDAP_SEARCHBASE: Users search baseMY_LDAP_SEARCHFILTER: Users search filterMY_LDAP_SEARCHBIN: Path to ldapsearch binaryMY_MAIL_DELAY: Time before expiration where a mail is sent. No mail sent after expiration. If no value, the script will take the pwdExpireWarning of the password policyMY_LDAP_NAME_ATTR: attribute containing user’s nameMY_LDAP_LOGIN_ATTR: attribute containing user’s loginMY_LDAP_MAIL_ATTR:attribute containing user’s nameMY_MAIL_BODY: message bodyMY_MAIL_SUBJECT: message subjectMY_MAIL_BIN: mail binaryMY_LOG_HEADER: log headerMY_GAWK_BIN: path to gawk binaryMail content: you can edit MY_MAIL_BODY and use the following variables:
nameloginexpireTimeTZexpireDayspwdMinLengthpwdInHistoryDate localization: you can change the lang by modifying this line:
export LC_ALL=en_US.UTF-8
Source: Account expiration mail warning [LDAP Tool Box (LTB)]
Instantiate the module in the database where it will be used, after adding the new ppolicy schema and loading the ppolicy module. The following example shows the ppolicy module being added to the database that handles the naming context “dc=example,dc=com”. In this example we are also specifying the DN of a policy object to use if none other is specified in a user’s object.
       database mdb
       suffix "dc=example,dc=com"
       [...additional database configuration directives go here...]

       overlay ppolicy
       ppolicy_default "cn=default,ou=policies,dc=example,dc=com"
Now we need a container for the policy objects. In our example the password policy objects are going to be placed in a section of the tree called “ou=policies,dc=example,dc=com”:
       dn: ou=policies,dc=example,dc=com
       objectClass: organizationalUnit
       objectClass: top
       ou: policies
The default policy object that we are creating defines the following policies:
The actual policy would be:
       dn: cn=default,ou=policies,dc=example,dc=com
       cn: default
       objectClass: pwdPolicy
       objectClass: person
       objectClass: top
       pwdAllowUserChange: TRUE
       pwdAttribute: userPassword
       pwdCheckQuality: 2
       pwdExpireWarning: 600
       pwdFailureCountInterval: 30
       pwdGraceAuthNLimit: 5
       pwdInHistory: 5
       pwdLockout: TRUE
       pwdLockoutDuration: 0
       pwdMaxAge: 0
       pwdMaxFailure: 5
       pwdMinAge: 0
       pwdMinLength: 5
       pwdMustChange: FALSE
       pwdSafeModify: FALSE
       sn: dummy value
You can create additional policy objects as needed.
There are two ways password policy can be applied to individual objects:
1. The pwdPolicySubentry in a user’s object – If a user’s object has a pwdPolicySubEntry attribute specifying the DN of a policy object, then the policy defined by that object is applied.
2. Default password policy – If there is no specific pwdPolicySubentry set for an object, and the password policy module was configured with the DN of a default policy object and if that object exists, then the policy defined in that object is applied.
Please see slapo-ppolicy(5) for complete explanations of features and discussion of “Password Management Issues” at http://www.symas.com/blog/?page_id=66
slapo-ppolicy(5)
Source: OpenLDAP Software 2.4 Administrator’s Guide: Overlays
OpenLDAP has a dynamically loadable module which can enforce password policies. It allows to define policies for the userPassword attribute. Policies can define the maximum login attempts with the wrong password, maximum age of a password and many more.
Here is a short introduction into this module. If you want to read about it in detail, see the link collection at the end of this page.
Note: The connection parameters and DN parameters deeply depend on your setup, the examples here need to be adjusted to your setup.
The basic configuration depends on your OpenLDAP version. Newer versions store their configuration in a so-called Online Configuration Database (OLC), older ones use a configuration file called slapd.conf
ldapmodify -D "cn=root,cn=config" -W -a -f /etc/openldap/schema/ppolicy.ldifldapmodify -D "cn=root,cn=config" -W -a -f ppolicymodule.ldifdn: cn=module{0},cn=config
objectClass: olcModuleList
cn: module{0}
olcModuleLoad: ppolicy.la
ldapmodify -D "cn=root,cn=config" -W -a -f ppolicyoverlay.ldifdn: olcOverlay=ppolicy,olcDatabase={1}bdb,cn=config
objectClass: olcOverlayConfig
objectClass: olcPPolicyConfig
olcOverlay: ppolicy
olcPPolicyDefault: cn=passwordDefault,ou=Policies,dc=mydomain,dc=tld
olcPPolicyHashCleartext: FALSE
olcPPolicyUseLockout: FALSE
olcPPolicyForwardUpdates: FALSE
If you have an older version of OpenLDAP, the configuration goes into slapd.conf:
#-- Load schema
include         /etc/openldap/schema/ppolicy.schema

#-- Load module
moduleload ppolicy.la
The next snippet should come somewhere after the database definition:
#-- Load overlay
overlay ppolicy
ppolicy_default "cn=passwordDefault,ou=Policies,dc=mydomain,dc=tld"
This means the default policy is located under cn=passwordDefault,ou=Policies,dc=mydomain,dc=tld
In the overlay configuration we specified the default policy, so we add it now using the following LDIF:
dn: ou=Policies,dc=mydomain,dc=tld
ou: Policies
objectClass: organizationalUnit

dn: cn=passwordDefault,ou=Policies,dc=mydomain,dc=tld
objectClass: pwdPolicy
objectClass: person
objectClass: top
cn: passwordDefault
sn: passwordDefault
pwdAttribute: userPassword
pwdCheckQuality: 0
pwdMinAge: 0
pwdMaxAge: 0
pwdMinLength: 8
pwdInHistory: 5
pwdMaxFailure: 3
pwdFailureCountInterval: 0
pwdLockout: TRUE
pwdLockoutDuration: 0
pwdAllowUserChange: TRUE
pwdExpireWarning: 0
pwdGraceAuthNLimit: 0
pwdMustChange: FALSE
pwdSafeModify: FALSE
All these parameters are described in detail at Chapter 6 OpenLDAP password policy overlay / pwdPolicy ObjectClass and Attributes.
This policy applies to all userPassword attributes. If an object needs a different policy, just define the differing policy under another name and reference the policy with the pwdPolicySubentry attribute. Example:
dn: cn=My User,ou=People,dc=mydomain,dc=tld
changetype: modify
add: pwdPolicySubentry
pwdPolicySubentry: cn=passwordSpecial,ou=Policies,dc=mydomain,dc=tld
If an object has the pwdAccountLockedTime attribute: it is locked since then. Simply issue the following query:
ldapsearch <MYCONNECTIONPARAMS> -b "ou=People,dc=mydomain,dc=tld" "pwdAccountLockedTime=*" pwdAccountLockedTime
There are two variants. For the first one you simply delete the pwdAccountLockedTime attribute which unlocks the account immediately:
dn: cn=My User,ou=People,dc=mydomain,dc=tld
changetype: modify
delete: pwdAccountLockedTime
The second variant adds the attribute pwdReset which basically means: The user can only login again after changing it’s password:
dn: cn=My User,ou=People,dc=mydomain,dc=tld
changetype: modify
add: pwdReset
pwdReset: TRUE
If the user tries other operations than changing its password, the OpenLDAP server responds with bind: Operations are restricted to bind/unbind/abandon/StartTLS/modify password Changing an LDAP password can be done f.e. with the ldappasswd tool:
ldappasswd <MYCONNECTIONPARAMS> -D "cn=My User,ou=People,dc=mydomain,dc=tld" -W -S "cn=My User,ou=People,dc=mydomain,dc=tld"
A short overview of how some of the policies behave (not all covered here):
pwdMinAge
Result: Constraint violation (19)
Additional info: Password is too young to change
pwdMaxAge
ldap_bind: Invalid credentials (49)
in the logfile: ppolicy_bind: Entry cn=My User,ou=People,dc=mydomain,dc=tld has an expired password: 0 grace logins
pwdGraceAuthNLimit
in the log: ppolicy_bind: Entry cn=My User,ou=People,dc=mydomain,dc=tld has an expired password: 1 grace logins
pwdInHistory
Result: Constraint violation (19)
Additional info: Password is in history of old passwords
pwdAllowUserChange
Result: Insufficient access (50)
Additional info: User alteration of password is not allowed
Policy data (f.e. number of failed login attempts) is stored as Operational Attributes on each object. In a normal ldapsearch query operational attributes are not returned. To make them visible, add a “+” to the end of the query. Example: ldapsearch <MYCONNECTIONPARAMS> -b "ou=People,dc=mydomain,dc=tld" "+"
If you replicate from an LDAP master to LDAP slave(s) and your users are authenticating against slaves, take into consideration that the policy data needs to be synced somehow back to the master (f.e. number of failed login attempts).
The ppolicy module already knows about it. You basically need to set the
configuration value olcPPolicyForwardUpdates (OLC style) / ppolicy_forward_updates (slapd.conf). Furthermore chaining must be configured, including syncrepl. This is very well documented at Linuxtopia.
Hello ! In this post, I will explain how to add a new schema into OpenLDAP 2.4 and higher. Why ? Because since release 2.4, the structure of the server has a little changed. I’m not an LDAP expert but I’m writing this article because I insulted my OpenLDAP and my Linux several times during one week while I try to add my own schema into OpenLDAP 2.4. I have read a lot of posts but honestly, I never find a good “how-to” which respond to the question in this post’s title.
The configuration in OpenLDAP 2.4 and next versions is now in LDIF format and it follows a pretty logical schema like this :

We can look that schemas must be placed as child of cn=schema,cn=config. Before the release 2.4, all .schema (stored under /etc/ldap/schema/) were included into slapd.conf. Since 2.4, we must “forget” the .schema file. The best way to explain how to add new schema with 2.4 (and higher) release is to start with a real and practical example. I suppose you already have a OpenLDAP server running. For your information, my OpenLDAP runs on a Ubuntu Server 12.04 LTS with a 3.5.0-48 64 bits kernel.
root@ldapserver:~# lsb_release -a && uname -a
No LSB modules are available.
Distributor ID: Ubuntu
Description:    Ubuntu 12.04.4 LTS
Release:        12.04
Codename:       precise
Linux ldapserver 3.5.0-48-generic #72~precise1-Ubuntu SMP Tue Mar 11 20:09:08 UTC 2014 x86_64 x86_64 x86_64 GNU/Linux
For this example, we can imagine that we want to add a new schema with a custom objectClass for our business application. This new objectClass has the name of nsaEngineer and the schema nsaProject. As a reminder, a schema is a container (package) for one or many objectClass. An objectClass contains references to other objectClass and attributes. Now, the objectClass nsaEngineer has 3 customs mandatory attributes and a optional (description) which is referenced in another base schema.
Now, let’s go to create this schema (and objectClass and attributes). Note : for more information about LDAP structures, please consult the following link : LDAP structure
The .schema format is simple to understand and to write for the beginners. Let’s start by creating a working directory for example /tmp/ldapworkingdir.
root@ldapserver:~# mkdir /tmp/ldapworkingdir
Now, create the file nsaProject.schema which contains the definition of the new and custom attributes and the new objectClass nsaEngineer and save it in /etc/ldap/schema/. I will not explain in detail the content of nsaProject.schema because it is out of the scope for this post.
Convert and add the schema to OpenLDAP
Now it’s time to try to convert our .schema into an LDIF file and add it to OpenLDAP. To begin, create a dummy file into /tmp/ldapworkingdir called ldap.conf for example and write into it the include directive to the nsaProject.schema.
root@ldapserver:~# cd /tmp/ldapworkingdir/
root@ldapserver:/tmp/ldapworkingdir# touch ldap.conf
root@ldapserver:/tmp/ldapworkingdir# echo "include /etc/ldap/schema/nsaProject.schema" > ldap.conf
Now try to convert the .schema file with this command
root@ldapserver:/tmp/ldapworkingdir# slaptest -f ldap.conf -F .
config file testing succeeded
This will create in place a directory called cn=config and a file cn=config.ldif. Now go to new created sub-directory ./cn=config/cn/schema/ and edit the file cn={0}nsaProject
root@ldapserver:/tmp/ldapworkingdir# cd cn\=config/cn\=schema/
The file must contains the following:
# AUTO-GENERATED FILE - DO NOT EDIT!! Use ldapmodify.
# CRC32 50a9d844
dn: cn={0}nsaproject
objectClass: olcSchemaConfig
cn: {0}nsaproject
olcAttributeTypes: {0}( 2.25.896523589646542389.1 NAME 'mainDoorKey' SUP descr
 iption EQUALITY caseExactMatch SYNTAX 1.3.6.1.4.1.1466.115.121.1.44 SINGLE-VA
 LUE )
olcAttributeTypes: {1}( 2.25.896523589646542389.2 NAME 'safeKey' SUP descripti
 on EQUALITY caseExactMatch SYNTAX 1.3.6.1.4.1.1466.115.121.1.44 SINGLE-VALUE
 )
olcAttributeTypes: {2}( 2.25.896523589646542389.3 NAME 'nsaID' SUP description
  EQUALITY caseExactMatch SYNTAX 1.3.6.1.4.1.1466.115.121.1.44 SINGLE-VALUE )
olcObjectClasses: {0}( 2.25.896523589646542389.10 NAME 'nsaEngineer' STRUCTURA
 L MUST ( mainDoorKey $ safeKey $ nsaID ) MAY description )
structuralObjectClass: olcSchemaConfig
entryUUID: 51ee4aea-79c9-1033-958d-ef361bf34673
creatorsName: cn=config
createTimestamp: 20140527090205Z
entryCSN: 20140527090205.718989Z#000000#000#000000
modifiersName: cn=config
modifyTimestamp: 20140527090205Z
You must keep only the following things and delete the rest.
You must modify dn: and cn: (just remove {0} for cn but write the correct dn for the schema ! (dn:cn=nsaproject,cn=schema,cn=config) ). After these modifications, the file is like this:
dn: cn=nsaproject,cn=schema,cn=config
objectClass: olcSchemaConfig
cn: nsaproject

olcAttributeTypes: {0}( 2.25.896523589646542389.1 NAME 'mainDoorKey' SUP descr
 iption EQUALITY caseExactMatch SYNTAX 1.3.6.1.4.1.1466.115.121.1.44 SINGLE-VA
 LUE )

olcAttributeTypes: {1}( 2.25.896523589646542389.2 NAME 'safeKey' SUP descripti
 on EQUALITY caseExactMatch SYNTAX 1.3.6.1.4.1.1466.115.121.1.44 SINGLE-VALUE
 )

olcAttributeTypes: {2}( 2.25.896523589646542389.3 NAME 'nsaID' SUP description
  EQUALITY caseExactMatch SYNTAX 1.3.6.1.4.1.1466.115.121.1.44 SINGLE-VALUE )

olcObjectClasses: {0}( 2.25.896523589646542389.10 NAME 'nsaEngineer' STRUCTURA
 L MUST ( mainDoorKey $ safeKey $ nsaID ) MAY description )
That’s it ! Now we are ready to add this schema to the OpenLDAP server using this command
root@ldapserver:/tmp/ldapworkingdir/cn=config/cn=schema#  ldapadd -Q -Y EXTERNAL -H ldapi:/// -W -f /tmp/ldapworkingdir/cn\=config/cn\=schema/cn\=\{0\}nsaproject.ldif
Enter LDAP Password:
adding new entry "cn=nsaproject,cn=schema,cn=config"
Now you can verify if the new schema is correctly added using a ldapsearch command like this :
root@ldapserver: ldapsearch -Q -LLL -Y EXTERNAL -H ldapi:/// -b cn=config nsa*
dn: cn=config
dn: cn=module{0},cn=config
dn: cn=schema,cn=config
dn: cn={0}core,cn=schema,cn=config
dn: cn={1}cosine,cn=schema,cn=config
dn: cn={2}nis,cn=schema,cn=config
dn: cn={3}inetorgperson,cn=schema,cn=config
dn: cn={4}nsaproject,cn=schema,cn=config     #yeah :-)
dn: olcBackend={0}hdb,cn=config
dn: olcDatabase={-1}frontend,cn=config
dn: olcDatabase={0}config,cn=config
dn: olcDatabase={1}hdb,cn=conf
Vladimir Samoylovich Horowitz (/ˈhɒrəvɪts/; Russian: Владимир Самойлович Горовиц; Yiddish: וולאדימיר סאַמוילאָוויטש האָראָוויץ; October 1 [O.S. September 18] 1903 – November 5, 1989) was a Russian-born American classical pianist and composer, who lived most of his life in the United States. He was acclaimed for his virtuoso technique, his tone color, and the excitement that was engendered by his playing. He is widely regarded as one of the greatest pianists of all time.