Source: How to automatically start a service when running a docker container? – Stack Overflow
Year: 2020
How to run a cron job inside a docker container? – Stack Overflow
Using Docker for Node.js in Development and Production
What is the WORKDIR command in Docker?
If the WORKDIR command is not written in the Dockerfile, it will automatically be created by the Docker compiler. Hence, it can be said that the command performs mkdir and cd implicitly.
DHCP with docker-compose and bridge networking
Using Docker Compose for NodeJS Development
Docker is an amazing tool for developers. It allows us to build and replicate images on any host, removing the inconsistencies of dev environments and reducing onboarding timelines considerably.
To provide an example of how you might move to containerized development, I built a simpletodoAPI using NodeJS, Express, and PostgreSQL using Docker Compose for development, testing, and eventually in my CI/CD pipeline.
In a two-part series, I will cover the development and pipeline creation steps. In this post, I will cover the first part: developing and testing with Docker Compose.
[Tweet “Exploring development and pipeline creation steps for a simple API using NodeJS and Docker Compose.”]Requirements for This Tutorial
This tutorial requires you to have a few items before you can get started.
- Install Docker Community Edition
- Install Docker Compose
- Download Todo App Example – Non- Docker branch
The todo app here is essentially a stand-in, and you could replace it with your own application. Some of the setup here is specific for this application, and the needs of your application may not be covered, but it should be a good starting point for you to get the concepts needed to Dockerize your own applications.
Once you have everything set up, you can move on to the next section.
Creating the Dockerfile
At the foundation of any Dockerized application, you will find aDockerfile. TheDockerfilecontains all of the instructions used to build out the application image. You can set this up by installing NodeJS and all of its dependencies; however the Docker ecosystem has an image repository (the Docker Store) with a NodeJS image already created and ready to use.
In the root directory of the application, create a newDockerfile.
/> touch DockerfileOpen the newly createdDockerfilein your favorite editor. The first instruction,FROM, will tell Docker to use the prebuilt NodeJS image. There are several choices, but this project uses thenode:7.7.2-alpineimage. For more details about why I’m usingalpinehere over the other options, you can read this post.
FROM node:7.7.2-alpineIf you rundocker build ., you will see something similar to the following:
Sending build context to Docker daemon 249.3 kB
Step 1/1 : FROM node:7.7.2-alpine
7.7.2-alpine: Pulling from library/node
709515475419: Pull complete
1a7746e437f7: Pull complete
662ac7b95f9d: Pull complete
Digest: sha256:6dcd183eaf2852dd8c1079642c04cc2d1f777e4b34f2a534cc0ad328a98d7f73
Status: Downloaded newer image for node:7.7.2-alpine
 ---> 95b4a6de40c3
Successfully built 95b4a6de40c3
With only one instruction in the Dockerfile, this doesn’t do too much, but it does show you the build process without too much happening. At this point, you now have an image created, and runningdocker imageswill show you the images you have available:
REPOSITORY          TAG                 IMAGE ID            CREATED             SIZE
node 7.7.2-alpine 95b4a6de40c3 6 weeks ago 59.2 MBTheDockerfileneeds more instructions to build out the application. Currently it’s only creating an image with NodeJS installed, but we still need our application code to run inside the container. Let’s add some more instructions to do this and build this image again.
This particular Docker file usesRUN,COPY, andWORKDIR. You can read more about those on Docker’s reference page to get a deeper understanding.
Let’s add the instructions to theDockerfilenow:
FROM node:7.7.2-alpine
WORKDIR /usr/app
COPY package.json .
RUN npm install --quiet
COPY . .
Here is what is happening:
- Set the working directory to
/usr/app - Copy the
package.jsonfile to/usr/app - Install
node_modules - Copy all the files from the project’s root to
/usr/app
You can now rundocker build .again and see the results:
Sending build context to Docker daemon 249.3 kB
Step 1/5 : FROM node:7.7.2-alpine
  ---> 95b4a6de40c3
Step 2/5 : WORKDIR /usr/app
 ---> e215b737ca38
Removing intermediate container 3b0bb16a8721
Step 3/5 : COPY package.json .
 ---> 930082a35f18
Removing intermediate container ac3ab0693f61
Step 4/5 : RUN npm install --quiet
 ---> Running in 46a7dcbba114
 ### NPM MODULES INSTALLED ###
 ---> 525f662aeacf
 ---> dd46e9316b4d
Removing intermediate container 46a7dcbba114
Step 5/5 : COPY . .
 ---> 1493455bcf6b
Removing intermediate container 6d75df0498f9
Successfully built 1493455bcf6b
You have now successfully created the application image using Docker. Currently, however, our app won’t do much since we still need a database, and we want to connect everything together. This is where Docker Compose will help us out.
Docker Compose Services
Now that you know how to create an image with aDockerfile, let’s create an application as a service and connect it to a database. Then we can run some setup commands and be on our way to creating that new todo list.
Create the filedocker-compose.yml:
/> touch docker-compose.ymlThe Docker Compose file will define and run the containers based on a configuration file. We are using compose file version 2 syntax, and you can read up on it on Docker’s site.
An important concept to understand is that Docker Compose spans “buildtime” and “runtime.” Up until now, we have been building images usingdocker build ., which is “buildtime.” This is when our containers are actually built. We can think of “runtime” as what happens once our containers are built and being used.
Compose triggers “buildtime” — instructing our images and containers to build — but it also populates data used at “runtime,” such as env vars and volumes. This is important to be clear on. For instance, when we add things likevolumesandcommand, they will override the same things that may have been set up via the Dockerfile at “buildtime.”
Open yourdocker-compose.ymlfile in your editor and copy/paste the following lines:
version: '2'
services:
  web:
    build: .
    command: npm run dev
    volumes:
      - .:/usr/app/
      - /usr/app/node_modules
    ports:
      - "3000:3000"
    depends_on:
      - postgres
    environment:
      DATABASE_URL: postgres://todoapp@postgres/todos
  postgres:
    image: postgres:9.6.2-alpine
    environment:
      POSTGRES_USER: todoapp
      POSTGRES_DB: todos
This will take a bit to unpack, but let’s break it down by service.
The web service
The first directive in the web service is tobuildthe image based on ourDockerfile. This will recreate the image we used before, but it will now be named according to the project we are in,nodejsexpresstodoapp. After that, we are giving the service some specific instructions on how it should operate:
command: npm run dev– Once the image is built, and the container is running, thenpm run devcommand will start the application.volumes:– This section will mount paths between the host and the container..:/usr/app/– This will mount the root directory to our working directory in the container./usr/app/node_modules– This will mount thenode_modulesdirectory to the host machine using the buildtime directory.environment:– The application itself expects the environment variableDATABASE_URLto run. This is set indb.js.ports:– This will publish the container’s port, in this case3000, to the host as port3000.
TheDATABASE_URLis the connection string.postgres://todoapp@postgres/todosconnects using thetodoappuser, on the hostpostgres, using the databasetodos.
The Postgres service
Like the NodeJS image we used, the Docker Store has a prebuilt image for PostgreSQL. Instead of using abuilddirective, we can use the name of the image, and Docker will grab that image for us and use it. In this case, we are usingpostgres:9.6.2-alpine. We could leave it like that, but it hasenvironmentvariables to let us customize it a bit.
environment:– This particular image accepts a couple environment variables so we can customize things to our needs.POSTGRES_USER: todoapp– This creates the usertodoappas the default user for PostgreSQL.POSTGRES_DB: todos– This will create the default database astodos.
Running The Application
Now that we have our services defined, we can build the application usingdocker-compose up. This will show the images being built and eventually starting. After the initial build, you will see the names of the containers being created:
Pulling postgres (postgres:9.6.2-alpine)...
9.6.2-alpine: Pulling from library/postgres
627beaf3eaaf: Pull complete
e351d01eba53: Pull complete
cbc11f1629f1: Pull complete
2931b310bc1e: Pull complete
2996796a1321: Pull complete
ebdf8bbd1a35: Pull complete
47255f8e1bca: Pull complete
4945582dcf7d: Pull complete
92139846ff88: Pull complete
Digest: sha256:7f3a59bc91a4c80c9a3ff0430ec012f7ce82f906ab0a2d7176fcbbf24ea9f893
Status: Downloaded newer image for postgres:9.6.2-alpine
Building web
...
Creating nodejsexpresstodoapp_postgres_1
Creating nodejsexpresstodoapp_web_1
...
web_1       | Your app is running on port 3000
At this point, the application is running, and you will see log output in the console. You can also run the services as a background process, usingdocker-compose up -d. During development, I prefer to run without-dand create a second terminal window to run other commands. If you want to run it as a background process and view the logs, you can rundocker-compose logs.
At a new command prompt, you can rundocker-compose psto view your running containers. You should see something like the following:
            Name                            Command              State           Ports
------------------------------------------------------------------------------------------------
nodejsexpresstodoapp_postgres_1   docker-entrypoint.sh postgres   Up      5432/tcp
nodejsexpresstodoapp_web_1        npm run dev                     Up      0.0.0.0:3000->3000/tcp
This will tell you the name of the services, the command used to start it, its current state, and the ports. Noticenodejsexpresstodoapp_web_1has listed the port as0.0.0.0:3000->3000/tcp. This tells us that you can access the application usinglocalhost:3000/todoson the host machine.
/> curl localhost:3000/todos
[]Thepackage.jsonfile has a script to automatically build the code and migrate the schema to PostgreSQL. The schema and all of the data in the container will persist as long as thepostgres:9.6.2-alpineimage is not removed.
Eventually, however, it would be good to check how your app will build with a clean setup. You can rundocker-compose down, which will clear things that are built and let you see what is happening with a fresh start.
Feel free to check out the source code, play around a bit, and see how things go for you.
Testing the Application
The application itself includes some integration tests built usingjest. There are various ways to go about testing, including creating something likeDockerfile.testanddocker-compose.test.ymlfiles specific for the test environment. That’s a bit beyond the current scope of this article, but I want to show you how to run the tests using the current setup.
The current containers are running using the project namenodejsexpresstodoapp. This is a default from the directory name. If we attempt to run commands, it will use the same project, and containers will restart. This is what we don’t want.
Instead, we will use a different project name to run the application, isolating the tests into their own environment. Since containers are ephemeral (short-lived), running your tests in a separate set of containers makes certain that your app is behaving exactly as it should in a clean environment.
In your terminal, run the following command:
/> docker-compose -p tests run -p 3000 --rm web npm run watch-testsYou should seejestrun through integration tests and wait for changes.
Thedocker-composecommand accepts several options, followed by a command. In this case, you are using-p teststo run the services under thetestsproject name. The command being used isrun, which will execute a one-time command against a service.
Since thedocker-compose.ymlfile specifies a port, we use-p 3000to create a random port to prevent port collision. The--rmoption will remove the containers when we stop the containers. Finally, we are running in thewebservicenpm run watch-tests.
Conclusion
At this point, you should have a solid start using Docker Compose for local app development. In the next part of this series about using Docker Compose for NodeJS development, I will cover integration and deployments of this application using Codeship.
Is your team using Docker in its development workflow? If so, I would love to hear about what you are doing and what benefits you see as a result.
Source: Using Docker Compose for NodeJS Development – via @codeship
Dockerizing a Node.js web app | Node.js
Dockerizing a Node.js web app
The goal of this example is to show you how to get a Node.js application into a Docker container. The guide is intended for development, and not for a production deployment. The guide also assumes you have a working Docker installation and a basic understanding of how a Node.js application is structured.
In the first part of this guide we will create a simple web application in Node.js, then we will build a Docker image for that application, and lastly we will instantiate a container from that image.
Docker allows you to package an application with its environment and all of its dependencies into a “box”, called a container. Usually, a container consists of an application running in a stripped-to-basics version of a Linux operating system. An image is the blueprint for a container, a container is a running instance of an image.
Create the Node.js app
First, create a new directory where all the files would live. In this directory create a package.json file that describes your app and its dependencies:
{
  "name": "docker_web_app",
  "version": "1.0.0",
  "description": "Node.js on Docker",
  "author": "First Last <first.last@example.com>",
  "main": "server.js",
  "scripts": {
    "start": "node server.js"
  },
  "dependencies": {
    "express": "^4.16.1"
  }
}
With your new package.json file, run npm install. If you are using npm version 5 or later, this will generate a package-lock.json file which will be copied to your Docker image.
Then, create a server.js file that defines a web app using the Express.js framework:
'use strict';

const express = require('express');

// Constants
const PORT = 8080;
const HOST = '0.0.0.0';

// App
const app = express();
app.get('/', (req, res) => {
  res.send('Hello World');
});

app.listen(PORT, HOST);
console.log(`Running on http://${HOST}:${PORT}`);
In the next steps, we’ll look at how you can run this app inside a Docker container using the official Docker image. First, you’ll need to build a Docker image of your app.
Creating a Dockerfile
Create an empty file called Dockerfile:
touch DockerfileOpen the Dockerfile in your favorite text editor
The first thing we need to do is define from what image we want to build from. Here we will use the latest LTS (long term support) version 12 of node available from the Docker Hub:
FROM node:12Next we create a directory to hold the application code inside the image, this will be the working directory for your application:
# Create app directory
WORKDIR /usr/src/app
This image comes with Node.js and NPM already installed so the next thing we need to do is to install your app dependencies using the npm binary. Please note that if you are using npm version 4 or earlier a package-lock.json file will not be generated.
# Install app dependencies
# A wildcard is used to ensure both package.json AND package-lock.json are copied
# where available (npm@5+)
COPY package*.json ./

RUN npm install
# If you are building your code for production
# RUN npm ci --only=production
Note that, rather than copying the entire working directory, we are only copying the package.json file. This allows us to take advantage of cached Docker layers. bitJudo has a good explanation of this here. Furthermore, the npm ci command, specified in the comments, helps provide faster, reliable, reproducible builds for production environments. You can read more about this here.
To bundle your app’s source code inside the Docker image, use the COPY instruction:
# Bundle app source
COPY . .
Your app binds to port 8080 so you’ll use the EXPOSE instruction to have it mapped by the docker daemon:
EXPOSE 8080Last but not least, define the command to run your app using CMD which defines your runtime. Here we will use node server.js to start your server:
CMD [ "node", "server.js" ]Your Dockerfile should now look like this:
FROM node:12

# Create app directory
WORKDIR /usr/src/app

# Install app dependencies
# A wildcard is used to ensure both package.json AND package-lock.json are copied
# where available (npm@5+)
COPY package*.json ./

RUN npm install
# If you are building your code for production
# RUN npm ci --only=production

# Bundle app source
COPY . .

EXPOSE 8080
CMD [ "node", "server.js" ]
.dockerignore file
Create a .dockerignore file in the same directory as your Dockerfile with following content:
node_modules
npm-debug.log
This will prevent your local modules and debug logs from being copied onto your Docker image and possibly overwriting modules installed within your image.
Building your image
Go to the directory that has your Dockerfile and run the following command to build the Docker image. The -t flag lets you tag your image so it’s easier to find later using the docker images command:
docker build -t <your username>/node-web-app .Your image will now be listed by Docker:
$ docker images

# Example
REPOSITORY                      TAG        ID              CREATED
node                            12         1934b0b038d1    5 days ago
<your username>/node-web-app    latest     d64d3505b0d2    1 minute ago
Run the image
Running your image with -d runs the container in detached mode, leaving the container running in the background. The -p flag redirects a public port to a private port inside the container. Run the image you previously built:
docker run -p 49160:8080 -d <your username>/node-web-appPrint the output of your app:
# Get container ID
$ docker ps

# Print app output
$ docker logs <container id>

# Example
Running on http://localhost:8080
If you need to go inside the container you can use the exec command:
# Enter the container
$ docker exec -it <container id> /bin/bash
Test
To test your app, get the port of your app that Docker mapped:
$ docker ps

# Example
ID            IMAGE                                COMMAND    ...   PORTS
ecce33b30ebf  <your username>/node-web-app:latest  npm start  ...   49160->8080
In the example above, Docker mapped the 8080 port inside of the container to the port 49160 on your machine.
Now you can call your app using curl (install if needed via: sudo apt-get install curl):
$ curl -i localhost:49160

HTTP/1.1 200 OK
X-Powered-By: Express
Content-Type: text/html; charset=utf-8
Content-Length: 12
ETag: W/"c-M6tWOb/Y57lesdjQuHeB1P/qTV0"
Date: Mon, 13 Nov 2017 20:53:59 GMT
Connection: keep-alive

Hello world
We hope this tutorial helped you get up and running a simple Node.js application on Docker.
You can find more information about Docker and Node.js on Docker in the following places:
PHP issue “Cannot send session cookie” – Stack Overflow
-
How do i check for BOM? If this is causing the issue how do i get rid of it? – Kaya Suleyman Mar 12 ’13 at 16:50
-
-
-
Microsoft Expression. I’m new to this stuff, how do i check for BOM, what does it look like and how do i get my code working again? – Kaya Suleyman Mar 12 ’13 at 16:54
- Download Notepad++ and open the file there, delete all fancy characters before the
<?PHP - Make sure there is no whitespace character like ” ” or tab or linebreak before the
<?PHP.- In Notepad++ click
Encodingand thenUTF-8 without BOMto convert the file to UTF-8 without BOM, then save it.
- In Notepad++ click
- Also add
ob_start();beforesession_start();to be safe.
- Download Notepad++ and open the file there, delete all fancy characters before the
Source: PHP issue “Cannot send session cookie” – Stack Overflow
Provide static IP to docker containers via docker-compose
version: “3.7”
services:
web-server:
build:
dockerfile: php.Dockerfile
context: .
restart: always
volumes:
– “./html/:/var/www/html/”
ports:
– “80:80”
networks:
vpcbr:
ipv4_address: 192.168.1.10
mysql-server:
image: mysql:5.7.32
tty: true
environment:
MYSQL_ROOT_PASSWORD: XXXXX
volumes:
– mysql-data:/var/lib/mysql
networks:
vpcbr:
ipv4_address: 192.168.1.11
volumes:
mysql-data:
networks:
vpcbr:
driver: bridge
ipam:
config:
– subnet: 192.168.1.8/29
Source: Provide static IP to docker containers via docker-compose – Stack Overflow
The Carnival of the Animals – Wikipedia
The Carnival of the Animals (Le carnaval des animaux) is a humorous musical suite of fourteen movements by the French Romantic composer Camille Saint-Saëns. The work was written for private performance by an ad hoc ensemble of two pianos and other instruments, and lasts around 25 minutes.
Set up a LAMP server with Docker – Linux Hint
Set up a LAMP server with Docker
Requirements:
In order to follow this article, you must have Docker installed on your computer. LinuxHint has a lot of articles that you can follow to install Docker on your desired Linux distribution if you don’t have it installed already. So, be sure to check LinuxHint.com in case you’re having trouble installing Docker.
Installing Docker Compose:
You can download Docker Compose binary file very easily with the following command:
docker-compose-$(uname -s)–$(uname -m)“ -o /usr/local/bin/docker-compose
NOTE: curl may not be installed on your Linux distribution. If that’s the case, you can install curl with the following command:
Ubuntu/Debian/Linux Mint:
CentOS/RHEL/Fedora:
Once docker-compose binary file is downloaded, run the following command:
Now, check whether docker-compose command is working as follows:
It should print the version information as shown in the screenshot below.
Setting Up Docker Compose for the Project:
Now, create a project directory ~/docker/lamp (let’s say) and a html/ directory inside the project directory for keeping the website files (i.e. php, html, css, js etc.) as follows:
Now, navigate to the project directory ~/docker/lamp as follows:
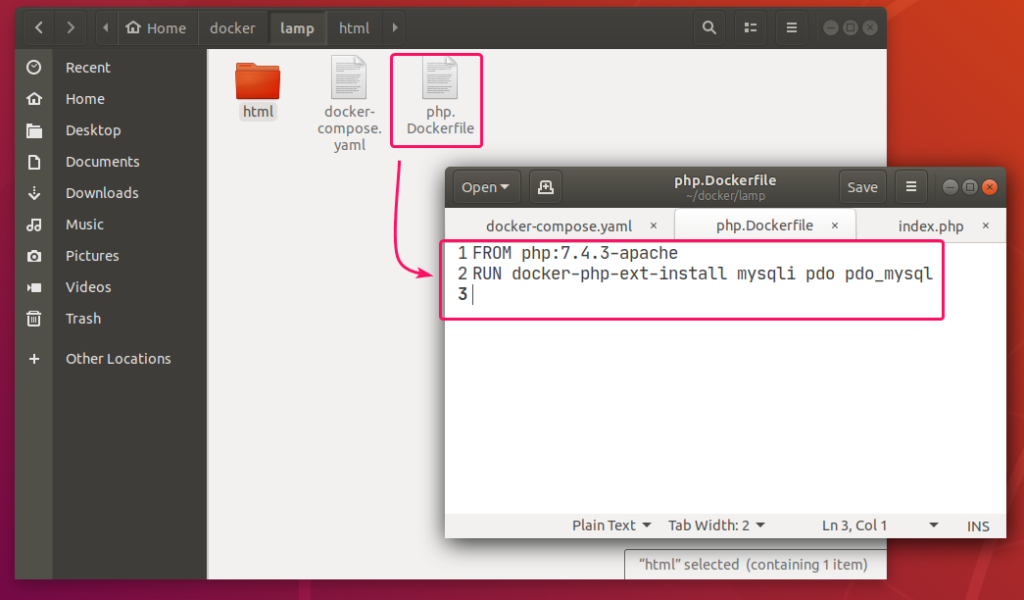
Create a php.Dockerfile in the project directory ~/docker/lamp. This is a Dockerfile which enables mysqli and PDO php extensions in the php:7.4.3-apache image from Docker Hub and builds a custom Docker image from it.
The contents of the php.Dockerfile is given below.
RUN
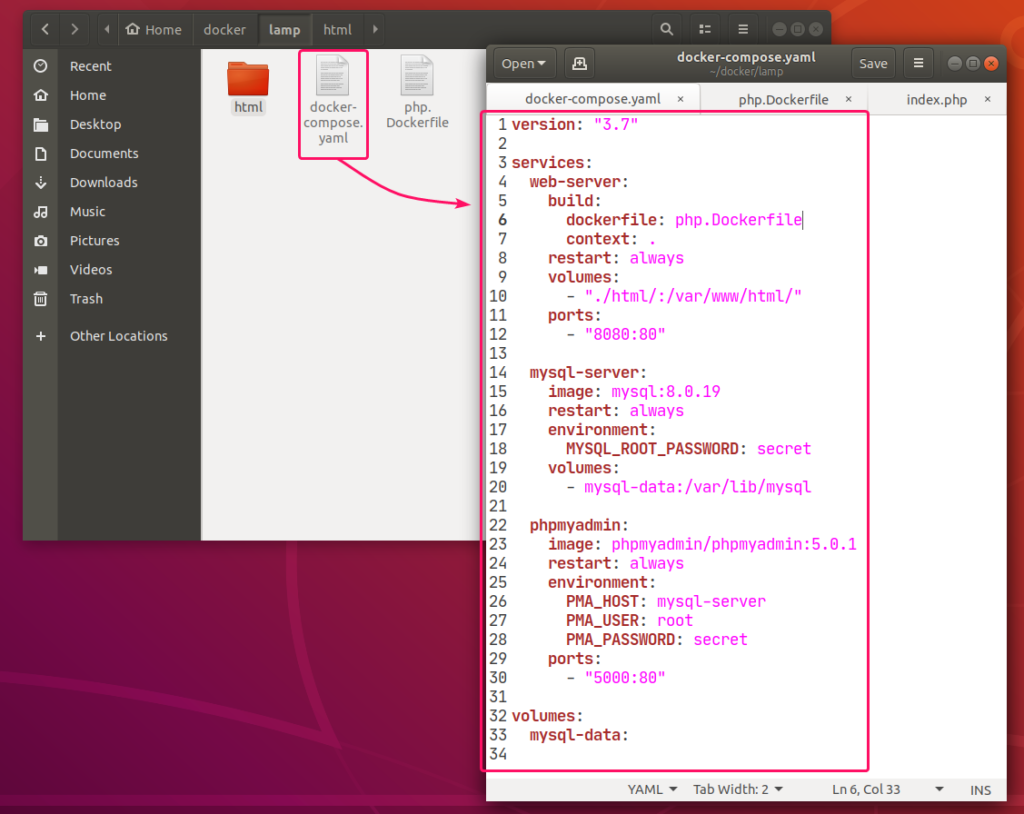
Now, create a docker-compose.yaml file in the project directory ~/docker/lamp and type in the following lines in the docker-compose.yaml file.
services:
web-server:
build:
dockerfile: php.Dockerfile
context: .
restart: always
volumes:
– “./html/:/var/www/html/”
ports:
– “8080:80”
mysql-server:
image: mysql:8.0.19
restart: always
environment:
MYSQL_ROOT_PASSWORD: secret
volumes:
– mysql-data:/var/lib/mysql
phpmyadmin:
image: phpmyadmin/phpmyadmin:5.0.1
restart: always
environment:
PMA_HOST: mysql-server
PMA_USER: root
PMA_PASSWORD: secret
ports:
– “5000:80”
volumes:
mysql-data:
The docker-compose.yaml file should look as follows.
Here, I have created 3 services web-server, mysql-server and phpmyadmin.
web-server service will run a custom-built Docker image as defined in php.Dockerfile.
mysql-server service will run the mysql:8.0.19 image (from DockerHub) in a Docker container.
phpmyadmin service will run the phpmyadmin/phpmyadmin:5.0.1 image (from DockerHub) in another Docker container.
In mysql-server service, the MYSQL_ROOT_PASSWORD environment variable is used to set the root password of MySQL.
In phpmyadmin service, the PMA_HOST, PMA_USER, PMA_PASSWORD environment variables are used to set the MySQL hostname, username and password respectively that phpMyAdmin will use to connect to the MySQL database server running as mysql-server service.
In mysql-server service, all the contents of the /var/lib/mysql directory will be saved permanently in the mysql-data volume.’
In the web-server service, the container port 80 (right) is mapped to the Docker host port 8080 (left).’
In the phpmyadmin service, the container port 5000 (right) is mapped to the Docker host port 80 (left).
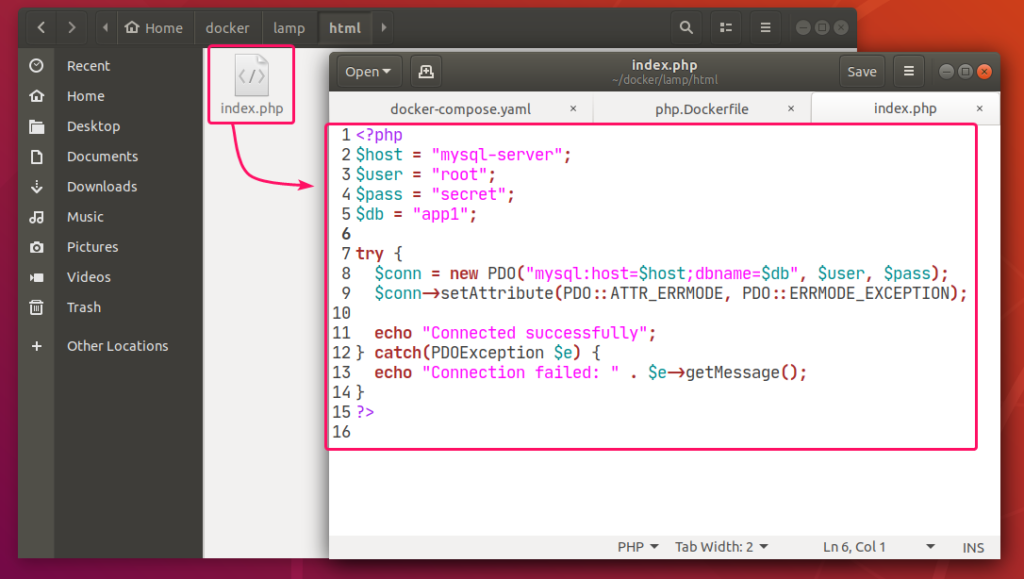
Also, create a index.php file in the html/ directory for testing the LAMP server.
The contents of the index.php file in my case,
$host = “mysql-server”;
$user = “root”;
$pass = “secret”;
$db = “app1”;
try {
$conn = new PDO(“mysql:host=$host;dbname=$db“, $user, $pass);
$conn->setAttribute(PDO::ATTR_ERRMODE, PDO::ERRMODE_EXCEPTION);
echo “Connected successfully”;
} catch(PDOException $e) {
echo “Connection failed: “ . $e->getMessage();
}
?>
Finally, the project directory ~/docker/lamp should look as follows:
Starting the LAMP Server:
Now, to start the web-server, mysql-server and phpmyadmin services, run the following command:
All the services should start in the background.
To see how the ports are mapped, run the following command:
As you can see, for the web-server service, the Docker host port 8080 is mapped to the container TCP port 80.
For the phpmyadmin service, the Docker host port 5000 is mapped to the container TCP port 80.
Finding the IP Address of Docker Host:
If you want to access the LAMP server from other computers on your network, you must know the IP address of your Docker host.
To find the IP address of your Docker host, run the following command:
In my case, the IP address of my Docker host 192.168.20.160. It will be different for you. So, make sure to replace it with yours from now on.
Testing the LAMP Server:
Now, you can access phpMyAdmin 5 and the web server from a web browser.
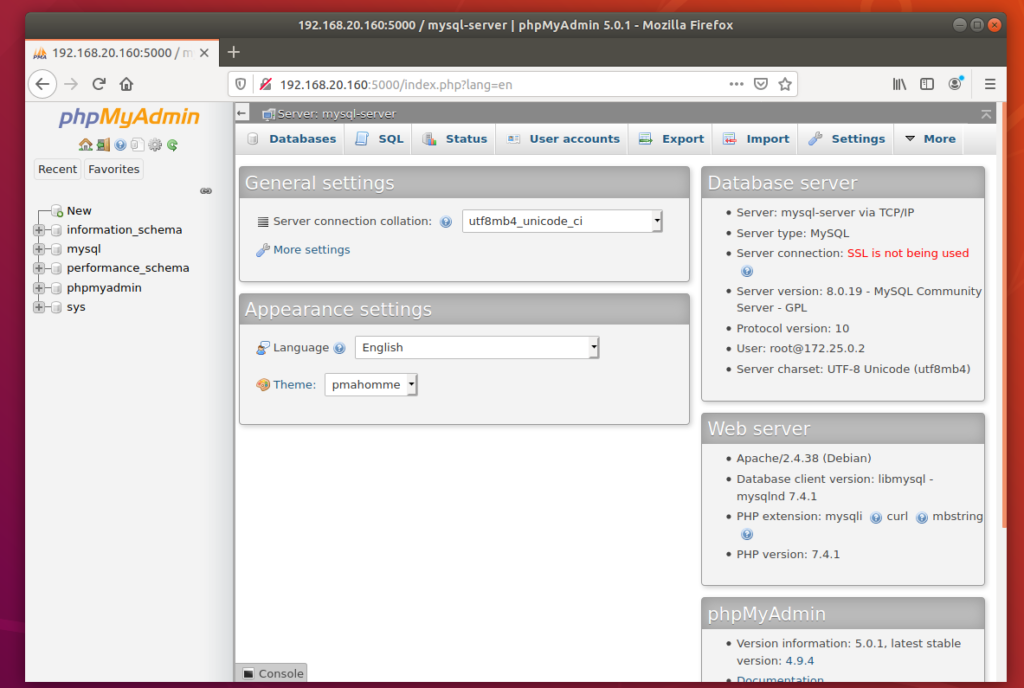
To access phpMyAdmin 5, open a web browser and visit http://localhost:5000 from your Docker host or visit http://192.168.20.160:5000 from any other computer on the network.
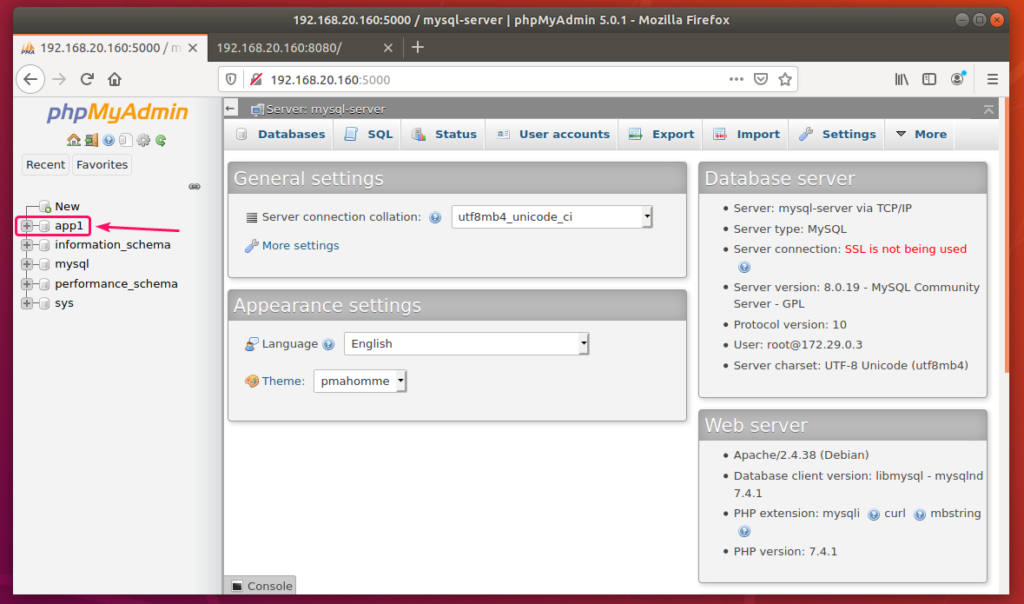
phpMyAdmin 5 should load in your web browser.
Now, create an app1 MySQL database from phpMyAdmin.
Now, visit http://localhost:8080 from your Docker host or http://192.168.20.160:8080 from any other computer on your network to access the web server.
You should see the Connected successfully message. It means, the PHP is working and the MySQL database server is accessible from the web-server container. So, technically, the LAMP server is fully functional.
Stopping the LAMP Server:
To stop the web-server, mysql-server and phpmyadmin services, run the following command:
The web-server, mysql-server and phpmyadmin services should be stopped.
Cleaning Up MySQL Server Data:
If you want to remove all the MySQL database data and settings, you must remove the mysql-data volume.
You can find the actual name of the volume with the following command:
You can remove the volume lamp_mysql-data with the following command:
So, that’s how you set up a LAMP server with Docker. Thanks for reading this article.
As you can see, the volume to remove is lamp_mysql-data.
How to move docker data directory to another location on Ubuntu – guguweb.com
How to move docker data directory to another location on Ubuntu
Docker is a popular container management platform that can dramatically speed up your development workflow. It is available as a package on major Linux distributions, including Ubuntu.
The standard data directory used for docker is /var/lib/docker, and since this directory will store all your images, volumes, etc. it can become quite large in a relative small amount of time.
If you want to move the docker data directory on another location you can follow the following simple steps.
1. Stop the docker daemon
sudo service docker stop
2. Add a configuration file to tell the docker daemon what is the location of the data directory
Using your preferred text editor add a file named daemon.json under the directory /etc/docker. The file should have this content:
{
   "data-root": "/path/to/your/docker"
}
of course you should customize the location “/path/to/your/docker” with the path you want to use for your new docker data directory.
3. Copy the current data directory to the new one
sudo rsync -aP /var/lib/docker/ /path/to/your/docker
4. Rename the old docker directory
sudo mv /var/lib/docker /var/lib/docker.old
This is just a sanity check to see that everything is ok and docker daemon will effectively use the new location for its data.
5. Restart the docker daemon
sudo service docker start
6. Test
If everything is ok you should see no differences in using your docker containers. When you are sure that the new directory is being used correctly by docker daemon you can delete the old data directory.
sudo rm -rf /var/lib/docker.old
Follow the previous steps to move docker data directory and you won’t risk any more to run out of space in your root partition, and you’ll happily use your docker containers for many years to come. ?
7. Extra step: remote debug on your Docker container!
Do you know that you can remote debug your application running on a Docker container? Check out my tutorial on Remote debugging a Django project in VS Code! It uses Django as an example, but the Docker related part is general.
Source: How to move docker data directory to another location on Ubuntu – guguweb.com


