Month: February 2017
Drone Nerds Academy: Phantom 3 Standard vs Advanced – YouTube

How to make a transparent background using GIMP – YouTube
RawTherapee Tutorial – YouTube
2. Туторијал на youtube
2.1 Ако стиснеш „i“ ќе ти прикаже EXIF податоци за сликата
2.2 Exposure
– Exposure compensation е исто со зголемување на ISO. Ако го зголемиш на 1 тоа значи дека 1 stop нагоре (ако било ISO100 одиш на ISO200).
– Black и White ги сетира со користење на Tone Curve 1 (Control Cage). Белото е десно црното е лево. Гледаш на хистограмот само да ги допре y-оската за црно лево, а за бело десно.
Кривата обично изгледа приближно како буквата S. Пази ги гаси дифолтно предожените вредности за црно и бело. Не пипа контраст, lightnest ниту сатурација. Ги чепка
Highlight compression (не над 100) i Highlight Comression threshold
2.3 Whithe balance
Ова е многу важно. Ја бира пипетата и бира неутрален регион каде што имаш јако сиво или јако бело. Со тоа автоматски се мести на добра white balance. Вика понекогаш
може да го чепнеш Vibrance но не и другите параметри
2.4 Sharpening. Бира само Sharpen only edges. Инаку на небото ќе му се јави шум. Изоштрувањето го прави со промена на радиус. Обично го држи под 1 максимум 0.8.
Температурата ја чепка, ретко Tint, но не Blu/Red equalizer
2.5 Noice Reduction
– На tutorialot на youtube виика дека ако имаш големо ISO тогаш со noice reduction – Luminance треба да бидеш во опсег од 10-15 (rule of thumb). Се користи method: L*a*b
– noice reduction – Chrominance го остава на Auto. Ако избереш соодветен профил (пр. Difault ISO High или Default ISO Medium) тој ќе аплицира автоматски соодветен
noice reduction.
2.6 Save to JPG
Вика дека во избор на JPEG quality тешко можеш да видиш разлика меѓу 94 и 100%. Веројатно 94 е тамам. За Subsampling избира Balance. Вика дека тоа е добра опција.
How to Resize and Make Images Larger without Losing Quality
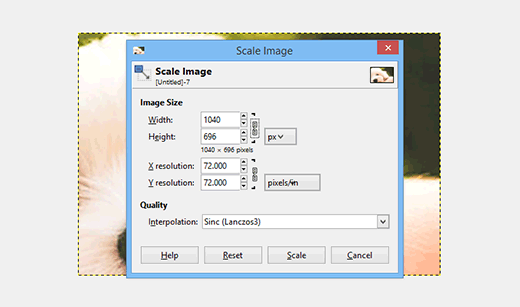
Ever wanted to enlarge an image without quality loss? Learn how to resize images to make them larger without losing quality in Photoshop and GIMP.
Source: How to Resize and Make Images Larger without Losing Quality
Topic: Adding Shortcode to Homepage « WordPress.org Forums
Adding Shortcode to Homepage hbdevore (@hbdevore) 3 months, 3 weeks ago Hi, I need to insert this shortcode [instashow id=”1″] into my homepage to show a live feed of Instagram posts. I don’t see the option when I hit “customize” on the homepage – just a few sections like feature text boxes and testimonials. I don’t want this to be a sidebar – I want it to run across the page in one row, full-width. Can anyone help? Ps. Theme is Brasserie. Thank you! Viewing 2 replies – 1 through 2 (of 2 total) Michael (@a
Source: Topic: Adding Shortcode to Homepage « WordPress.org Forums
What’s the Difference Between Bleached and Unbleached Flour? — Ingredient Intelligence | Kitchn
U-Verse DVR Motorola VIP 1225 Hard Drive Upgrade Hack – YouTube
drive was 250GB not 160GB. So the numbers d
How to pass a variable in form using GET with spaces in PHP+HTML+SQL – Stack Overflow
I have a form where I display a select item and two other invisible inputs with some variable values that I need to pass to the same page at the press of the “Action” button. But I’m having the problem that those variables are city names like “New York”, so there is a space inside the name, and at the moment of passing the variable only the “New” gets passed; nothing after the space goes with it. I have read that there shouldn’t be any spaces in those variables, so how should I do this?Here is my sample code:// at the beginning of the code I get this variables pass from other pages$pais=$_GET[‘pais’]; $name=$_GET[‘nombre’];// this is how I query my table to populate my select item$SN=mysql_real_escape_string($name);$SP=mysql_real_escape_string($pais);$estadoquery = “SELECT * FROM `”.$SP.”` ORDER BY Estado ASC”;$estadoresult = mysql_query($estadoquery);// this is how I make my form<form method=”post” action=””><input type=”HIDDEN” name=nombre value=””><input type=”HIDDEN” name=pais value=””> Todos <option value=> // and this is what the button action does if(@$_POST[‘ACTION’]==’IR’){$pais = $_POST[‘pais’];$name = $_POST[‘nombre’];$estado = $_POST[‘estado’]; $pais = mysql_escape_string($pais); $name = mysql_escape_string($name); $estado = mysql_escape_string($estado);// this next echos are just to check my variables.echo $pais;echo $name;echo $estado; // so here I can tell that this variable is not complete}And I have read that variables cannot be passed with spaces, why does my $pais variable “United States” gets passed with the space in between correctly? Can someone tell me how to achieve this or how to transform my <option value=> so it can pass the space?php html sql variablesshareimprove this question edited Jul 15 ’13 at 19:27Alex Shesterov9,58072754 asked Oct 27 ’12 at 20:23zvzej2,18152136 The value of a variable can have spaces, the name cannot. For example, $pais can contain “New York”, but the the variable cannot be called $pais name. Make sense? – cale_b Oct 27 ’12 at 20:281 The problem is that you have not put quotes around the option values. Change it like so: <option value=””> and you’ll be good to go. – cale_b Oct 27 ’12 at 20:30 @cale_b this was the solution thank you! – zvzej Oct 27 ’12 at 20:43 You are very welcome. – cale_b Oct 27 ’12 at 20:44add a comment7 Answersactiveoldestvotesup vote2down voteaccepted Per my comment above:The problem is that there are not quotes around the option values. Change it like so:<option value=””> and you’ll be good to go.
Source: How to pass a variable in form using GET with spaces in PHP+HTML+SQL – Stack Overflow
Hasselblad H6D: a $27,000 monster of a camera – YouTube
Mamiya
Mamiya
From Wikipedia, the free encyclopedia
This article needs additional citations for verification. (August 2012) (Learn how and when to remove this template message)
Mamiya Digital Imaging Co., Ltd. Camera and lens manufacturer Industry Digital imaging and photography Founded May 1940 Headquarters Tokyo, Japan Seiichi Mamiya, founder Products Cameras, Optical and other products 200 Parent Phase One Website Mamiya Japan
Mamiya LeafMamiya Digital Imaging Co., Ltd. (マミヤ・デジタル・イメージング マミヤ・デジタル・イメージング ー株式会社?, Mamiya Dejitaru Imejingu Kabushiki-gaisha)[needs IPA] is a Japanese company that manufactures high-end cameras and other related photographic and optical equipment. With headquarters in Tokyo, it has two manufacturing plants and a workforce of over 200 people. The company was founded in May 1940 by camera designer Seiichi Mamiya (間宮精一) and financial backer Tsunejiro Sugawara.
History[edit]

A Mamiya C3 twin lens reflex, from 1962.
Mamiya originally achieved fame for its professional medium-format film cameras such as the Mamiya Six and the Mamiya Press series. It later went on to develop the industry workhorse RB67 series, the RZ67 and the twin-lens reflex Mamiya C-series, used by advanced amateur and professional photographers.
Many Mamiya models over the past six decades have become collectors’ items. The earliest Mamiya Six medium-format folding camera, the 35 mm Mamiya-Sekor 1000DTL, the lightweight 35 mm Mamiya NC1000, the 6×6 cm medium-format C series of interchangeable-lens twin-lens reflex (TLR) cameras, and the press cameras of the Super/Universal series are highly valued. Mamiya also manufactured the last models in the Omega line of medium format cameras.
Mamiya entered other business markets over time by purchasing other companies.[1] Until 2000, it made fishing equipment such as fishing rods and fishing reels. In 2006, the Mamiya Op Co., Ltd., Inc. transferred the camera and optical business to Mamiya Digital Imaging Co., Ltd. The original company, doing business as Mamiya-OP, continues to exist and makes a variety of industrial and electronics products. It also makes golf clubs, golf club shafts and grips, and golf balls through its subsidiaries Kasco and USTMamiya.[2]
In 2009, Phase One, a medium format digital camera back manufacturer from Denmark, purchased a major stake in Mamiya. In 2012, Phase One combined Mamiya and another subsidiary, Leaf Imaging, created a new, worldwide Mamiya Leaf brand to integrate both companies’ product lines into one complete medium-format digital camera system offering. The re-branding offers a streamlined product development and establishment of a more efficient customer sales and support base.
135 film[edit]
Mamiya started manufacturing 135-film cameras in 1949, with 135-film point-and-shoot compact cameras being introduced later. The excellent Mamiya-35 series of rangefinder cameras was followed by the Mamiya Prismat SLR in 1961 and the Mamiya TL/DTL in the mid-to-late 1960s. The SX, XTL and NC1000 were other 135-film SLR camera models introduced by Mamiya. One of Mamiya’s last 135-film SLR designs was the Z-series. The original entry-level ZE model was an aperture-priority-only SLR; the ZE-2 added manual exposure; the ZE-X added shutter priority and full program automated mode, and (with a dedicated flash and an EF-series lens) focus-priority flash exposure). In these models the aperture ring had no direct connection to the diaphragm, allowing the camera body to override the set aperture, and the lenses could communicate a considerable amount of information to the camera body via electrical contacts on the mount.
The Mamiya ZM, introduced in 1982, was essentially an advanced version of the ZE-2, with some of the features of the ZE-X. It was the last Mamiya 135-film camera produced. It had an aperture-priority automatic time control, based on center-weighted TTL readings, an automatic shutter-speed range from 4 seconds to 1/1000, and a manual range from 2 seconds to 1/1000. Visual and audio signals indicated over- or under-exposure, pending battery failure, or excessive camera shake. Metering modes, shutter release, self-timer, manual time settings and the ergonomics of the camera body were also improved.
In 1984 Osawa, one of Mamiya’s major distributors, filed for the Japanese equivalent of bankruptcy and, soon after, Mamiya discontinued 135-film camera production to focus on the medium-format professional market.
Medium format[edit]
Mamiya made a series of square format twin lens reflex (TLR) throughout the middle of the twentieth century. These were developed into the C cameras (C2, C3 through to C330s) which have interchangeable lenses as well as bellows focus.
In 1970, Mamiya introduced the RB67 6×7 cm professional single lens reflex (SLR). The RB67, a large, heavy, medium-format camera with built-in closeup bellows was innovative and successful. Previous medium-format professional cameras used the square 6×6 cm format which did not require the camera to be rotated for photographs in portrait orientation, problematical with large and heavy cameras when tripod-mounted. The RB67 had a rotating back which enabled photographs to be taken in either landscape or portrait orientation without rotating the camera, at the expense of additional weight and bulk. The RB67 soon became widely used by professional studio photographers. The 6×7 frame was described as being ideal, as the 56mm x 67mm negatives required very little cropping to fit on standard 10″ x 8″ paper.
When comparing the RB67 to full frame 135 cameras there is a so-called “crop factor” of a half. That means the standard 35mm frame has “half” the diagonal of the 67 (though the ratio is different) but a quarter the area. This effects the focal length of lenses so that to get an equivalent field of view on a 35mm camera you need half the focal length. There is a similar effect on the depth of field of a particular aperture, so a 90mm f1:3.5 on the RB67 is equivalent to using a 45mm f1:1.8 on 35mm full frame.
In 1975 Mamiya started to offer the M645, a camera with 6×4.5 cm frame, allowing 15 shots on a standard 120 roll film becoming the first MF camera to offer that format size also known as the 645 format.
The RB67 was followed by the more advanced RZ67 6x7cm frame format camera in 1982. These cameras established Mamiya as a major medium-format professional camera manufacturer, together with Hasselblad, Rollei, Bronica and Pentax.
In 1989, Mamiya introduced the Mamiya 6 and Mamiya 7 (6x6cm and 6x7cm, respectively) rangefinder cameras, compact and quiet cameras which are reputed for the extremely high optical quality of their lenses.
In 1999, Mamiya presented the Mamiya 645AF, a 6X4.5 frame SLR camera with interchangeable lenses and film backs, auto focus and an integrated prism visor that would be the base platform for the Mamiya 645AFD film and digital back cameras.
Digital products[edit]
Mamiya introduced the Mamiya ZD, which was a compact medium-format camera, in 2004. Rather than taking the form of a digital back solution, it was all built into one unit, much like a 35mm camera. This camera utilized the Mamiya 645AF lenses and had a resolution of 22mp. The solution had technical difficulties and became delayed. At the same time, Mamiya also announced a ZD back which had the same specification but was intended to be used with the Mamiya 645AFDII / AFDIII. The ZD back was even more delayed and, once it was introduced, it was already outdated.
In 2009, the Mamiya M Series digital backs were released (M18, M22 and M31) all featuring high pixel counts with large CCDs and compatibility with the Mamiya 645AFD range and RZ/ RB series (via specially manufactured adapters). All the backs are compatible with 4×5 inch view cameras. In the final quarter of 2009, Mamiya released its Mamiya 645DF camera, the latest and digital-only version of the famed 6×4.5 format AF camera series. The Mamiya 645DF has many improved features including mirror-up delay, lack of shutter lag, AF preference with priority on speed or precision, and compatibility with the new leaf shutter lens range (Mamiya Sekor AF 80mm, 55mm and 110mm D lenses with in-built leaf shutters). With these lenses attached, flash synchronizations speeds of up to 1/1,600 of a second are achievable, although the camera can also be programmed to use the focal plane shutter even if a leaf shutter lens is attached. 2010 saw the release of 3 Mamiya DM Systems (Mamiya DM33 System, consisting of a 645DF camera body and 33MP digital back, the Mamiya DM28 System, consisting of a 645 AF III camera body and 28MP digital back, and the Mamiya DM22 System, consisting of a 645 AF III camera body and 22MP digital back. A new logo and webpage were also launched.[3]
Mamiya America Corporation[edit]
In the United States, the trademark for “Mamiya” is not owned by the original company in Japan but rather by a wholly separate entity called Mamiya America Corporation (“M.A.C.”). As such, All products that bear the name “Mamiya” are controlled by M.A.C. and has resulted in a considerable rise in retail pricing when comparing the same products to ones sold outside the United States. As of 2014 MAC group no longer manages the Mamiya brand in America, all sales, service and support was transferred to Phase One who already owned a large portion of Mamiya.
Products[edit]
For a detailed list of current and historical products, see List of Mamiya products.6×4.5 cm format[edit]
- The M645 (discontinued) was manufactured from 1975 to 1987. This was the first model to offer a 6×4.5 cm frame.
- The Mamiya 645 Super (discontinued) was manufactured from 1985 to 1993. This was a new camera with a moulded plastic shell on a diecast metal frame. Its features are as for the M645 1000s (indeed it is able to use the same lenses and film cartridges). It added removable film backs, whereby a dark-slide could be inserted and the back removed mid-roll.
- The Mamiya 645 Pro (discontinued) was manufactured from 1993 to 1998.
- The Mamiya 645 Pro-TL (discontinued) was first released in 1997.
- The Mamiya 645E (discontinued) was first released in 2000. Entry-level camera, non-interchangeable back, popular among beginners.
- Mamiya 645DF+ — modular DSLR medium-format camera; also available as the Phase One 645DF
6×7 cm format[edit]
- RB67 Pro-SD — mechanical 6 cm × 7 cm SLR medium-format camera
- RZ67 IID — electronic 6 cm × 7 cm SLR medium-format camera
- Mamiya 7II — electronic 6 cm × 7 cm rangefinder camera
35mm SLR Mamiya ZE
Mamiya 135 EE
Mamiya ZM


Source: Mamiya – Wikipedia
Back-illuminated sensor
Back-illuminated sensor
From Wikipedia, the free encyclopediaFor the lighting design practice, see Backlighting (lighting design). For backlights in liquid crystal displays, see backlight.A back-illuminated sensor, also known as backside illumination (BSI or BI) sensor, is a type of digital image sensor that uses a novel arrangement of the imaging elements to increase the amount of light captured and thereby improve low-light performance. The technique was used for some time in specialized roles like low-light security cameras and astronomy sensors, but was complex to build and required further refinement to become widely used. Sony was the first to reduce these problems and their costs sufficiently to introduce a 5-megapixel 1.75 µm BI CMOS sensor at general consumer prices in 2009.[1][2] BI sensors from OmniVision Technologies have since been used in consumer electronics from other manufacturers as in the HTC EVO 4G[3][4] Android smart phone, and as a major selling point for the camera in Apple’s iPhone 4.[5][6]
Description[edit]
A traditional, front-illuminated digital camera is constructed in a fashion similar to the human eye, with a lens at the front and photodetectors at the back. This traditional orientation of the sensor places the active matrix of the digital camera image sensor—a matrix of individual picture elements—on its front surface and simplifies manufacturing. The matrix and its wiring, however, reflect some of the light, and thus the photocathode layer can only receive the remainder of the incoming light; the reflection reduces the signal that is available to be captured.[1]
A back-illuminated sensor contains the same elements, but arranges the wiring behind the photocathode layer by flipping the silicon wafer during manufacturing and then thinning its reverse side so that light can strike the photocathode layer without passing through the wiring layer.[7] This change can improve the chance of an input photon being captured from about 60% to over 90%,[8] with the greatest difference realised when pixel size is small,[citation needed] as the light capture area gained in moving the wiring from the top (light incident) to bottom surface (paraphrasing the BSI design) is proportionately smaller for a larger pixel.[citation needed] BSI-CMOS sensors are most advantageous in partial sun and other low light conditions.[9] Placing the wiring behind the light sensors is similar to the difference between a cephalopod eye and a vertebrate eye. Orienting the active matrix transistors behind the photocathode layer can lead to a host of problems, such as cross-talk, which causes noise, dark current, and color mixing between adjacent pixels. Thinning also makes the silicon wafer more fragile. These problems could be solved through improved manufacturing processes, but only at the cost of lower yields, and consequently higher prices. Despite these issues, early BI sensors found uses in niche roles where their better low-light performance was important. Early uses included industrial sensors, security cameras, microscope cameras and astronomy systems.[8]
Industry observers[who?] noted that a back-illuminated sensor could theoretically cost less than a similar front-illuminated version. The ability to collect more light meant that a similarly sized sensor array could offer higher resolution without the drop in low-light performance otherwise associated with the megapixel race. Alternatively, the same resolution and low-light capability could be offered on a smaller chip, lowering costs. Key to attaining these advantages would be an improved process that addressed the yield problems, largely through improving the uniformity of an active layer on the front of the detectors.[8]
A major step in the adoption of BI sensors was made when OmniVision Technologies sampled their first sensors using the technique in 2007.[10]These sensors, however, did not see widespread use due to their high costs. Sony’s work on new photo diode materials and processes allowed them to introduce the first consumer back-illuminated sensor as their CMOS-based “Exmor R” in August 2009.[1] According to Sony, the new material offered +8 dB signaling and −2 dB noise. When combined with the new back-illuminated layout, the sensor improved low-light performance by as much as two times.[1]
Competitors followed suit, and by the end of the year most companies were offering a version in their high-end products. OmniVision has continued to push the technology down their product lines. By contrast, the iPhone 4s employs a sensor manufactured by Sony. Another example is the HTC EVO 4G[4][3] which equipped with an 8 megapixel, 1.4 µm pixel BSI sensor from OmniVision. In 2011, Sony implemented their Exmor R sensor in their flagship smartphone Sony Ericsson Xperia Arc.[11]
In January 2012 Sony developed the back-side illuminated sensor further with Stacked CMOS,[3] where the supporting circuitry is moved below the active pixel section, giving another 30% improvement to light capturing capability.[12] This was commercialized by Sony in August 2012 as Exmor RS with resolutions of 13 and 8 effective megapixels.[13]
In September 2014 Samsung announced the world’s first APS-C sensor to adopt back-side illuminated (BSI) pixel technology.[14][3] This 28-megapixels sensor (S5KVB2) was adopted by their new compact system camera, the NX1, and was showcased along with the camera at photokina 2014, held in Cologne, Germany, 16 to 21 September.
On 10 June 2015 Sony announced the first camera employing a back-side illuminated full frame sensor, the α7R II.[3]
w-