MMV
How To Install and Configure OpenLDAP and phpLDAPadmin on an Ubuntu 14.04 Server
We also want to password protect our phpLDAPadmin location. Even though phpLDAPadmin has password authentication, this will provide an extra level of protection.
The utility that we need is contained in an Apache utility package. Get it by typing:
sudo apt-get install apache2-utils
Now that you have the utility available, you can create a password file that will contain a username that you choose and the associated hashed password.
We will keep this in the /etc/apache2 directory. Create the file and specify the username you want to use by typing:
sudo htpasswd -c /etc/apache2/htpasswd demo_user
Now, we are ready to modify Apache to take advantage of our security upgrades.
Modify the phpLDAPadmin Apache Configuration
The first thing we will do is modify the alias that is set up to serve our phpLDAPadmin files.
Open the file with root privileges in your text editor:
sudo nano /etc/phpldapadmin/apache.conf
This is the place where we need to decide on the URL location where we want to access our interface. The default is /phpldapadmin, but we want to change this to cut down on random login attempts by bots and malicious parties.
For this guide, we’re going to use the location /superldap, but you should choose your own value.
We need to modify the line that specifies the Alias. This should be in an IfModule mod_alias.c block. When you are finished, it should look like this:
<IfModule mod_alias.c>
    Alias /superldap /usr/share/phpldapadmin/htdocs
</IfModule>
When you are finished, safe and close the file.
Configure the HTTP Virtual Host
Next, we need to modify our current Virtual Hosts file. Open it with root privileges in your editor:
sudo nano /etc/apache2/sites-enabled/000-default.conf
Inside, you’ll see a rather bare configuration file that looks like this:
<VirtualHost *:80>
    ServerAdmin webmaster@localhost
    DocumentRoot /var/www/html
    ErrorLog ${APACHE_LOG_DIR}/error.log
    CustomLog ${APACHE_LOG_DIR}/access.log combined
</VirtualHost>
We want to add information about our domain name or IP address to define our server name and we want to set up our redirect to point all HTTP requests to the HTTPS interface. This will match the alias we configured in the last section.
The changes we discussed will end up looking like this. Modify the items in red with your own values:
<VirtualHost *:80>
    ServerAdmin webmaster@server_domain_or_IP
    DocumentRoot /var/www/html
    ServerName server_domain_or_IP
    Redirect permanent /superldap https://server_domain_or_IP/superldap
    ErrorLog ${APACHE_LOG_DIR}/error.log
    CustomLog ${APACHE_LOG_DIR}/access.log combined
</VirtualHost>
Save and close the file when you are finished.
The last thing we need to do is set up the location block that will implement our password protection for the entire phpLDAPadmin installation.
We do this by referencing the location where we are serving the phpLDAPadmin and setting up authentication using the file we generated. We will require anyone attempting to access this content to authenticate as a valid user:
<Location /superldap>
    AuthType Basic
    AuthName "Restricted Files"
    AuthUserFile /etc/apache2/htpasswd
    Require valid-user
</Location>
Save and close the file when you are finished.
Restart Apache to implement all of the changes that we have made:
sudo service apache2 restartSource: How To Install and Configure OpenLDAP and phpLDAPadmin on an Ubuntu 14.04 Server | DigitalOcean
Owncloud/Nextcloud – Migration of database to LDAP users
1) In owncloud database change the table : oc_accounts
For the existing owncloud user in the column backend put: OC\User_LDAP\User_Proxy instead of OC\User\Database. For example:
UPDATE oc_accounts SET backend=’OCA\\User_LDAP\\User_Proxy’ WHERE user_id=’my_user’;
2) In table oc_ldap_user_mapping add the LDAP user. For example:
insert into oc_ldap_user_mapping (owncloud_name, ldap_dn, directory_uuid) values(‘my_user’,’cn=User_Name User_Surname,ou=users,dc=ris,dc=mk’,’user_uuid_from_LDAP’);
3) Delete the existing user from oc_users
delete from oc_users where uid=”my_user”;
How to Install and Configure OpenLDAP Server on Ubuntu 16.04 Step by Step
In this tutorial, we are going to take a look at installing and Configuring OpenLDAP server on Ubuntu 16.04 LTS. We will also install the phpLDAPadmin web-based management tool.
What is OpenLDAP
OpenLDAP is an open-source and fast directory server that provides network client with directory services. Client applications connect to OpenLDAP server using the Lightweight Directory Access Protocol (LDAP) to access organizational information stored on that server. Given the appropriate access, clients can search the directory, modify and manipulate records in the directory. OpenLDAP is efficient on both reading and modifying data in the directory.
OpenLDAP servers are most commonly used to provide centralized management of user accounts. For example, you can create an account in OpenLDAP and if it is connected with mail server, FTP server, Samba server, or any other server, you can use the account to log in to these servers without creating a new account for each server.
How to Install OpenLDAP Server on Ubuntu 16.04
Run the following command to install OpenLDAP server and the client command-line utilities from Ubuntu 16.04 package repository. slapd stands for the Stand-Alone LDAP Daemon.
sudo apt install slapd ldap-utils
You will be asked to set a password for the admin entry in the LDAP directory.
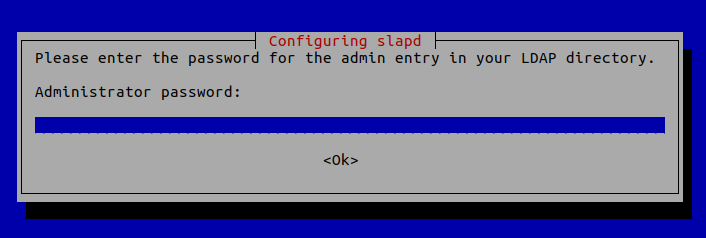
Once it’s done, slapd will be automatically started. You can check out its status with:
systemctl status slapd
Be default, it runs as the openldap user as is defined in /etc/default/slapd file.
Basic Post-Installation Configuration
The installation process installs the package without any configurations. To have our OpenLDAP server running properly, we need to do some basic post-installation configuration. Run the following command to start the configuration wizard.
sudo dpkg-reconfigure slapd
You will need to answer a series of questions. Answer these questions as follows:
Omit LDAP server configuration: NO.

DNS domain name: Enter your domain name like linuxbabe.com. You will need to set a correct A record for your domain name. You can also use a subdomain like directory.linuxbabe.com. This information is used to create the base DN (distinguished name) of the LDAP directory.
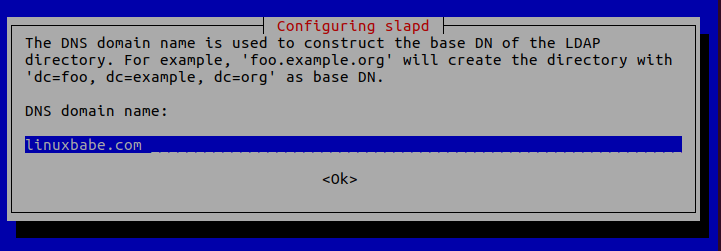
Organization name: Enter your organization name like LinuxBabe.

Administrator password: Enter the same password set during installation.

Database backend: MDB.
BDB (Berkeley Database) is slow and cumbersome. It is deprecated and support will be dropped in future OpenLDAP releases. HDB (Hierarchical Database) is a variant of the BDB backend and will also be deprecated.
MDB reads are 5-20x faster than BDB. Writes are 2-5x faster. And it consumes 1/4 as much RAM as BDB. So we choose MDB as the database backend.
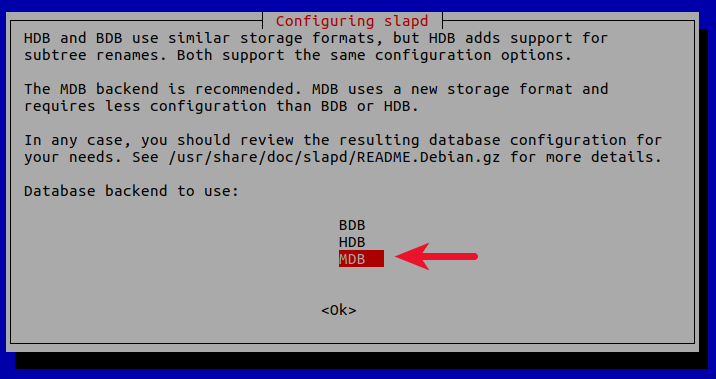
Do you want the database to be removed when slapd is purged? No.

Move old database? Yes.
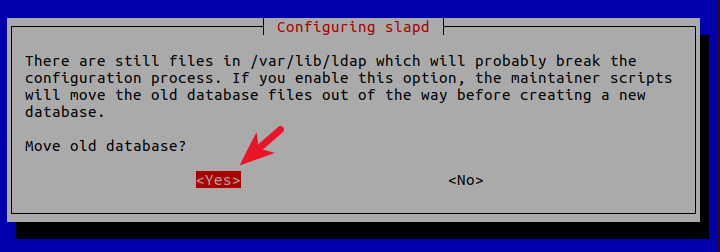
Allow LDAPv2 protocol? No. The latest version of LDAP is LDAP v.3, developed in 1997. LDAPv2 is obsolete.
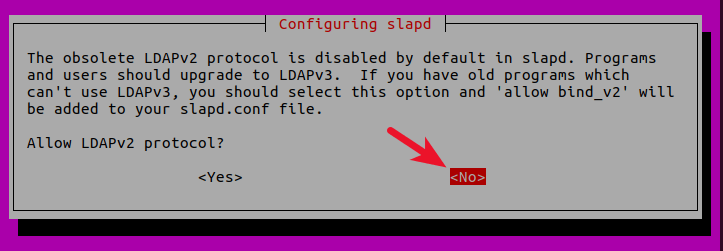
Now the process will reconfigure the OpenLDAP service according to your answers. Your OpenLDAP server is now ready to use.

Configuring the LDAP Clients
/etc/ldap/ldap.conf is the configuration file for all OpenLDAP clients. Open this file.
sudo nano /etc/ldap/ldap.conf
We need to specify two parameters: the base DN and the URI of our OpenLDAP server. Copy and paste the following text at the end of the file. Replace your-domain and com as appropriate.
BASE     dc=your-domain,dc=com
URI      ldap://localhost
The first line defines the base DN. It tells the client programs where to start their search in the directory. If you used a subdomain when configuring OpenLDAP server, then you need to add the subdomain here like so
BASE dc=subdomain,dc=your-domain,dc=com
The second line defines the URI of our OpenLDAP server. Since the LDAP server and client are on the same machine, we should set the URI to ldap://localhost.
Testing OpenLDAP Server
Now that OpenLDAP server is running and client configuration is done, run the following command to make test connections to the server.
ldapsearch -x
Output:
# extended LDIF
#
# LDAPv3
# base <dc=linuxbabe,dc=com> (default) with scope subtree
# filter: (objectclass=*)
# requesting: ALL
#

# linuxbabe.com
dn: dc=linuxbabe,dc=com
objectClass: top
objectClass: dcObject
objectClass: organization
o: LinuxBabe

# admin, linuxbabe.com
dn: cn=admin,dc=linuxbabe,dc=com
objectClass: simpleSecurityObject
objectClass: organizationalRole
cn: admin
description: LDAP administrator

# search result
search: 2
result: 0 Success

# numResponses: 3
# numEntries: 2
Result: 0 Success indicates that OpenLDAP server is working. If you get the following line, then it’s not working.
result: 32 No such object
Installing phpLDAPadmin
phpLDAPadmin is a web-based program for managing OpenLDAP server. The command-line utilities can be used to manage our OpenLDAP server, but for those who want an easy-to-use interface, you can install phpLDAPadmin.
Run the following command to install phpLDAPadmin from Ubuntu package repository.
sudo apt install phpldapadmin
If your Ubuntu server doesn’t have a web server running, then the above command will install the Apache web server as a dependency. If there’s already a web server such as Nginx, then Apache won’t be installed.
If you use Apache
The installation will put a configuration file phpldapadmin.conf under /etc/apache2/conf-enabled/ directory. Once the installation is done, you can access phpLDAPadmin web interface at
your-server-ip/phpldapadmin
or
your-domain.com/phpldapadmin
To enable HTTPS, you can obtain and install a free TLS certificate issued from Let’s Encrypt.
If you use Nginx
Nginx users will need to manually create a server block file for phpLDAPadmin.
sudo nano /etc/nginx/conf.d/phpldapadmin.conf
Copy the following text and paste it to the file. Replace ldap.your-domain.com with your preferred domain name.
server {
        listen 80;
        server_name ldap.your-domain.com;

        root /usr/share/phpldapadmin/htdocs;
        index index.php index.html index.htm;

        error_log /var/log/nginx/phpldapadmin.error;
        access_log /var/log/nginx/phpldapadmin.access;

        location ~ \.php$ {
            fastcgi_pass unix:/run/php/php7.0-fpm.sock;
            fastcgi_index index.php;
            fastcgi_param SCRIPT_FILENAME  $document_root/$fastcgi_script_name;
            include fastcgi_params;
        }
}
Save and close the file. Then text Nginx configurations.
sudo nginx -t
If the test is successful, reload Nginx for the changes to take effect.
sudo systemctl reload nginx
Now you can access phpLDAPadmin web interface at ldap.your-domain.com. To enable HTTPS, you can obtain and install a free TLS certificate issued from Let’s Encrypt.
Configuring phpLDAPadmin
We need to do some configurations just like we did with the command-line client. The phpLDAPadmin configuration file is at /etc/phpldapadmin/config.php .
sudo nano /etc/phpldapadmin/config.php
Since OpenLDAP and phpLDAPadmin are running on the same machine, so we will configure phpLDAPadmin to connect to localhost on the default LDAP port 389 without SSL/TLS encryption.
Line 293 specifies that phpLDAPadmin will connect to localhost.
$servers->setValue('server','host','127.0.0.1');
Line 296 is commented out by default, which means the standard port 389 will be used.
// $servers->setValue('server','port',389);
Line 335 is commented out by default, which means TLS encryption is not enabled.
// $servers->setValue('server','tls',false);
Then go to line 300.
$servers->setValue('server','base',array('dc=example,dc=com'));
Change it to:
$servers->setValue('server','base',array());
This will let phpLDAPadmin automatically detect the base DN of your OpenLDAP server. Next, you can disable anonymous login. Go to line 453.
// $servers->setValue('login','anon_bind',true);
By default, anonymous login is enabled. To disable it, you need to remove the comment character (the two slashes) and change true to false.
$servers->setValue('login','anon_bind',false);
You will probably want to disable template warnings because these warnings are annoying and unimportant. Go to line 161.
// $config->custom->appearance['hide_template_warning'] = false;
Remove the comment character and change false to true.
$config->custom->appearance['hide_template_warning'] = true;
Save and close the file.
Accessing phpLDAPadmin Web Interface
We can now test out the phpLDAPadmin tool with our web browser. When phpLDAPadmin first loads, it looks something like this.
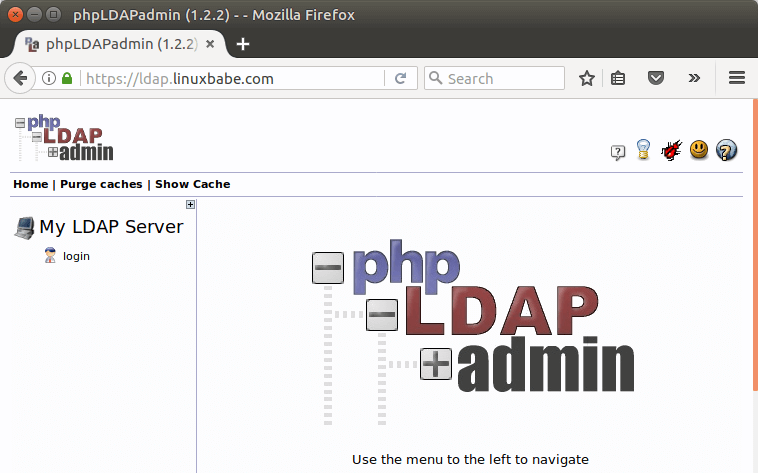
To log into our OpenLDAP server, click on the login link. You will see the login dialog box. The default login DN is cn=admin,dc=example,dc=com. You may need to change dc=example. In my case, I need to change the login DN to cn=admin,dc=linuxbabe,dc=com.
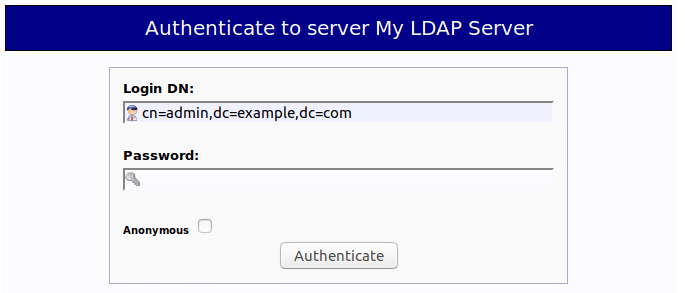
The password is the admin password you set during the configuration of OpenLDAP server. Once you log into phpLDAPadmin, you can manage this directory server.
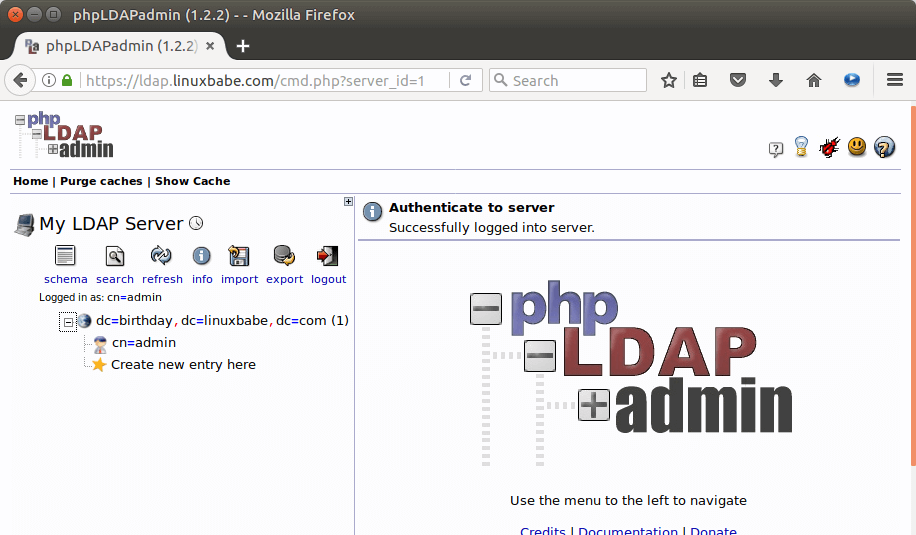
That’s it! I hope this tutorial helped you install and configure both OpenLDAP server and phpLDAPadmin on Ubuntu 16.04. In the next tutorial, we will see how to configure Ubuntu to authenticate user logins with OpenLDAP.
Source: How to Install and Configure OpenLDAP Server on Ubuntu 16.04 Step by Step
Mixed content (HTTP & HTTPS) while loading app (Nextcloud) · Issue #56 · strukturag/nextcloud-spreedme
RequestHeader set X-Forwarded-Proto ‘https’
Fixing “mixed content” errors when using a proxy
‘overwritecondaddr’ => ‘^555\\.555\\.555\\.555$’,
Source: Fixing “mixed content” errors when using a proxy – howto – Nextcloud community
Pigeonhole/ManageSieve/Troubleshooting – Dovecot Wiki
ManageSieve Troubleshooting
Like Dovecot itself, the ManageSieve service always logs a detailed error message if something goes wrong at the server (refer to Dovecot Logging for more details): the logs are the first place to look if you suspect something is wrong. To get additional debug messages in your log file, you should set mail_debug=yes in dovecot.conf (inside protocol sieve {...} if you want to enable this for ManageSieve only).
If the client commits protocol violations or sends invalid scripts, an error response is provided to the client which is not necessarily logged on the server. A good ManageSieve client presents such error messages to the user.
Keep in mind that the the ManageSieve service only provides the Sieve protocol, which may be somewhat confusing. This protocol can only be used to upload Sieve scripts and activate them for execution. Performing the steps below therefore only verifies that this functionality is working and not whether Sieve scripts are correctly being executed upon delivery. The execution of Sieve scripts is performed by the Dovecot Local Delivery Agent (LDA) or its LMTP service using the LDA Sieve plugin. If you have problems with Sieve script execution upon delivery, you are referred to the Sieve Troubleshooting page.
Manual Login and Script Upload
If you fail to login or upload scripts to the server, it is not necessarily caused by Dovecot or your configuration. It is often best to test your ManageSieve server manually first. This also provides you with the direct error messages from the server without intermission of your client. If you do not use TLS, you can connect using a simple telnet or netcat connection to the configured port (typically 4190 or 2000 for older setups). Otherwise you must use a TLS-capable text protocol client like gnutls-cli as described below. Upon connection, the server presents the initial greeting with its capabilities:
"IMPLEMENTATION" "dovecot"
"SASL" "PLAIN"
"SIEVE" "comparator-i;ascii-numeric fileinto reject vacation imapflags notify include envelope body relational regex subaddress copy"
"STARTTLS"
OK "Dovecot ready."
Note that the reported STARTTLS capability means that the server accepts TLS, but, since you are using telnet/netcat, you cannot use this (refer to Manual TLS Login below). The SASL capability lists the available SASL authentication mechanisms. If this list is empty and STARTTLS is available, it probably means that the server forces you to initiate TLS first (as dictated by ‘disable_plaintext_auth=yes‘ in dovecot.conf).
Now you need to log in. Although potentially multiple SASL mechanisms are available, only PLAIN is described here. Authentication is performed using the ManageSieve AUTHENTICATE command. This command typically looks as follows when the PLAIN mechanism is used:
AUTHENTICATE "PLAIN" "<base64-encoded credentials>"
The credentials are the base64-encoded version of the string "\0<username>\0<password" (in which \0 represents the ASCII NUL character). Generating this is cumbersome and a bit daunting for the novice user, so for convenience a simple Perl script is provided to generate the AUTHENTICATE command for you. It is available here and used as follows:
sieve-auth-command.pl <username> <password>
The command is written to stdout and you can paste this to your protocol session, e.g.:
AUTHENTICATE "PLAIN" "AHVzZXJuYW1lAHBhc3N3b3Jk"
OK "Logged in."
Now that you are logged in, you can upload a script. This is done using the PUTSCRIPT command. Its first argument is the name for the script and its second argument is a string literal. A string literal starts with a length specification '{<bytes>+}' followed by a newline. Thereafter the server expects <bytes> bytes of script data. The following uploads a trivial 6 byte long sieve script that keeps every message (6th byte is the newline character):
PUTSCRIPT "hutsefluts" {6+}
keep;
OK "Putscript completed."
Upon successful upload, you should find a file called hutsefluts.sieve in your sieve_dir directory. The script should also be listed by the server as follows when the LISTSCRIPTS command is issued:
LISTSCRIPTS
"hutsefluts"
OK "Listscripts completed."
You can check whether your script is uploaded correctly by downloading it using the GETSCRIPT command. This command accepts the name of the downloaded script as its only parameter:
GETSCRIPT "hutsefluts"
{6}
keep;
OK "Getscript completed."
To let the Sieve plugin use your newly uploaded script, you must activate it using the SETACTIVE command (only one script can be active at any time). The active script is indicated ACTIVE in the LISTSCRIPTS output, e.g.:
SETACTIVE "hutsefluts"
OK "Setactive completed."
LISTSCRIPTS
"hutsefluts" ACTIVE
OK "Listscripts completed.
The symbolic link configured with the sieve setting should now point to the activated script in the sieve_dir directory. If no script is active, this symbolic link is absent.
Manual TLS Login
When TLS needs to be used during manual testing, gnutls-cli provides the means to do so. This command-line utility is part of the GNUTLS distribution and on most systems this should be easy to install. It is used to connect to ManageSieve as follows:
gnutls-cli --starttls -p <port> <host>
This starts the client in plain text mode first. As shown in the previous section, the server presents a greeting with all capabilities of the server. If STARTTLS is listed, you can issue the STARTTLS command as follows:
STARTTLS
OK "Begin TLS negotiation now."
If an OK response is given by the server you can press Ctrl-D to make gnutls-cli start the TLS negotiation. Upon pressing Ctrl-D, gnutls-cli will show information on the negotiated TLS session and finally the first response of the server is shown:
"IMPLEMENTATION" "dovecot"
"SASL" "PLAIN"
"SIEVE" "comparator-i;ascii-numeric fileinto reject vacation imapflags notify include envelope body relational regex subaddress copy"
OK "TLS negotiation successful."
Hereafter, you can continue to authenticate and upload a script as described in the previous section.
Client Problems
If manual efforts to upload a script are successful, but your client still fails, you need to obtain a view on what the client communicates with the server. A common method is to sniff the client protocol session using a tool like ngrep. However, this will not work when TLS is active. If the problem is not specific to TLS, you are advised to temporarily turn off TLS and sniff the plain text protocol. If TLS is part of the issue, you can use Dovecot’s rawlog facility to see what is going on if the client is logged in. If the authentication is the problem, there is no real nice way to obtain a transcript of the protocol. One way is to run managesieve from inetd, wrapping it into a script that writes the protocol messages somewhere (FIXME: This needs some checking and explanation). Alternatively, if possible, the client can be altered to write its protocol messages somewhere.
Refer to the ManageSieve Clients page for information on known client problems.
Known Server Issues and Protocol Deviations
- The ANONYMOUS authentication mechanism is currently not supported and explicitly denied.
NOTE: If you add new issues to this list, notify the author or send an e-mail to the Dovecot mailing list. In any case, you must make sure that the issue is properly explained and that the author can contact you for more information.
Source: Pigeonhole/ManageSieve/Troubleshooting – Dovecot Wiki
postfix mta – How to move spam to spam folder?
How to Setup SpamAssassin With Postfix On Ubuntu 16.04
By Francis Ndungu, Alibaba Cloud Tech Share Author. Tech Share is Alibaba Cloud’s incentive program to encourage the sharing of technical knowledge and best practices within the cloud community.
Unsolicited emails are very annoying because they take up your disk space and waste your time every time you try to weed them out from your inbox . Luckily, SpamAssassin is one of the best Open-source tools for filtering and blocking spam.
Designed in Perl, Apache SpamAssassin uses different approaches to identify and block spam. These include: online blacklist database lookup, checksum based filters, Bayesian algorithm and third party programs.
The highly configurable email filter utility is rule-based and to function effectively, it uses regular expressions to determine if an email contains Spam.
If you have already setup an email server with Postfix, SpamAssassin is a good tool for keeping your inbox free from unwanted emails from hackers and telemarketers.
This is a comprehensive guide that walks you through the process of securing your Ubuntu 16.04 Postfix email server with SpamAssassin.
Prerequisites
- An Alibaba Cloud account.
- An Alibaba Cloud ECS instance running Ubuntu 16.04 Linux distribution.
- Postfix Email Server. See our guide for setting up an email server with Postfix, Dovecot and SquirrelMail on Ubuntu 16.04 Alibaba ECS
- A non-root user that can perform sudo tasks on your server.
Step 1: Installing and Configuring SpamAssassin
SpamAssassin is available on the Ubuntu software repository. So before we install it, let’s first update the package information index:
$ sudo apt-get updateThen we can install SpamAssassin with the command below:
$ sudo apt-get install spamassassin spamcStep 2: Creating a User for SpamAssassin
Next, we need to create a dedicated user for SpamAssassin:
$ sudo adduser spamd --disabled-loginStep 3: Configuring SpamAssassin
After installation, we are going to edit the SpamAssassin configuration file. To do this, open the file /etc/default/spamassassin using nano text editor:
$ sudo nano /etc/default/spamassassin To enable SpamAssassin on the system, find the parameter ENABLED and change its value from 0 to 1.
ENABLED =1Next, we are going to create a SAHOME variable and direct it to SpamAssassin home directory:
SAHOME="/var/log/spamassassin/"Then, locate the below line on the same file:
OPTIONS="--create-prefs --max-children 5 --helper-home-dir"Change it to:
OPTIONS="--create-prefs --max-children 5 --username spamd --helper-home-dir /home/spamd/ -s /home/spamd/spamd.log"To pick the latest updates from SpamAssassin, we are going to change the CRON value from 0 to 1:
CRON =1When you are done editing the file, press CTRL+X, Y and Enter to save the changes.
Step 4: Adding Rules to SpamAssassin
We can now start adding rules to SpamAssassin. Open the file /etc/spamassassin/local.cf
Using nano text editor:
$ sudo nano /etc/spamassassin/local.cfMake sure the below parameters and values are set on the file:
rewrite_header Subject [***** SPAM _SCORE_ *****]
required_score          5.0
use_bayes               1
bayes_auto_learn        1
The above parameters tell SpamAssassin to rewrite the subject of each email that surpasses the threshold score of 5.0. When set to 1, use_bayes instructs SpamAssassin to use the Bayes algorithm to classify emails as either ham or spam using a mathematical formula based on probability.
The parameter bayes_auto_learn is set to 1 to enable the auto-learning mechanism. Save and close the file by pressing CTRL+X, Y and Enter.
Step 5: Configuring Postfix to Use SpamAssassin as an Email Filter
Next, edit the Postfix master configuration file and instruct it to route emails to SpamAssassin for filtering:
$ sudo nano /etc/postfix/master.cfFind the line:
smtp inet n - - - - smtpdThen, add the following information below it:
   -o content_filter=spamassassin
spamassassin unix -     n       n       -       -       pipe
    user=spamd argv=/usr/bin/spamc -f -e
    /usr/sbin/sendmail -oi -f ${sender} ${recipient}
Note: Please put several spaces before "-o content_filter=spamassassin" .
Save and close the file by pressing CTRL+X, Y and Enter. Then, restart both Postfix and SpamAssassin.
$ sudo service postfix restart
$ sudo service spamassassin restart
Step 6: Testing SpamAssassin Email Filter
To check whether SpamAssassin is working, send an email to your server (e.g. info@example.com) and add include the content below on the email body to trigger the spam check:
XJS*C4JDBQADN1.NSBN3*2IDNEN*GTUBE-STANDARD-ANTI-UBE-TEST-EMAIL*C.34XOpen your email client (in this case, we are using SquirrelMail) and check your inbox. Your email should now be marked as spam and the subject should be re-written to indicate the same.
Conclusion
We have gone through the steps of securing your Postfix email server with SpamAssassin on Ubuntu 16.04 server hosted on Alibaba Cloud. We believe you are going to implement the steps in this article to safeguard your email servers from unwanted emails.
Source: How to Setup SpamAssassin With Postfix On Ubuntu 16.04 – Alibaba Cloud Community
(MMV) Ethernet Shield W5100 connection issue
– The W5100 board is a cheap version from china
– The resistor network immediately behind the Rj45 socket has the value 511 on it (its small get a magnifying glass – it is a black rectangle with 8 connections like a mini IC)
Basically it would appear this component is not correct. I should be 510 or close to this value. Because it is 10 times over spec it is much more sensitive to switches which are sensitive to the voltage on the network.
There are 3 possible fixes:
– Change to a switch that is not as sensitive. There is some discussion on the board about this.
– Change the resistor network to something close to the 49.9R that the arduino schematics suggest it should be. I have only seen one post where someone has done this and gotten it to work. This is fiddly due to the components being so small and surface mount … you would have to be keen to do this.
– Buy a more reputable brand wiznet board or switch to the even cheaper ENC28J60 boards which dont seem to have the same problems.
erroneous placement. A faulty connection occurs in particular at the when used as a Web client.
The incorrect line termination is apparent in reflections that prevent the connection.
I’ve tried everything, 4 different switches, short lines, long lines … the result was not satisfactory.
Short and sweet – my solution was quite simple:
1. Check to see if the SMD resistors are labeled 511 – see above (important)
2. Installation of two additional resistors 120 Ohm on the circuit side (Bottom Layer),
immediately in connection to the Ethernet jack. One between 1-2, and the other between 3-6.
The body of the resistors should point downwards so that no short circuit with the USB socket of the underlying UNO occurs.
The “1” of the socket is the way to the left (shorter distance to the edge) when the Ethernet socket facing upward, of course, on the ladder page (Bottom Layer) seen.The other terminals follow slightly offset.
After installation, I never had problems again …
I hope my Google English was understandable enough
ESP8266 NodeMCU HTTPS Secured GET Request
Octave function reference: butter filter
 sf = 800; sf2 = sf/2;
 data=[[1;zeros(sf-1,1)],sinetone(25,sf,1,1),sinetone(50,sf,1,1),sinetone(100,sf,1,1)];
 [b,a]=butter ( 1, 50 / sf2 );
 filtered = filter(b,a,data);

 clf
 subplot ( columns ( filtered ), 1, 1)
 plot(filtered(:,1),";Impulse response;")
 subplot ( columns ( filtered ), 1, 2 )
 plot(filtered(:,2),";25Hz response;")
 subplot ( columns ( filtered ), 1, 3 )
 plot(filtered(:,3),";50Hz response;")
 subplot ( columns ( filtered ), 1, 4 )
 plot(filtered(:,4),";100Hz response;")
Source: Function Reference: butter