FAI is a tool for unattended mass deployment of Linux. It’s a system to install and configure Linux systems and software packages on computers as well as virtual machines, from small labs to large-scale infrastructures like clusters and virtual environments. You can take one or more virgin PC’s, turn on the power, and after a few minutes, the systems are installed, and completely configured to your exact needs, without any interaction necessary.
linux
PHP issue “Cannot send session cookie” – Stack Overflow
-
How do i check for BOM? If this is causing the issue how do i get rid of it? – Kaya Suleyman Mar 12 ’13 at 16:50
-
-
-
Microsoft Expression. I’m new to this stuff, how do i check for BOM, what does it look like and how do i get my code working again? – Kaya Suleyman Mar 12 ’13 at 16:54
- Download Notepad++ and open the file there, delete all fancy characters before the
<?PHP - Make sure there is no whitespace character like ” ” or tab or linebreak before the
<?PHP.- In Notepad++ click
Encodingand thenUTF-8 without BOMto convert the file to UTF-8 without BOM, then save it.
- In Notepad++ click
- Also add
ob_start();beforesession_start();to be safe.
- Download Notepad++ and open the file there, delete all fancy characters before the
Source: PHP issue “Cannot send session cookie” – Stack Overflow
Set up a LAMP server with Docker – Linux Hint
Set up a LAMP server with Docker
Requirements:
In order to follow this article, you must have Docker installed on your computer. LinuxHint has a lot of articles that you can follow to install Docker on your desired Linux distribution if you don’t have it installed already. So, be sure to check LinuxHint.com in case you’re having trouble installing Docker.
Installing Docker Compose:
You can download Docker Compose binary file very easily with the following command:
docker-compose-$(uname -s)–$(uname -m)“ -o /usr/local/bin/docker-compose
NOTE: curl may not be installed on your Linux distribution. If that’s the case, you can install curl with the following command:
Ubuntu/Debian/Linux Mint:
CentOS/RHEL/Fedora:
Once docker-compose binary file is downloaded, run the following command:
Now, check whether docker-compose command is working as follows:
It should print the version information as shown in the screenshot below.
Setting Up Docker Compose for the Project:
Now, create a project directory ~/docker/lamp (let’s say) and a html/ directory inside the project directory for keeping the website files (i.e. php, html, css, js etc.) as follows:
Now, navigate to the project directory ~/docker/lamp as follows:
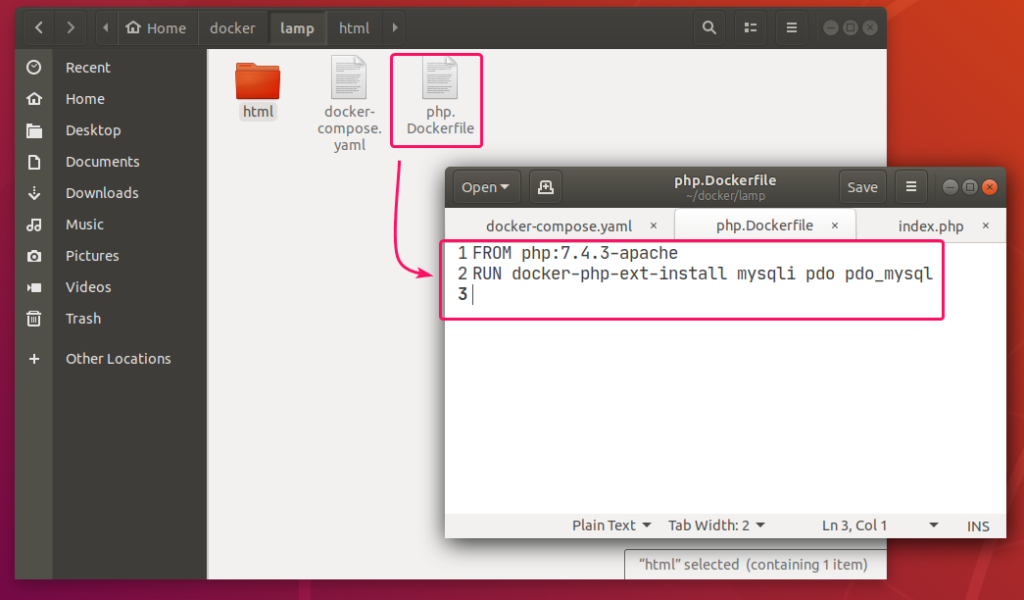
Create a php.Dockerfile in the project directory ~/docker/lamp. This is a Dockerfile which enables mysqli and PDO php extensions in the php:7.4.3-apache image from Docker Hub and builds a custom Docker image from it.
The contents of the php.Dockerfile is given below.
RUN
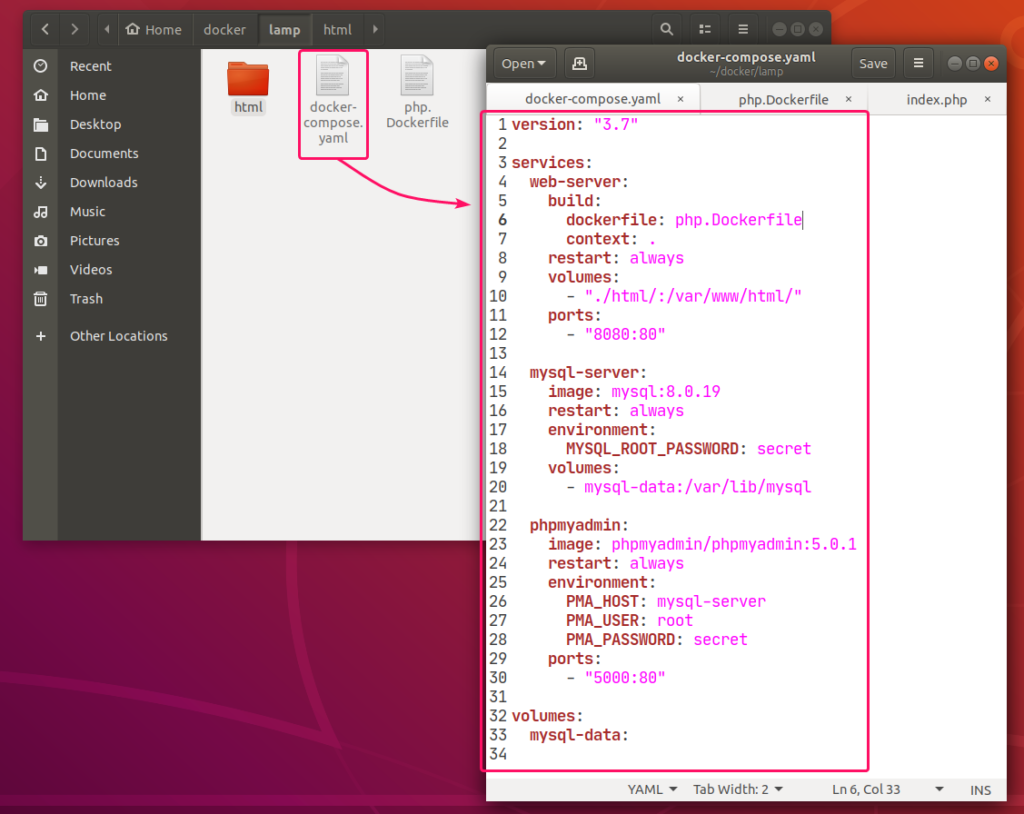
Now, create a docker-compose.yaml file in the project directory ~/docker/lamp and type in the following lines in the docker-compose.yaml file.
services:
web-server:
build:
dockerfile: php.Dockerfile
context: .
restart: always
volumes:
– “./html/:/var/www/html/”
ports:
– “8080:80”
mysql-server:
image: mysql:8.0.19
restart: always
environment:
MYSQL_ROOT_PASSWORD: secret
volumes:
– mysql-data:/var/lib/mysql
phpmyadmin:
image: phpmyadmin/phpmyadmin:5.0.1
restart: always
environment:
PMA_HOST: mysql-server
PMA_USER: root
PMA_PASSWORD: secret
ports:
– “5000:80”
volumes:
mysql-data:
The docker-compose.yaml file should look as follows.
Here, I have created 3 services web-server, mysql-server and phpmyadmin.
web-server service will run a custom-built Docker image as defined in php.Dockerfile.
mysql-server service will run the mysql:8.0.19 image (from DockerHub) in a Docker container.
phpmyadmin service will run the phpmyadmin/phpmyadmin:5.0.1 image (from DockerHub) in another Docker container.
In mysql-server service, the MYSQL_ROOT_PASSWORD environment variable is used to set the root password of MySQL.
In phpmyadmin service, the PMA_HOST, PMA_USER, PMA_PASSWORD environment variables are used to set the MySQL hostname, username and password respectively that phpMyAdmin will use to connect to the MySQL database server running as mysql-server service.
In mysql-server service, all the contents of the /var/lib/mysql directory will be saved permanently in the mysql-data volume.’
In the web-server service, the container port 80 (right) is mapped to the Docker host port 8080 (left).’
In the phpmyadmin service, the container port 5000 (right) is mapped to the Docker host port 80 (left).
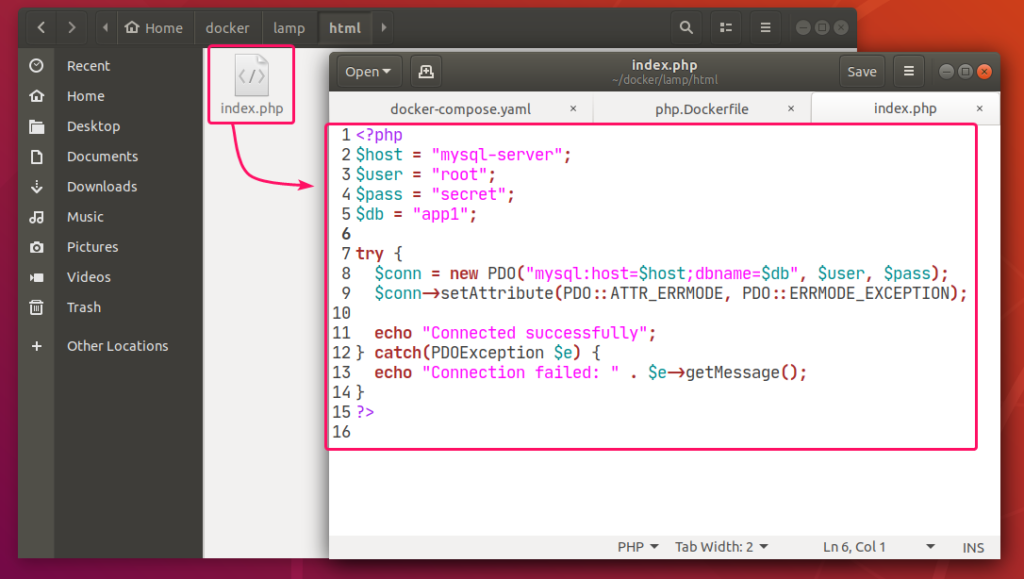
Also, create a index.php file in the html/ directory for testing the LAMP server.
The contents of the index.php file in my case,
$host = “mysql-server”;
$user = “root”;
$pass = “secret”;
$db = “app1”;
try {
$conn = new PDO(“mysql:host=$host;dbname=$db“, $user, $pass);
$conn->setAttribute(PDO::ATTR_ERRMODE, PDO::ERRMODE_EXCEPTION);
echo “Connected successfully”;
} catch(PDOException $e) {
echo “Connection failed: “ . $e->getMessage();
}
?>
Finally, the project directory ~/docker/lamp should look as follows:
Starting the LAMP Server:
Now, to start the web-server, mysql-server and phpmyadmin services, run the following command:
All the services should start in the background.
To see how the ports are mapped, run the following command:
As you can see, for the web-server service, the Docker host port 8080 is mapped to the container TCP port 80.
For the phpmyadmin service, the Docker host port 5000 is mapped to the container TCP port 80.
Finding the IP Address of Docker Host:
If you want to access the LAMP server from other computers on your network, you must know the IP address of your Docker host.
To find the IP address of your Docker host, run the following command:
In my case, the IP address of my Docker host 192.168.20.160. It will be different for you. So, make sure to replace it with yours from now on.
Testing the LAMP Server:
Now, you can access phpMyAdmin 5 and the web server from a web browser.
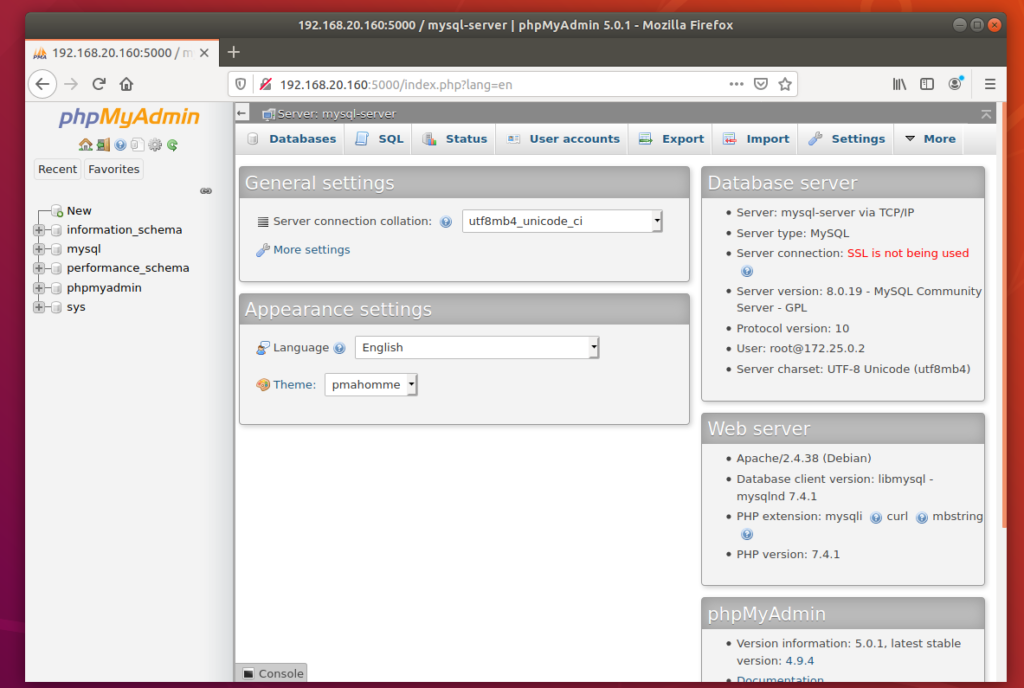
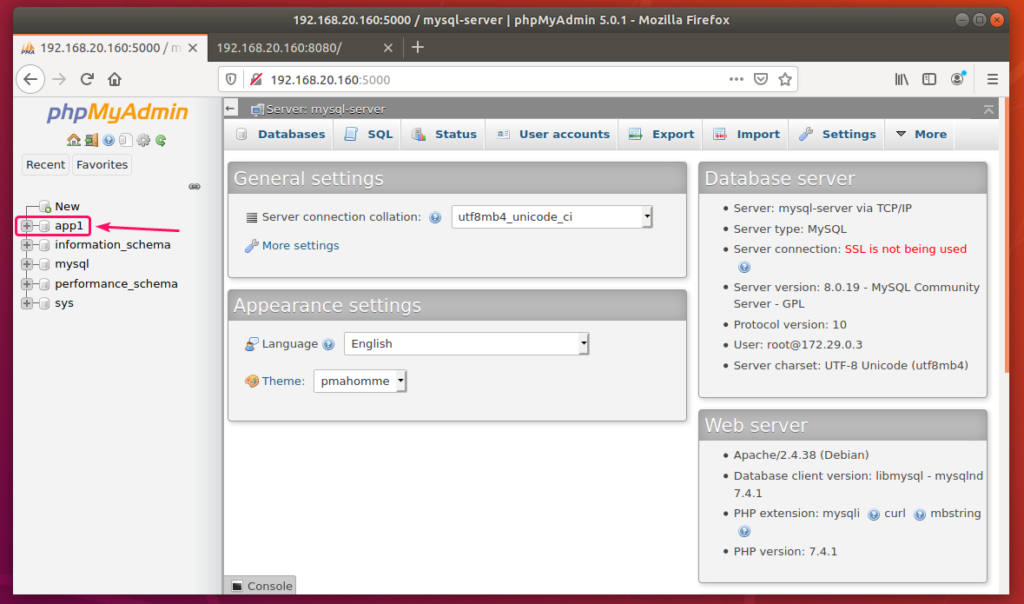
To access phpMyAdmin 5, open a web browser and visit http://localhost:5000 from your Docker host or visit http://192.168.20.160:5000 from any other computer on the network.
phpMyAdmin 5 should load in your web browser.
Now, create an app1 MySQL database from phpMyAdmin.
Now, visit http://localhost:8080 from your Docker host or http://192.168.20.160:8080 from any other computer on your network to access the web server.
You should see the Connected successfully message. It means, the PHP is working and the MySQL database server is accessible from the web-server container. So, technically, the LAMP server is fully functional.
Stopping the LAMP Server:
To stop the web-server, mysql-server and phpmyadmin services, run the following command:
The web-server, mysql-server and phpmyadmin services should be stopped.
Cleaning Up MySQL Server Data:
If you want to remove all the MySQL database data and settings, you must remove the mysql-data volume.
You can find the actual name of the volume with the following command:
You can remove the volume lamp_mysql-data with the following command:
So, that’s how you set up a LAMP server with Docker. Thanks for reading this article.
As you can see, the volume to remove is lamp_mysql-data.
18.04 – Blueman Protocol not available
Today my bluetooth headset stopped working. I haven’t modified anything recently (although a few days ago I was trying to get a bluetooth headset to automatically connect in a2dp mode, which involved installing blueman and re-pairing with it, but I’ve connected and rebooted several times since making that change and everything was working).
Now when I try to connect the headset I get:
Connection Failed: blueman.bluez.errors.DBusFailedError: Protocol Not available
Based on a few things from here (Bluetooth – Connection Failed: blueman.bluez.errors.DBusFailedError: Protocol Not available) and other Internet searches, I’ve tried:
$ sudo apt-get install pulseaudio-module-bluetooth
$ pactl load-module module-bluetooth-discover
And I’ve tried reinstalling things:
$ sudo apt-get --purge --reinstall install bluetooth bluez blueman pulseaudio pulseaudio-module-bluetooth
$ sudo /etc/init.d/networking restart
    [ ok ] Restarting networking (via systemctl): networking.service.
$ sudo /etc/init.d/bluetooth restart
    [ ok ] Restarting bluetooth (via systemctl): bluetooth.service.
And of course rebooting, but nothing seems to help, and I can’t figure out what protocol it’s talking about, since I can see the headset and pair with it, but not make an audio connection.
I’m running Ubuntu 18.04.1. Some other details:
$ dpkg -l | grep blue
    blueman                            2.0.5-1ubuntu1
    bluetooth                          5.48-0ubuntu3.1
    bluez                              5.48-0ubuntu3.1
    bluez-cups                         5.48-0ubuntu3.1
    bluez-obexd                        5.48-0ubuntu3.1
    gir1.2-gnomebluetooth-1.0:amd64    3.28.0-2ubuntu0.1
    gnome-bluetooth                    3.28.0-2ubuntu0.1
    indicator-bluetooth                0.0.6+17.10.20170605-0ubuntu3
    libbluetooth3:amd64                5.48-0ubuntu3.1
    libgnome-bluetooth13:amd64         3.28.0-2ubuntu0.1
    pulseaudio-module-bluetooth        1:11.1-1ubuntu7.1

$ sudo service bluetooth status
* bluetooth.service - Bluetooth service    Loaded: loaded (/lib/systemd/system/bluetooth.service; enabled; vendor preset    Active: active (running) since Mon 2019-02-04 14:36:47 PST; 1min 13s ago
     Docs: man:bluetoothd(8)  Main PID: 6912 (bluetoothd)    Status: "Running"
    Tasks: 1 (limit: 4915)    CGroup: /system.slice/bluetooth.service
           └─6912 /usr/lib/bluetooth/bluetoothd

Feb 04 14:36:47 AVB systemd[1]: Starting Bluetooth service... Feb 04 14:36:47 AVB bluetoothd[6912]: Bluetooth daemon 5.48 Feb 04 14:36:47 AVB systemd[1]: Started Bluetooth service. Feb 04 14:36:47 AVB bluetoothd[6912]: Starting SDP server Feb 04 14:36:47 AVB bluetoothd[6912]: Bluetooth management interface 1.14 initialized

$ dmesg | grep Bluetooth
    [    5.197632] Bluetooth: Core ver 2.22
    [    5.197654] Bluetooth: HCI device and connection manager initialized
    [    5.197657] Bluetooth: HCI socket layer initialized
    [    5.197660] Bluetooth: L2CAP socket layer initialized
    [    5.197664] Bluetooth: SCO socket layer initialized
    [    5.349217] Bluetooth: hci0: Firmware revision 0.1 build 185 week 49 2017
    [    5.492623] Bluetooth: BNEP (Ethernet Emulation) ver 1.3
    [    5.492625] Bluetooth: BNEP filters: protocol multicast
    [    5.492628] Bluetooth: BNEP socket layer initialized
    [   16.972106] Bluetooth: RFCOMM TTY layer initialized
    [   16.972113] Bluetooth: RFCOMM socket layer initialized
    [   16.972117] Bluetooth: RFCOMM ver 1.11
    [   84.672241] Bluetooth: hci0: last event is not cmd complete (0x0f)

$ hciconfig
    hci0:    Type: Primary  Bus: USB
    BD Address: 74:70:FD:B6:73:0C  ACL MTU: 1021:4  SCO MTU: 96:6
    UP RUNNING PSCAN ISCAN INQUIRY
    RX bytes:18753 acl:61 sco:0 events:738 errors:0
    TX bytes:14257 acl:60 sco:0 commands:267 errors:0

$ lspci -knn | grep Net -A3
    02:00.0 Network controller [0280]: Intel Corporation Wireless 8265 / 8275 [8086:24fd] (rev 78)
    Subsystem: Intel Corporation Dual Band Wireless-AC 8265 [8086:0010]
    Kernel driver in use: iwlwifi
    Kernel modules: iwlwifi

$ lsusb
    Bus 002 Device 001: ID 1d6b:0003 Linux Foundation 3.0 root hub
    Bus 001 Device 003: ID 8087:0a2b Intel Corp.
    Bus 001 Device 002: ID 13d3:5a07 IMC Networks
    Bus 001 Device 001: ID 1d6b:0002 Linux Foundation 2.0 root hub

$ ps aux | grep blue
    me        2032  0.0  0.6 694048 54240 tty2     Sl+  14:19   0:01 /usr/bin/python3 /usr/bin/blueman-applet
    me        2091  0.0  0.0  82728  6832 ?        Ss   14:19   0:00 /usr/lib/bluetooth/obexd
    root      6912  0.0  0.0  37992  6096 ?        Ss   14:36   0:02 /usr/lib/bluetooth/bluetoothd
Any suggestions on where to look next? Thanks.
-
3I might have solved this myself. “sudo apt install pulseaudio-module-bluetooth” and then restarting pulse audio (“pulseaudio -k” “pulseaudio –start”) and the error goes away. I still have no idea why this is necessary or what the error originally meant. – M. P. Feb 5 ’19 at 17:53
For me just reloading the module by executing:
pactl unload-module module-bluetooth-discover
pactl load-module module-bluetooth-discover
helped solving the issue.
-
4Works with 19.04 too. The module must be unloaded first
pactl unload-module module-bluetooth-discover. – Vladimir Botka Oct 4 ’19 at 14:59 -
This is the only thing that worked for me with my Bose 700 headphones using blueman on cinnamon. Didn’t even have to restart bluetooth service and didn’t have to run the commands above as root. – Plasty Grove Jul 28 at 2:56
Just delete the device on bluetooth manager and pair again. Works for me.
Random Musings: Ubuntu 14.04 and the Canon LBP6020B laser printer
How To Install MySQL on Ubuntu 18.04
Step 3 — (Optional) Adjusting User Authentication and Privileges
In Ubuntu systems running MySQL 5.7 (and later versions), the root MySQL user is set to authenticate using the auth_socket plugin by default rather than with a password. This allows for some greater security and usability in many cases, but it can also complicate things when you need to allow an external program (e.g., phpMyAdmin) to access the user.
In order to use a password to connect to MySQL as root, you will need to switch its authentication method from auth_socket to mysql_native_password. To do this, open up the MySQL prompt from your terminal:
- sudo mysql
Next, check which authentication method each of your MySQL user accounts use with the following command:
- SELECT user,authentication_string,plugin,host FROM mysql.user;
+------------------+-------------------------------------------+-----------------------+-----------+
| user             | authentication_string                     | plugin                | host      |
+------------------+-------------------------------------------+-----------------------+-----------+
| root             |                                           | auth_socket           | localhost |
| mysql.session    | *THISISNOTAVALIDPASSWORDTHATCANBEUSEDHERE | mysql_native_password | localhost |
| mysql.sys        | *THISISNOTAVALIDPASSWORDTHATCANBEUSEDHERE | mysql_native_password | localhost |
| debian-sys-maint | *CC744277A401A7D25BE1CA89AFF17BF607F876FF | mysql_native_password | localhost |
+------------------+-------------------------------------------+-----------------------+-----------+
4 rows in set (0.00 sec)
In this example, you can see that the root user does in fact authenticate using the auth_socket plugin. To configure the root account to authenticate with a password, run the following ALTER USER command. Be sure to change password to a strong password of your choosing, and note that this command will change the root password you set in Step 2:
- ALTER USER ‘root’@’localhost’ IDENTIFIED WITH mysql_native_password BY ‘password‘;
Then, run FLUSH PRIVILEGES which tells the server to reload the grant tables and put your new changes into effect:
- FLUSH PRIVILEGES;
Check the authentication methods employed by each of your users again to confirm that root no longer authenticates using the auth_socket plugin:
- SELECT user,authentication_string,plugin,host FROM mysql.user;
+------------------+-------------------------------------------+-----------------------+-----------+
| user             | authentication_string                     | plugin                | host      |
+------------------+-------------------------------------------+-----------------------+-----------+
| root             | *3636DACC8616D997782ADD0839F92C1571D6D78F | mysql_native_password | localhost |
| mysql.session    | *THISISNOTAVALIDPASSWORDTHATCANBEUSEDHERE | mysql_native_password | localhost |
| mysql.sys        | *THISISNOTAVALIDPASSWORDTHATCANBEUSEDHERE | mysql_native_password | localhost |
| debian-sys-maint | *CC744277A401A7D25BE1CA89AFF17BF607F876FF | mysql_native_password | localhost |
+------------------+-------------------------------------------+-----------------------+-----------+
4 rows in set (0.00 sec)
You can see in this example output that the root MySQL user now authenticates using a password. Once you confirm this on your own server, you can exit the MySQL shell:
- exit
Alternatively, some may find that it better suits their workflow to connect to MySQL with a dedicated user. To create such a user, open up the MySQL shell once again:
- sudo mysql
Note: If you have password authentication enabled for root, as described in the preceding paragraphs, you will need to use a different command to access the MySQL shell. The following will run your MySQL client with regular user privileges, and you will only gain administrator privileges within the database by authenticating:
- mysql -u root -p
From there, create a new user and give it a strong password:
- CREATE USER ‘sammy‘@’localhost’ IDENTIFIED BY ‘password‘;
Then, grant your new user the appropriate privileges. For example, you could grant the user privileges to all tables within the database, as well as the power to add, change, and remove user privileges, with this command:
- GRANT ALL PRIVILEGES ON *.* TO ‘sammy‘@’localhost’ WITH GRANT OPTION;
Note that, at this point, you do not need to run the FLUSH PRIVILEGES command again. This command is only needed when you modify the grant tables using statements like INSERT, UPDATE, or DELETE. Because you created a new user, instead of modifying an existing one, FLUSH PRIVILEGES is unnecessary here.
Following this, exit the MySQL shell:
- exit
Finally, let’s test the MySQL installation.
16.04 – How to edit a .odt file from the terminal?
The closest thing to what you’re looking for is wordgrinder, a terminal-based word processor.
You can install it executing:
sudo apt install wordgrinder
Here is the official website of the project: https://cowlark.com/wordgrinder/
This is the Github repo: https://github.com/davidgiven/wordgrinder
And a quick Survival Guide: https://gist.github.com/davidgiven/1aba97e96a9b8f9b573b
If you check the Importing and Exporting sections you will find:
Importing
Imports basic content from ODT files. OpenDocument is complicated and hard to parse but WordGrinder will do its best to apply appropriate styles. Unsupported features are ignored.
Exporting
This produces an ODT file which can be read by LibreOffice and a variety of other major word processors. Character and paragraph styles are exported and are mapped to OpenDocument styles called P, H1, H2 etc.
Source: 16.04 – How to edit a .odt file from the terminal? – Ask Ubuntu
NFS – Dovecot Wiki
NFS
NFS is commonly used in one of these ways:
- Dovecot is run in a single computer.
- Dovecot is run in multiple computers, users are redirected more or less randomly to different computers.
- Dovecot is run in multiple computers, each user is assigned a specific computer which is used whenever possible.
The only way to reliably implement the 2nd setup is with the director service.
Dovecot configuration
Single Dovecot server setup or Dovecot director cluster setup:
mmap_disable = yes
#dotlock_use_excl = no # only needed with NFSv2, NFSv3+ supports O_EXCL and it's faster
mail_fsync = always
mail_nfs_storage = no
mail_nfs_index = no
Multi-server setup that tries to flush NFS caches (increases NFS operations, and isn’t fully reliable), try not to use this:
mmap_disable = yes
#dotlock_use_excl = no # only needed with NFSv2, NFSv3+ supports O_EXCL and it's faster
mail_fsync = always
# These settings slow things down and don't fully work, use director proxy instead:
mail_nfs_storage = yes
mail_nfs_index = yes
Common issues
Clock synchronization
Run ntpd in the NFS server and all the NFS clients to make sure their clocks are synchronized. If the clocks are more than one second apart from each others and multiple computers access the same mailbox simultaneously, you may get errors.
NFS caching problems
NFS caching is a big problem when multiple computers are accessing the same mailbox simultaneously. The best fix for this is to prevent it from happening. Configure your setup so that a user always gets redirected to the same server (unless it’s down). This also means that mail deliveries must be done by the same server, or alternatively it shouldn’t update index files.
Dovecot flushes NFS caches when needed if you set mail_nfs_storage=yes, but unfortunately this doesn’t work 100%, so you can get random errors.
Disabling NFS attribute cache helps a lot in getting rid of caching related errors, but this makes the performance MUCH worse and increases the load on NFS server. This can usually be done by giving actimeo=0 or noac mount option.
Index files
If you keep the index files stored on NFS, you’ll need to set mmap_disable=yes. If you’re not running lockd you’ll have to set lock_method=dotlock, but this degrades performance. Note that some NFS installations have problems with lockd. If you’re beginning to get all kinds of locking related errors, try if the problems go away with dotlocking.
With mbox/Maildir formats (but not dbox!) it’s also possible to store index files on local disk instead of on NFS. If the user gets redirected to different servers, the local indexes are automatically created/updated. If the user is (nearly) always redirected to the same server this should be fine and you would likely get higher performance than indexes stored on NFS, but if the server changes it can be slow to recreate the index/cache files.
Source: NFS – Dovecot Wiki
How to preserve old software – with snaps
Configuring e-Mail Notifications in Nagios Core…
Now that you have installed the required components to enabled Nagios to send mail notifications, you will need to download two configurations files from your Nagios Server (using FileZilla and edit them using Notepad++ – if you need to understand how to do this, please review part 2 of my installing Nagios for Exchange series).
These files are:
- commands.cfg
- contacts.cfg
Which are located in:
/usr/local/nagios/etc/objects
Open the commands.cfg file in Notepad++ and modify the following two lines:
# 'notify-host-by-email' command definition
define command{
    command_name    notify-host-by-email
    command_line    /usr/bin/printf "%b" "***** Nagios *****\n\nNotification Type: $NOTIFICATIONTYPE$\nHost: $HOSTNAME$\nState: $HOSTSTATE$\nAddress: $HOSTADDRESS$\nInfo: $HOSTOUTPUT$\n\nDate/Time: $LONGDATETIME$\n" | /bin/mailx -s "** $NOTIFICATIONTYPE$ Host Alert: $HOSTNAME$ is $HOSTSTATE$ **" $CONTACTEMAIL$
    }

# 'notify-service-by-email' command definition
define command{
    command_name    notify-service-by-email
    command_line    /usr/bin/printf "%b" "***** Nagios *****\n\nNotification Type: $NOTIFICATIONTYPE$\n\nService: $SERVICEDESC$\nHost: $HOSTALIAS$\nAddress: $HOSTADDRESS$\nState: $SERVICESTATE$\n\nDate/Time: $LONGDATETIME$\n\nAdditional Info:\n\n$SERVICEOUTPUT$\n" | /bin/mailx -s "** $NOTIFICATIONTYPE$ Service Alert: $HOSTALIAS$/$SERVICEDESC$ is $SERVICESTATE$ **" $CONTACTEMAIL$
    }
To look like the following:
# 'notify-host-by-email' command definition
define command{
    command_name    notify-host-by-email
    command_line    /usr/bin/printf "%b" "***** Nagios *****\n\nNotification Type: $NOTIFICATIONTYPE$\nHost: $HOSTNAME$\nState: $HOSTSTATE$\nAddress: $HOSTADDRESS$\nInfo: $HOSTOUTPUT$\n\nDate/Time: $LONGDATETIME$\n" | /usr/bin/mailx -s "** $NOTIFICATIONTYPE$ Host Alert: $HOSTNAME$ is $HOSTSTATE$ **" $CONTACTEMAIL$
    }

# 'notify-service-by-email' command definition
define command{
    command_name    notify-service-by-email
    command_line    /usr/bin/printf "%b" "***** Nagios *****\n\nNotification Type: $NOTIFICATIONTYPE$\n\nService: $SERVICEDESC$\nHost: $HOSTALIAS$\nAddress: $HOSTADDRESS$\nState: $SERVICESTATE$\n\nDate/Time: $LONGDATETIME$\n\nAdditional Info:\n\n$SERVICEOUTPUT$\n" | /usr/bin/mailx -s "** $NOTIFICATIONTYPE$ Service Alert: $HOSTALIAS$/$SERVICEDESC$ is $SERVICESTATE$ **" $CONTACTEMAIL$
    }
In essence you are changing the /bin/mail part of each command to /usr/bin/mailx
When you are done, save the file and then using FileZilla upload it back to your Nagios Server.
Next open the contacts.cfg file and change the “email” property to that of the account where you would like the notifications to be sent – see below
define contact{
        contact_name                    nagiosadmin        ; Short name of user
        use                                generic-contact        ; Inherit default values from generic-contact template (defined above)
        alias                           Nagios Admin        ; Full name of user
        email                           administrator@prepad.com    ; <<***** CHANGE THIS TO YOUR EMAIL ADDRESS ******
        }
When you are done, save the file, and upload it back to your Nagios server.
To finish up the configuration, from a PuTTY session type in the following command:
sudo /etc/init.d/nagios restart
Source: Configuring e-Mail Notifications in Nagios Core… – telnetport25.com


