Sending events from an Arduino to Riemann
Introduction
Monitoring can be many things. At uSwitch we monitor not only the general health of the servers we have in production, but also the internal state of the services, such as the number of reports stuck in a process, needing human intervention. For much of this monitoring, we use Riemann. Riemann allows us to quickly set up basic server monitoring, but is open enough for us to easily add new business specific metrics.
Riemann events don’t need to originate from a server in the cloud. In this post I’m going to demonstrate how to send events from an Arduino to Riemann, using a HTTP proxy. I am going to describe a simple circuit with a thermistor, an Ethernet interface and an Arduino Uno. The circuit is going to send the current temperature in the room to a Riemann server every five seconds.
The objective of the post is not to go into detail with every step of the construction of the circuit, but rather to describe the overall design.
Architecture
Sending events to Riemann requires access to one of the existing Riemann client libraries, or an implementation of the Riemann protocol. The Arduino platform is fairly limited in the size of the programs that can be stored on the board, and the range of libraries available. There isn’t an Arduino Riemann library out there, and even if there were, it might not be able to fit on the board, given other libraries and custom code.
Therefore, this setup only uses a TCP library on the Arduino, and a Riemann HTTP proxy written in Clojure to forward events to Riemann.

Setting up a Riemann HTTP proxy
This setup uses the Riemann HTTP Proxy project. If you go that project and clone the repo onto the box where you are running Riemann, you can start the proxy simply by changing to the directory where it was cloned and executing lein run.
This assumes that you have leiningen installed. If you do not, installation instructions are avaiable here.
Per default, the proxy is going to listen for HTTP traffic on port 8123, interpret anything it gets as an edn-formatted Riemann event and try to forward it to Riemann running on localhost. You can change the listening post with the --port argument, and the server address of Riemann with the --server argument.
You’ll probably want to have the proxy running using an upstart script or something similar.
Getting the Arduino online
To get your Arduino online, you either need an Ethernet shield or a stand-alone Ethernet interface. The Ethernet shield is typically around £30, whereas the Ethernet interface can be bought on Ebay for about £5.
I went for the cheap option and got a ENC28J60 Ethernet interface online. If you do the same, you’ll need to connect the pins to your board manually, either by soldering wires unto the board, or by using female-male jumper wires. You should connect the board up as follows:
SOto Arduino pin 12SIto Arduino pin 11SCKto Arduino pin 13CSto Ardunio pin 8VCCto Arduino3V3pinGNDto ArduinoGNDpin
This Instructables was a great help for me when setting it up.
The chip requires a driver. In this post we are going to use the EtherCard driver for Arduino. You need to download and install the latest version in the Arduino editor. There are instructions as to how to do it on the EtherCard wiki.
Add a thermistor to the Arduino
A thermistor is a small component that varies its resitance according to its temperature. If we connect a thermistor to the analog A0 pin on the Arduino through a 10K Ohm resistor to ground, we can use analogRead to get accurate readings we can convert to degrees celsius using the Steinhart-Hart equation.
This guide is very helpful for playing around with the thermistor. The guide contains a wiring diagram if you need the details for hooking up the thermistor to A0.
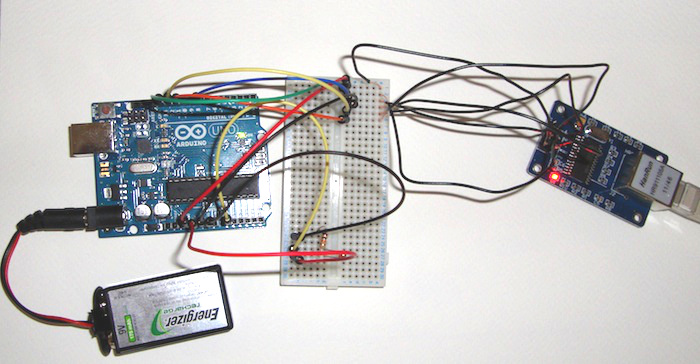
A setup similar to the one described will look something like this.
Arduino source
The program we are going to upload to the Arduino is quite simple. Every five seconds, we read the temperature and send the result as an edn-formatted event to the HTTP proxy. To keep the program simple, there is no error handling.
This example assumes your Riemann HTTP proxy can be looked up on DNS. Just change the proxyHost variable to point to your proxy, and you should be good to go.
#include <EtherCard.h>
#include <Stash.h>
static byte mac[] = { 0x74,0x69,0x69,0x2D,0x30,0x31 };
byte Ethernet::buffer[500];
Stash stash;
char proxyHost[] PROGMEM = "my.domain.com";
static uint32_t timer;
void setup () {
Serial.begin(57600);
if (ether.begin(sizeof Ethernet::buffer, mac) == 0)
Serial.println( "Failed to access Ethernet controller");
if (!ether.dhcpSetup())
Serial.println("DHCP failed");
ether.printIp("IP: ", ether.myip);
ether.printIp("GW: ", ether.gwip);
ether.printIp("DNS: ", ether.dnsip);
if (!ether.dnsLookup(proxyHost))
Serial.println("DNS failed");
ether.hisport = 8123;
ether.printIp("SRV: ", ether.hisip);
}
double thermister(int adc) {
double t;
t = log(((10240000/adc) - 10000));
t = 1 / (0.001129148 + (0.000234125 + (0.0000000876741 * t * t )) * t );
t = t - 273.15;
return t;
}
static void postTemperature(double temperature) {
char temperatureString[10];
dtostrf(temperature,1,2,temperatureString);
byte sd = stash.create();
stash.print("{:state \"ok\", :service \"temperature\", :metric ");
stash.print(temperatureString);
stash.print(", :host \"lounge\"}");
stash.save();
Stash::prepare(PSTR("POST http://$F:8123/ HTTP/1.1" "\r\n"
"Host: $F:8123" "\r\n"
"Content-Length: $D" "\r\n"
"\r\n"
"$H"),
proxyHost, proxyHost, stash.size(), sd);
ether.tcpSend();
}
void loop () {
int val = analogRead(0);
double temperature = thermister(val);
word len = ether.packetReceive();
word pos = ether.packetLoop(len);
if (millis() > timer) {
postTemperature(temperature);
timer = millis() + 5000;
}
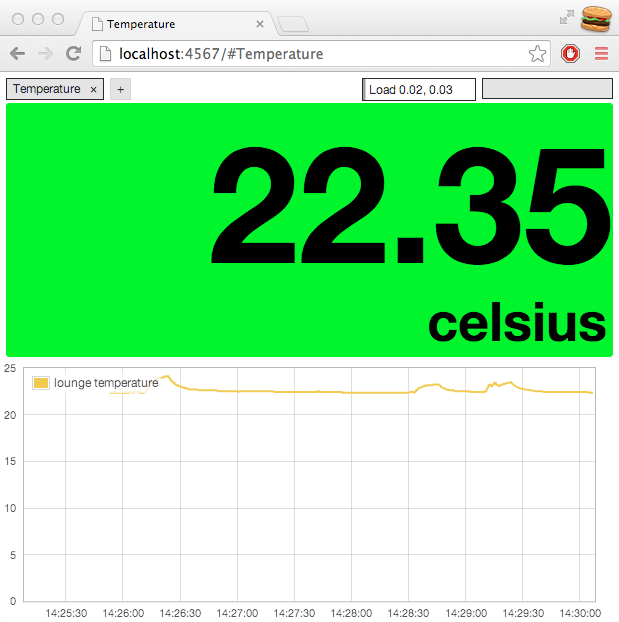
}Hopefully, if you go to your Riemann dashboard, you’ll be able to read the current temperature in the room you’ve plaved the Arduino as the metric of the temperature events that are ticking in.
Conclusion
In this post I’ve demonstrated how to send events from a very simple platform, the Arduino, to Riemann without relying on a Riemann library on the platform from which the events originate.
The question now is what to do with the events once they’re in Riemann. If you want to store them for further analysis, you can forward them to Graphite, or you could send out an email if the current temperature gets above a set threshold.
Using a HTTP proxy to send Riemann events can also be an advantage in projects where you wish to introduce Riemann monitoring on a component basis, but where you are restricted to a certain range of libraries. Since HTTP will (almost) always be available, you can resort to sending HTTP messages to the proxy, rather than import another library to your codebase.