The Carnival of the Animals (Le carnaval des animaux) is a humorous musical suite of fourteen movements by the French Romantic composer Camille Saint-Saëns. The work was written for private performance by an ad hoc ensemble of two pianos and other instruments, and lasts around 25 minutes.
Set up a LAMP server with Docker – Linux Hint
Set up a LAMP server with Docker
Requirements:
In order to follow this article, you must have Docker installed on your computer. LinuxHint has a lot of articles that you can follow to install Docker on your desired Linux distribution if you don’t have it installed already. So, be sure to check LinuxHint.com in case you’re having trouble installing Docker.
Installing Docker Compose:
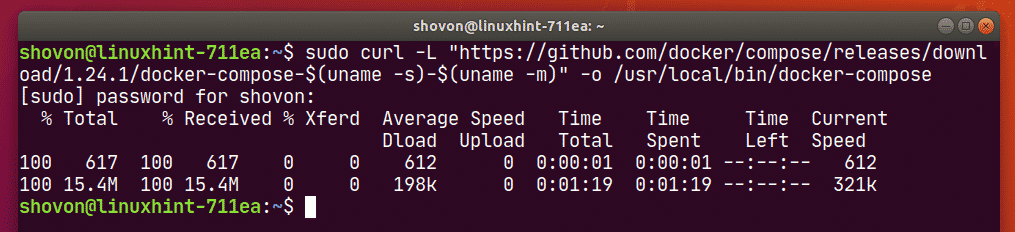
You can download Docker Compose binary file very easily with the following command:
docker-compose-$(uname -s)–$(uname -m)“ -o /usr/local/bin/docker-compose
NOTE: curl may not be installed on your Linux distribution. If that’s the case, you can install curl with the following command:
Ubuntu/Debian/Linux Mint:
CentOS/RHEL/Fedora:
Once docker-compose binary file is downloaded, run the following command:
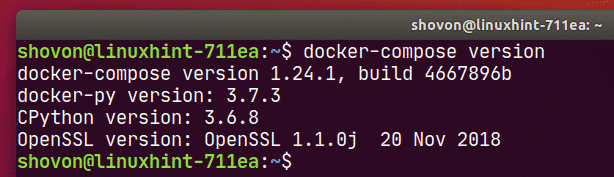
Now, check whether docker-compose command is working as follows:
It should print the version information as shown in the screenshot below.
Setting Up Docker Compose for the Project:
Now, create a project directory ~/docker/lamp (let’s say) and a html/ directory inside the project directory for keeping the website files (i.e. php, html, css, js etc.) as follows:
Now, navigate to the project directory ~/docker/lamp as follows:
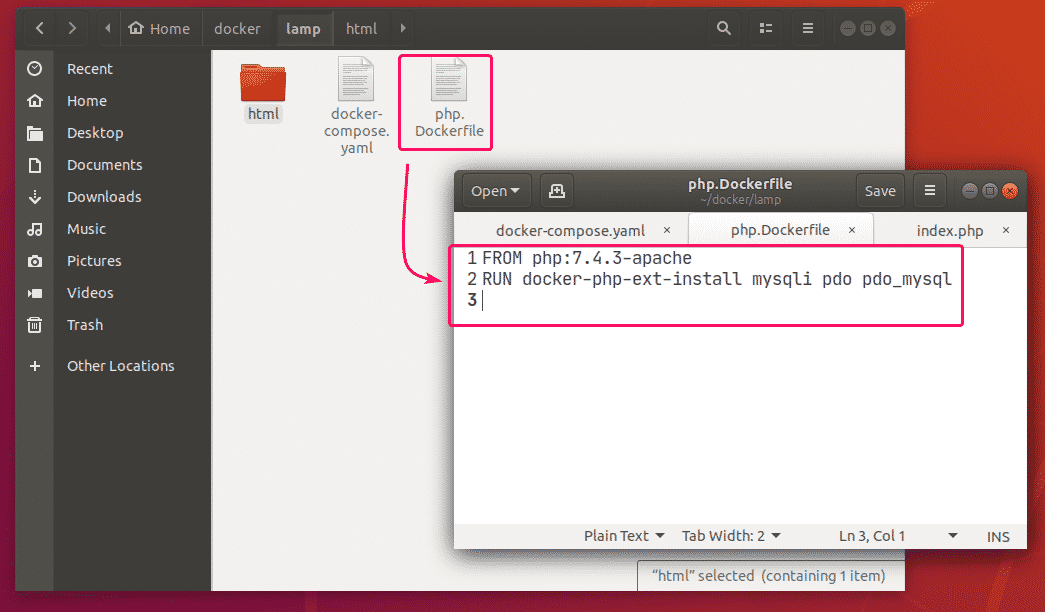
Create a php.Dockerfile in the project directory ~/docker/lamp. This is a Dockerfile which enables mysqli and PDO php extensions in the php:7.4.3-apache image from Docker Hub and builds a custom Docker image from it.
The contents of the php.Dockerfile is given below.
RUN
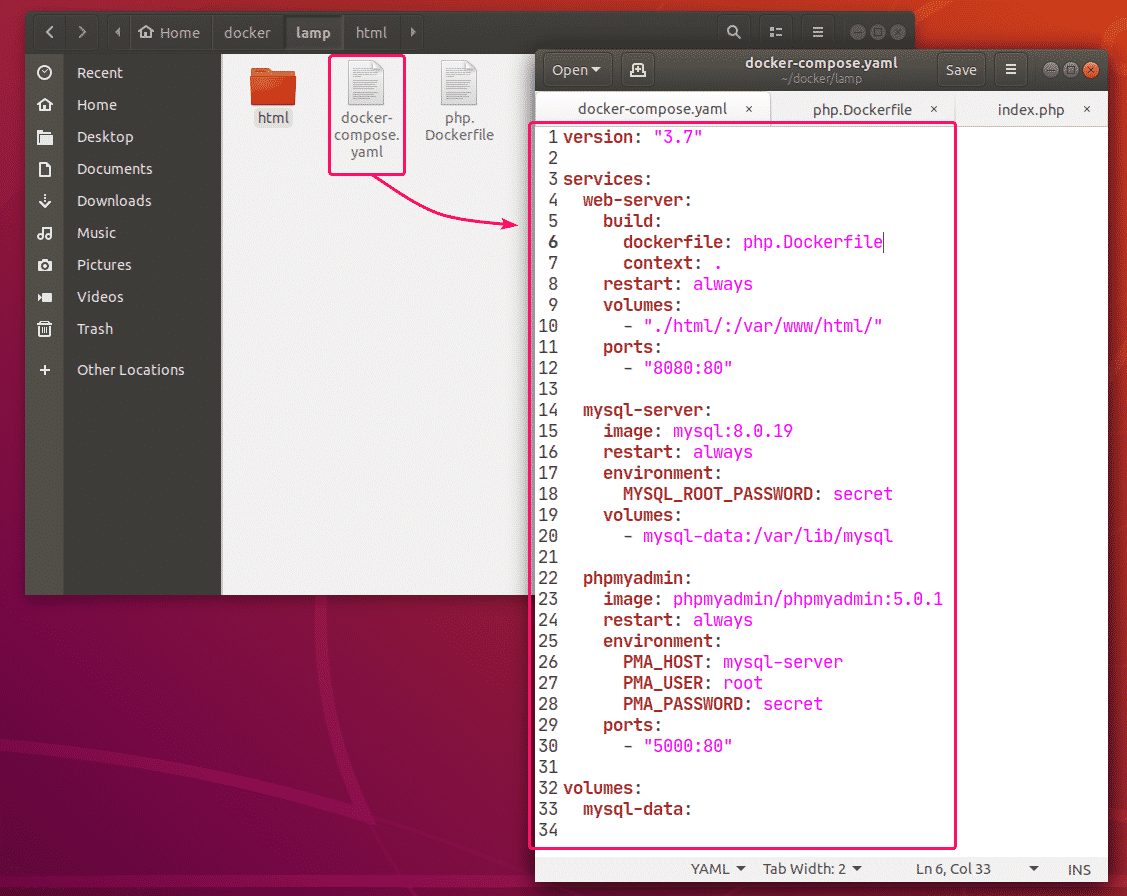
Now, create a docker-compose.yaml file in the project directory ~/docker/lamp and type in the following lines in the docker-compose.yaml file.
services:
web-server:
build:
dockerfile: php.Dockerfile
context: .
restart: always
volumes:
– “./html/:/var/www/html/”
ports:
– “8080:80”
mysql-server:
image: mysql:8.0.19
restart: always
environment:
MYSQL_ROOT_PASSWORD: secret
volumes:
– mysql-data:/var/lib/mysql
phpmyadmin:
image: phpmyadmin/phpmyadmin:5.0.1
restart: always
environment:
PMA_HOST: mysql-server
PMA_USER: root
PMA_PASSWORD: secret
ports:
– “5000:80”
volumes:
mysql-data:
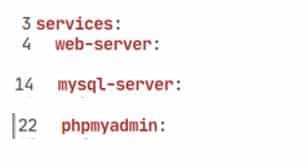
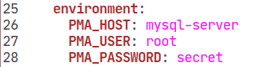
The docker-compose.yaml file should look as follows.
Here, I have created 3 services web-server, mysql-server and phpmyadmin.
web-server service will run a custom-built Docker image as defined in php.Dockerfile.
mysql-server service will run the mysql:8.0.19 image (from DockerHub) in a Docker container.
phpmyadmin service will run the phpmyadmin/phpmyadmin:5.0.1 image (from DockerHub) in another Docker container.
In mysql-server service, the MYSQL_ROOT_PASSWORD environment variable is used to set the root password of MySQL.
In phpmyadmin service, the PMA_HOST, PMA_USER, PMA_PASSWORD environment variables are used to set the MySQL hostname, username and password respectively that phpMyAdmin will use to connect to the MySQL database server running as mysql-server service.
In mysql-server service, all the contents of the /var/lib/mysql directory will be saved permanently in the mysql-data volume.’
In the web-server service, the container port 80 (right) is mapped to the Docker host port 8080 (left).’
In the phpmyadmin service, the container port 5000 (right) is mapped to the Docker host port 80 (left).
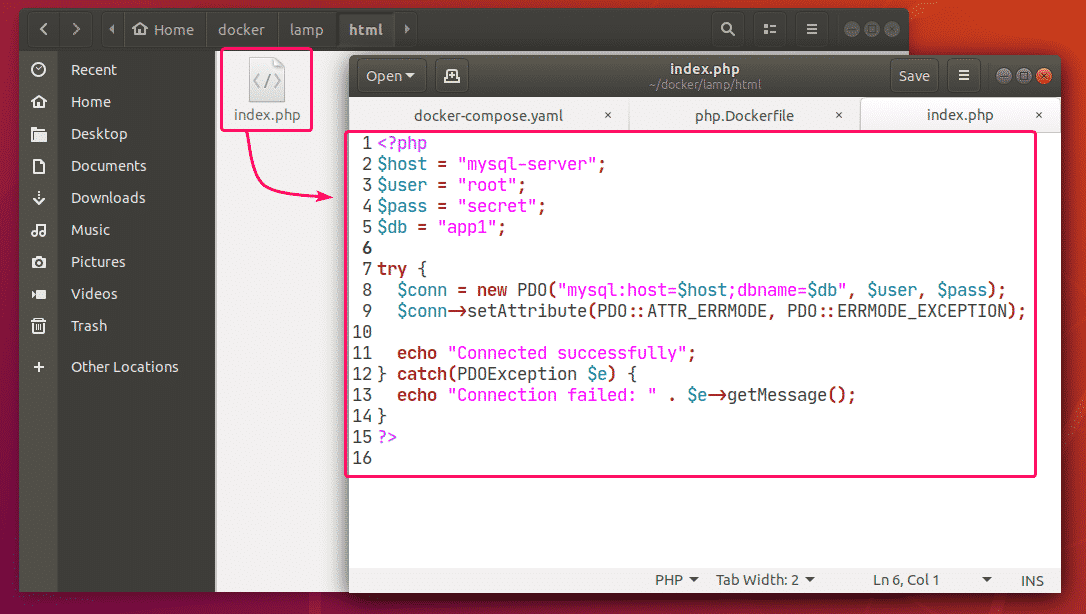
Also, create a index.php file in the html/ directory for testing the LAMP server.
The contents of the index.php file in my case,
$host = “mysql-server”;
$user = “root”;
$pass = “secret”;
$db = “app1”;
try {
$conn = new PDO(“mysql:host=$host;dbname=$db“, $user, $pass);
$conn->setAttribute(PDO::ATTR_ERRMODE, PDO::ERRMODE_EXCEPTION);
echo “Connected successfully”;
} catch(PDOException $e) {
echo “Connection failed: “ . $e->getMessage();
}
?>
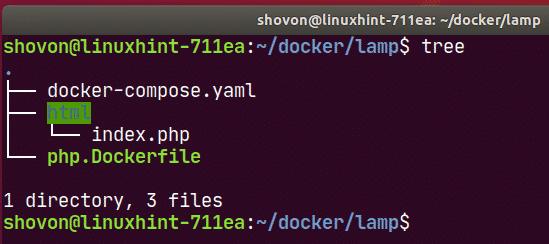
Finally, the project directory ~/docker/lamp should look as follows:
Starting the LAMP Server:
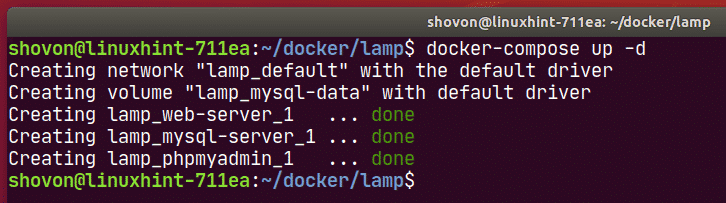
Now, to start the web-server, mysql-server and phpmyadmin services, run the following command:
All the services should start in the background.
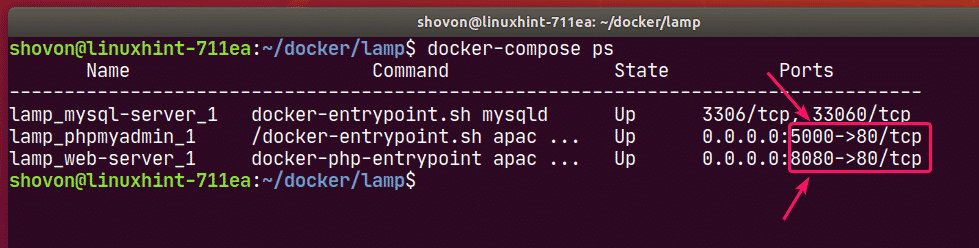
To see how the ports are mapped, run the following command:
As you can see, for the web-server service, the Docker host port 8080 is mapped to the container TCP port 80.
For the phpmyadmin service, the Docker host port 5000 is mapped to the container TCP port 80.
Finding the IP Address of Docker Host:
If you want to access the LAMP server from other computers on your network, you must know the IP address of your Docker host.
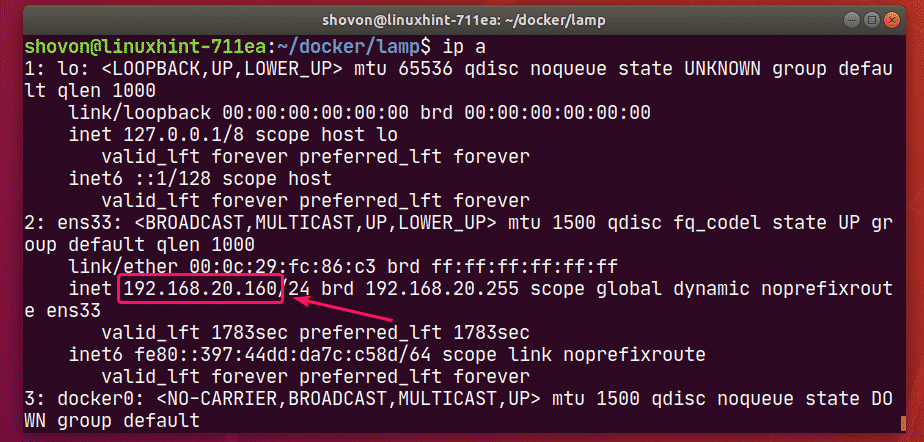
To find the IP address of your Docker host, run the following command:
In my case, the IP address of my Docker host 192.168.20.160. It will be different for you. So, make sure to replace it with yours from now on.
Testing the LAMP Server:
Now, you can access phpMyAdmin 5 and the web server from a web browser.
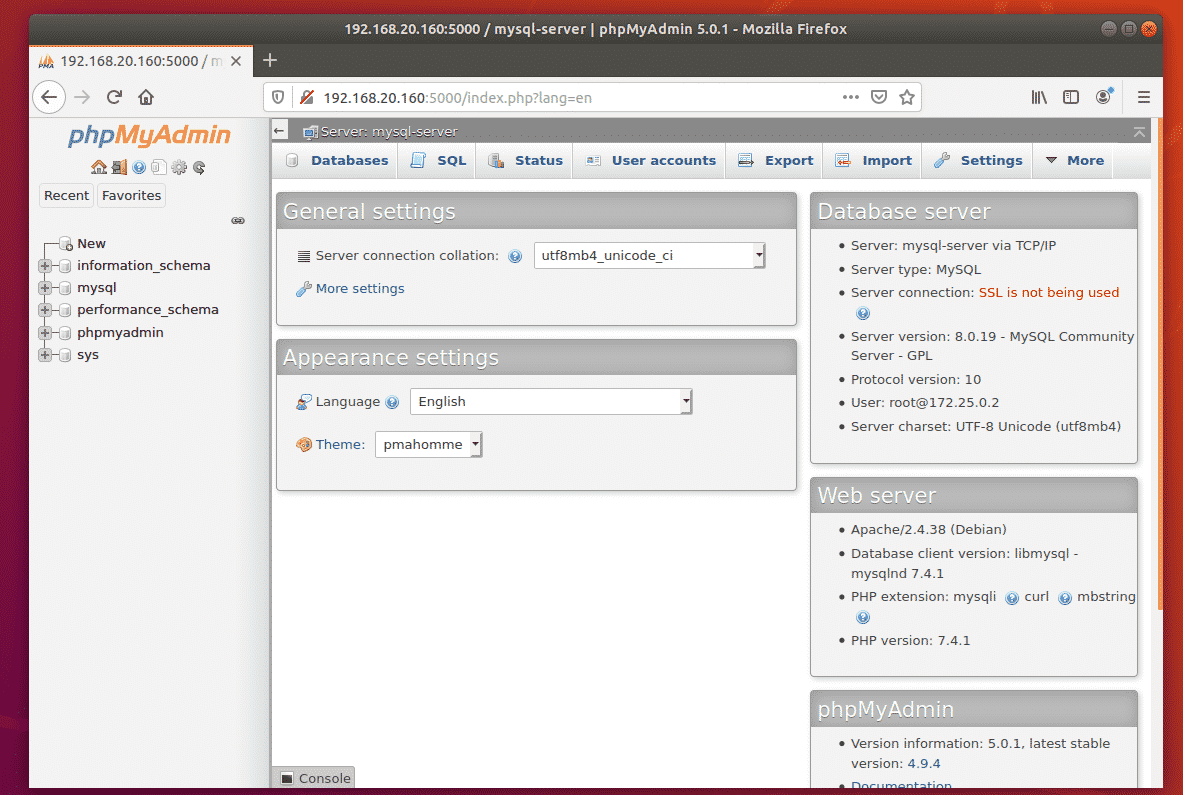
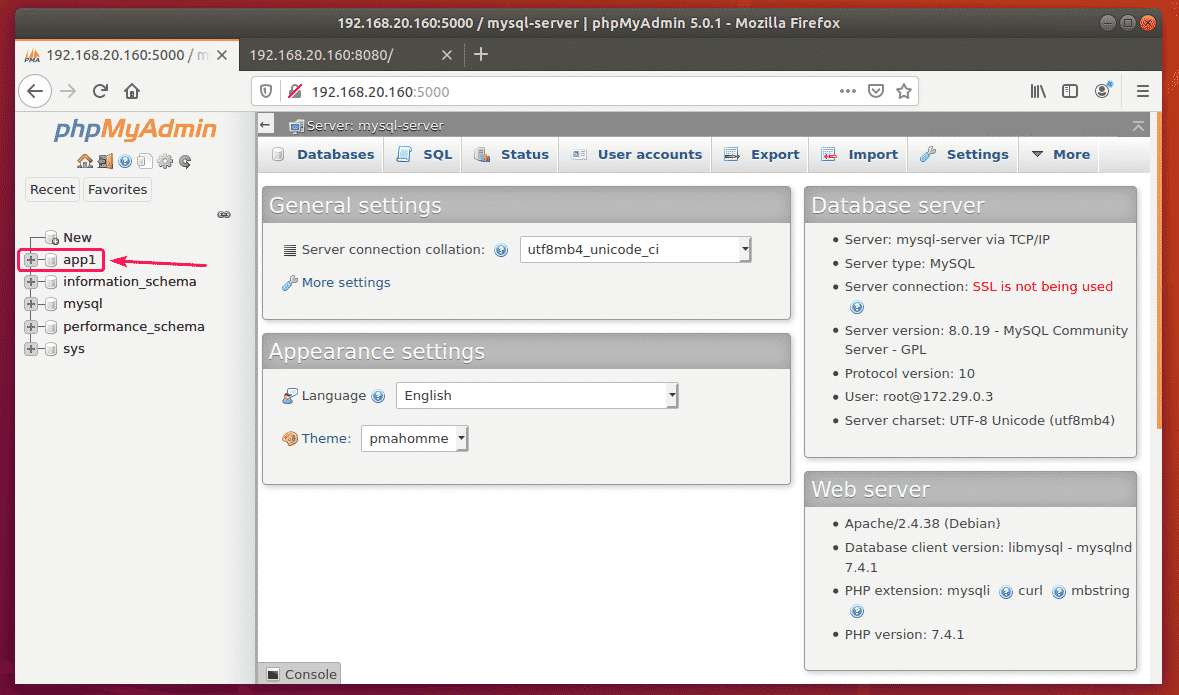
To access phpMyAdmin 5, open a web browser and visit http://localhost:5000 from your Docker host or visit http://192.168.20.160:5000 from any other computer on the network.
phpMyAdmin 5 should load in your web browser.
Now, create an app1 MySQL database from phpMyAdmin.
Now, visit http://localhost:8080 from your Docker host or http://192.168.20.160:8080 from any other computer on your network to access the web server.
You should see the Connected successfully message. It means, the PHP is working and the MySQL database server is accessible from the web-server container. So, technically, the LAMP server is fully functional.
Stopping the LAMP Server:
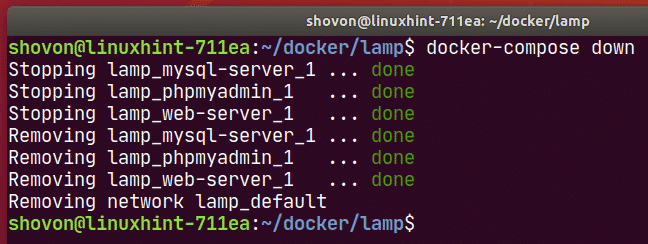
To stop the web-server, mysql-server and phpmyadmin services, run the following command:
The web-server, mysql-server and phpmyadmin services should be stopped.
Cleaning Up MySQL Server Data:
If you want to remove all the MySQL database data and settings, you must remove the mysql-data volume.
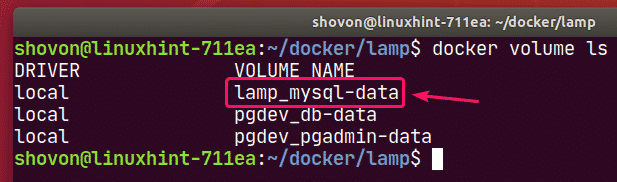
You can find the actual name of the volume with the following command:
You can remove the volume lamp_mysql-data with the following command:
So, that’s how you set up a LAMP server with Docker. Thanks for reading this article.
As you can see, the volume to remove is lamp_mysql-data.
How to move docker data directory to another location on Ubuntu – guguweb.com
How to move docker data directory to another location on Ubuntu
Docker is a popular container management platform that can dramatically speed up your development workflow. It is available as a package on major Linux distributions, including Ubuntu.
The standard data directory used for docker is /var/lib/docker, and since this directory will store all your images, volumes, etc. it can become quite large in a relative small amount of time.
If you want to move the docker data directory on another location you can follow the following simple steps.
1. Stop the docker daemon
sudo service docker stop
2. Add a configuration file to tell the docker daemon what is the location of the data directory
Using your preferred text editor add a file named daemon.json under the directory /etc/docker. The file should have this content:
{
"data-root": "/path/to/your/docker"
}
of course you should customize the location “/path/to/your/docker” with the path you want to use for your new docker data directory.
3. Copy the current data directory to the new one
sudo rsync -aP /var/lib/docker/ /path/to/your/docker
4. Rename the old docker directory
sudo mv /var/lib/docker /var/lib/docker.old
This is just a sanity check to see that everything is ok and docker daemon will effectively use the new location for its data.
5. Restart the docker daemon
sudo service docker start
6. Test
If everything is ok you should see no differences in using your docker containers. When you are sure that the new directory is being used correctly by docker daemon you can delete the old data directory.
sudo rm -rf /var/lib/docker.old
Follow the previous steps to move docker data directory and you won’t risk any more to run out of space in your root partition, and you’ll happily use your docker containers for many years to come. ?
7. Extra step: remote debug on your Docker container!
Do you know that you can remote debug your application running on a Docker container? Check out my tutorial on Remote debugging a Django project in VS Code! It uses Django as an example, but the Docker related part is general.
Source: How to move docker data directory to another location on Ubuntu – guguweb.com
GitHub – dneto/senseictl: Linux commandline tools to configure the SteelSeries Sensei Raw Gaming Mouse
SenseiCTL
SenseiCTL is an unofficial configuration tool for the SteelSeries Sensei Raw Gaming Mouse under linux and is based on RivalCTL. This peripheral nor any other product made by SteelSeries, has official Linux support today. The tool is limited in it’s functionality, since everything had to be reverse-engineered.
Installation
Requirements:
Required:
pyudev>=0.16
webcolors>=1.4
ioctl-opt>=1.2
PyYAML==3.11
Optional (for the experiments):
psutil==3.4.2
six==1.10.0
Write permission to the device is required as well
Manual Installation:
git clone https://github.com/dneto/senseictl.git
sudo python setup.py install
Usage
usage: senseictl [-h] [--commit] [--reset] [--profile PROFILE]
[--led-style STYLE] [--led-intensity INTENSITY] [--cpi1 CPI]
[--cpi2 CPI] [--polling-rate RATE]
A tool to configure the SteelSeries RAW Gaming Mouse
optional arguments:
-h, --help show this help message and exit
--commit Save to firmware
--reset Reset all options to FACTORY defaults
--profile PROFILE profile name or path to file
--led-style STYLE LED Style [1=Steady, 2-4=Breathe Speed, 5=On Click]
--led-intensity INTENSITY
LED Intensity [1=Off, 2=Low, 3=Medium, 4=High]
--cpi1 CPI 50-6500 in increments of 50 [default 800]
--cpi2 CPI 50-6500 in increments of 50 [default 1600]
--polling-rate RATE 1000, 500, 250, or 125 [default=1000]
How to create a docker based LAMP stack using docker on Ubuntu 20.04 – LinuxConfig.org
How To Install Docker Compose on Ubuntu 16.04 | DigitalOcean
Introduction
Docker is a great tool for automating the deployment of Linux applications inside software containers, but to take full advantage of its potential each component of an application should run in its own individual container. For complex applications with a lot of components, orchestrating all the containers to start up, communicate, and shut down together can quickly become unwieldy.
The Docker community came up with a popular solution called Fig, which allowed you to use a single YAML file to orchestrate all your Docker containers and configurations. This became so popular that the Docker team decided to make Docker Compose based on the Fig source, which is now deprecated. Docker Compose makes it easier for users to orchestrate the processes of Docker containers, including starting up, shutting down, and setting up intra-container linking and volumes.
In this tutorial, we’ll show you how to install the latest version of Docker Compose to help you manage multi-container applications.
Prerequisites
To follow this article, you will need an Ubuntu 16.04 server with the following:
- A non-root user with sudo privileges (Initial Server Setup with Ubuntu 16.04 explains how to set this up.)
- Docker installed with the instructions from Step 1 and Step 2 of How To Install and Use Docker on Ubuntu 16.04
Once these are in place, you’re ready to follow along.
Note: Even though the Prerequisites give instructions for installing Docker on Ubuntu 16.04, the docker commands in this article should work on other operating systems as long as Docker is installed.
Step 1 — Installing Docker Compose
Although we can install Docker Compose from the official Ubuntu repositories, it is several minor version behind the latest release, so we’ll install Docker Compose from the Docker’s GitHub repository. The command below is slightly different than the one you’ll find on the Releases page. By using the -o flag to specify the output file first rather than redirecting the output, this syntax avoids running into a permission denied error caused when using sudo.
We’ll check the current release and if necessary, update it in the command below:
Next we’ll set the permissions:
Then we’ll verify that the installation was successful by checking the version:
This will print out the version we installed:
Outputdocker-compose version 1.18.0, build 8dd22a9
Now that we have Docker Compose installed, we’re ready to run a “Hello World” example.
Step 2 — Running a Container with Docker Compose
The public Docker registry, Docker Hub, includes a Hello World image for demonstration and testing. It illustrates the minimal configuration required to run a container using Docker Compose: a YAML file that calls a single image:
First, we’ll create a directory for the YAML file and move into it:
Then, we’ll create the YAML file:
Put the following contents into the file, save the file, and exit the text editor:
The first line in the YAML file is used as part of the container name. The second line specifies which image to use to create the container. When we run the command docker-compose up it will look for a local image by the name we specified, hello-world. With this in place, we’ll save and exit the file.
We can look manually at images on our system with the docker images command:
When there are no local images at all, only the column headings display:
OutputREPOSITORY TAG IMAGE ID CREATED SIZE
Now, while still in the ~/hello-world directory, we’ll execute the following command:
The first time we run the command, if there’s no local image named hello-world, Docker Compose will pull it from the Docker Hub public repository:
OutputPulling my-test (hello-world:latest)...
latest: Pulling from library/hello-world
c04b14da8d14: Downloading [==================================================>] c04b14da8d14: Extracting [==================================================>] c04b14da8d14: Extracting [==================================================>] c04b14da8d14: Pull complete
Digest: sha256:0256e8a36e2070f7bf2d0b0763dbabdd67798512411de4cdcf9431a1feb60fd9
Status: Downloaded newer image for hello-world:latest
. . .
After pulling the image, docker-compose creates a container, attaches, and runs the helloprogram, which in turn confirms that the installation appears to be working:
Output. . .
Creating helloworld_my-test_1...
Attaching to helloworld_my-test_1
my-test_1 |
my-test_1 | Hello from Docker.
my-test_1 | This message shows that your installation appears to be working correctly.
my-test_1 |
. . .
Then it prints an explanation of what it did:
Output of docker-compose up1. The Docker client contacted the Docker daemon.
2. The Docker daemon pulled the "hello-world" image from the Docker Hub.
3. The Docker daemon created a new container from that image which runs the executable that produces the output you are currently reading.
4. The Docker daemon streamed that output to the Docker client, which sent it to your terminal.
Docker containers only run as long as the command is active, so once hello finished running, the container stopped. Consequently, when we look at active processes, the column headers will appear, but the hello-world container won’t be listed because it’s not running.
OutputCONTAINER ID IMAGE COMMAND CREATED STATUS PORTS NAMES
We can see the container information, which we’ll need in the next step, by using the -a flag which shows all containers, not just the active ones:
OutputCONTAINER ID IMAGE COMMAND CREATED STATUS PORTS NAMES
06069fd5ca23 hello-world "/hello" 35 minutes ago Exited (0) 35 minutes ago drunk_payne
This displays the information we’ll need to remove the container when we’re done with it.
Step 3 — Removing the Image (Optional)
To avoid using unnecessary disk space, we’ll remove the local image. To do so, we’ll need to delete all the containers that reference the image using the docker rm command, followed by either the CONTAINER ID or the NAME. Below, we’re using the CONTAINER ID from the docker ps -a command we just ran. Be sure to substitute the ID of your container:
Once all containers that reference the image have been removed, we can remove the image:
Conclusion
We’ve now installed Docker Compose, tested our installation by running a Hello World example, and removed the test image and container.
While the Hello World example confirmed our installation, the simple configuration does not show one of the main benefits of Docker Compose — being able to bring a group of Docker containers up and down all at the same time. To see the power of Docker Compose in action, you might like to check out this practical example, How To Configure a Continuous Integration Testing Environment with Docker and Docker Compose on Ubuntu 16.04
https://www.digitalocean.com/community/tutorials/how-to-install-docker-compose-on-ubuntu-16-04
How to copy Docker images from one host to another without using a repository
PIC16F1709 – 8-bit Microcontrollers
PIC16F1709 combines Intelligent Analog integration with low cost and extreme low power (XLP) to suit a variety of general purpose applications. This microcontroller delivers on-chip Op Amps, Core Independent Peripherals (CLC, COG and Zero Cross Detect) and Peripheral Pin Select, providing for increased design flexibility.
Program Memory Type
Flash
Program Memory Size (KB)
14
CPU Speed (MIPS/DMIPS)
8
SRAM (B)
1,024
Digital Communication Peripherals
1-UART, 1-SPI, 1-I2C
Capture/Compare/PWM Peripherals
2 Input Capture, 2 CCP,
Timers
4 x 8-bit, 1 x 16-bit
ADC Input
12 ch, 10-bit
Number of Comparators
2
Temperature Range (°C)
-40 to 125
Operating Voltage Range (V)
1.8 to 5.5
Pin Count
20
Low Power
Yes
- 14 KB Flash Program Memory
- 1 KB Data SRAM
- 128 B of Non-volatile Data Storage
- 18 I/O Pins
- Four 8-bit Timers / One 16-bit Timer
- 2 x High-Speed Comparators
- 2 x Op Amps
- 12ch x 10-bit ADC
- One 8-bit DAC
- Zero Cross Detect
- 2 x CCP / 2 x PWM
- 1 x COG
- 1 x EUSART
- 1 x I2C/SPI
- 3 x CLC
virtualbox.org • View topic – Win 7 resolution max 1024×768
Try shutting down the VM, then in the manager (not the VM), go to File|Preferences|Display and set the Maximum Guest Screen Size to None.
Source: virtualbox.org • View topic – Win 7 resolution max 1024×768
Docker -> Building a LAMP stack. This is a walkthrough on how to build a docker LAMP image
Enable Windows NTP Client
NtpClient
Source: Enable Windows NTP Client