I want to learn QT4 in Ubuntu,I have installed it in WindowsXP,but it has some problem in linux.Can’t make the program. I want to use synaptic to install the QT4,QT assistant,QT designer,can you tell me how to do.
Source: [help]Install QT4 in Ubuntu
I want to learn QT4 in Ubuntu,I have installed it in WindowsXP,but it has some problem in linux.Can’t make the program. I want to use synaptic to install the QT4,QT assistant,QT designer,can you tell me how to do.
Source: [help]Install QT4 in Ubuntu
I want install waveforge and write, that need libqt.so.2.
I download from internet libqt.so.2 and do not know were paste it.
[al@myhost ~]$ ‘/home/al/tar.gz,tgz/waveforge.0.1.2/WaveForge’
/home/al/tar.gz,tgz/waveforge.0.1.2/WaveForge: error while loading shared libraries: libqt.so.2: cannot open shared object file: No such file or directory
Source: Were must be libqt.so.2? / Newbie Corner / Arch Linux Forums
12-12-2008
All units supported by OpenUPSmart should now be supported by the Network UPS Tools. If you are having issues with any of the UPS units previously supported by OpenUPSmart they will be happy to help.
OpenUPSmart should be considered retired; NUT is your best choice for robust UPS support.
OpenUPSmart is a UNIX based daemon mainly for the no name UPS available from Dick Smith Electronics in Australia. It is listed on the website simply as “UPS Power Supply UPS0400 400VA”, but otherwise has no unique identifying features. If you know anything more about this little UPS, please contact us!
Update: Thanks to the Google cache, this appears to be called the “Micro Master” UPS, originally made by a company called Centralion.
At first OpenUPSmart used data gleened from sniffing the serial line with the Windows software. On later investigation the protocol appears to be based on the Megatec protocol, available here. (thanks to Chris Barnesfor relating this to the sniffed commands). Although the particular UPS pictured and originally targetted does not appear to be able to handle all of the commands.
The software is aimed as a daemon based replacement for the Commander Pro software available from www.ups-software-download.com It appears to be authored by a company called Waytech.
If your UPS uses software from this site, you should be able to replace it with OpenUPSmart. Please report any success.
The Linux software available from that site in RPM format is called UPSmart (hence OpenUPSmart).
The goal of OpenUPSmart is to communicate with the UPS, poll it periodically for status updates and run commands on event changes (power failure, power restore, etc).
The software is targetted at building and running on Linux and NetBSD but should be portable to any UNIX style operating system.
The SourceForge project page is available here.
The BlackOut Buster 800 from PowerKinetics has been reported as working by Julian Gomez. Thanks, Julian!
The Energy Sistem UPS Smart 500 VA has been reported as working by Daniel Sanjurjo. Thanks also for the bug report Daniel!
Also, the Energy Sistem UPS Smart 800 VA has been reported as working by Paco Brufal.
The WinPower CPM-800 has been reported as working by Quoc-Huy Nguyen Dinh. He also included a photo.
The Mustek PowerMust 800 Pro has been reported as working by Alexander Ennulat. The Mustek PowerMust 600Va has been reported working by Paulo Freire.
The Micro Master 600 has been reported as working by Ed.
The Ablerex Hope Office 400/600 (apparently that is hope not home) has been reported working by Ross Marshall.
The UNITEK Alpha 500 has been reported working by Julien.
The Infosec 500XP has been reported as working by Regis Damongeot.
The IPPON Back Power Pro has been reported working by blueman.
The Neus 400va and Neus 600va have been reported working by Gonzalo Mazarrasa.
ActivePower UPS devices have been reported working by Tadeusz Milek.
The Orvaldi 600 has been reported working by Zbynek Michl.
The Phasak 400VA and 600VA UPS has been reported working by Francisco Perez. Front photo | Back photo.
The current download version is 1.0. You can download the latest sources from the project page.
If you are having any issues, please check out the latest CVS version using the instructions below.
cvs -d:pserver:anonymous@cvs.sourceforge.net:/cvsroot/openupsmart login
cvs -z3 -d:pserver:anonymous@cvs.sourceforge.net:/cvsroot/openupsmart co openupsmart
Once you have the sources, run autogen.sh and then configure, make and make install as usual.
Bug reports or patches are happily accepted, but please try the latest CVS sources first, just incase.
If you’re sending code please create a patch using diff(1) (or use cvs with cvs diff -u). Feel free to email me if you’re unfamiliar with creating patches.
OpenUPSmart can optionally create a thread that listens on a specified port and reports status information. This can be easily plugged into MRTG.
Here is an example of how it works
ianw@morrison:~$ /usr/pkg/sbin/nc localhost 8740
248.0
58.0
28 days, 21 hours, 46 minutes, 35 seconds
OpenUPSmart
Here is a little of the logging information OpenUPSmart can show via gnuplot.
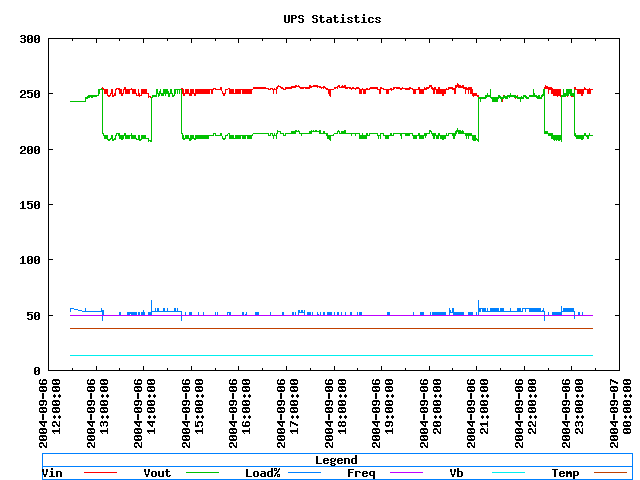
You can also assign various levels of console based output which is often useful for debugging your setup.
Thu Jul  3 22:58:48 2003 openupsmartd : starting
Thu Jul  3 22:58:49 2003 init ups
Thu Jul  3 22:58:50 2003 begin polling
Thu Jul  3 22:58:51 2003 IN:227.50V, FAULT:227.00V, OUT:227.50V, LOAD:41.00%
                         INFREQ:49.70hz, BATT:13.40V, TEMP:37.80C, FLAGS 00001000
                         ( FLAG_STANDBY )
Thu Jul  3 22:58:52 2003 IN:227.50V, FAULT:227.00V, OUT:227.50V, LOAD:41.00%
                         INFREQ:49.70hz, BATT:13.40V, TEMP:37.80C, FLAGS 00001000
                         ( FLAG_STANDBY )
Thu Jul  3 22:58:53 2003 IN:6.00V, FAULT:69.00V, OUT:230.00V, LOAD:53.00%
                         INFREQ:50.00hz, BATT:13.40V, TEMP:37.80C, FLAGS 10001000
                         ( FLAG_STANDBY FLAG_UTIL_POWER_FAIL )
Thu Jul  3 22:58:53 2003 ** Power failure **
Thu Jul  3 22:58:54 2003 IN:20.00V, FAULT:188.00V, OUT:230.00V, LOAD:53.00%
                         INFREQ:50.00hz, BATT:12.50V, TEMP:37.80C, FLAGS 10001000
                         ( FLAG_STANDBY FLAG_UTIL_POWER_FAIL )
Thu Jul  3 22:58:55 2003 IN:230.00V, FAULT:230.00V, OUT:230.00V, LOAD:46.00%
                         INFREQ:50.00hz, BATT:11.90V, TEMP:37.80C, FLAGS 00001000
                         ( FLAG_STANDBY )
Thu Jul  3 22:58:55 2003 ** Power restored **
For any problems or queries contact Ian Wienand
Source: OpenUPSmart
I got a scenario, where a software works only when you insert the USB device provided by the software vendor in windows operating system. Im trying to find the content stored in the USB device. In windows operating system, the USB device icon is not shown in My_Computer. I thought, I can see the content or atleast detect the USB device in Ubuntu.Also in ubuntu, the drive is not detected. I tried “sudo fdisk -l” to know the file system, but its not useful. The drive is not detected at all.I wanted to know, how the software works only when the USB drive is inserted and it wont when it is not inserted. Do they have any files stored in the USB device? In any case, how can we detect such kind of device in Ubuntu?
Hi all, I am trying to get apcupsd going. I have installed it thru synaptic, set it up accordingly to the various guides one can find across the net. When I run “acpaccess” I get the following error. “Error contacting apcupsd @ localhost:3551: Connection refused” What, if anything, can I do to rectify the above situtation. I am on Ubuntu Lucid 10.04.2 Desktop. Thanks.
Source: [SOLVED] Error contacting apcupsd @ localhost:3551: Connection refused
One-liner to shutdown remote host
To shutdown the local machine immediately, you execute this command as root or under sudo:$ shutdown -h nowIf it is a remote server that you want to shutdown, it could be slightly more involved.
You need to have root privileges to shutdown a machine. However, many systems are configured to block root from logging in remotely usingssh. So, you need to ssh in as a regular, non-root user, and pass the sudo command to shutdown host.
$ ssh -t peter@192.168.1.112 'sudo shutdown -h now'
peter@192.168.1.112's password:
[sudo] password for peter:
Broadcast message from root@tiger (pts/2) (Sat Apr 13 10:56:30 2013):

The system is going down for system halt NOW!
Connection to 192.168.1.112 closed.
$
Don’t forget the -t sshparameter to “force pseudo-tty allocation”. Without it, the above one-liner will fail with this message.
sudo: no tty present and no askpass program specifiedNote that you will be prompted twice to type in your password. The first time is for ssh; the second, sudo.
To avoid typing the first password, set up password-less login. This is a topic by itself, and I won’t go into it here.
To avoid the second, configure sudo to not prompt peter for his password when he issues a sudo command. This is done by editing the /etc/sudoers file.
$ visudoInsert the following line to the file:
peter ALL=(ALL) NOPASSWD: ALLThe above line allows peter to sudo as anybody from any host and run any command without being authenticated. Only do this after you have considered its security ramifications. You have been forewarned.
Now run the one-liner again.
$ ssh -t peter@192.168.1.112 'sudo shutdown -h now'
peter@192.168.1.112's password:

Broadcast message from root@tiger (pts/1) (Sat Apr 20 21:40:50 2013):

The system is going down for system halt NOW!
Connection to 192.168.1.112 closed.
The user is only prompted once, by ssh, to enter a password.
After upgrading my laptop from karmic to lucid, my fat32 partition won’t mount automatically. I get the message:
The disk drive for /osshare is not ready yet or not present
Continue to wait; or Press S to skip mounting or M for manual recovery
Funny thing is, if I skip, then
/osshare/is mounted once I log in.I’ve a similar setup on my desktop, and it works fine. Fstab on desktop:
UUID=4663-6853 /osshare vfat utf8,umask=007,gid=46 0 1
/etc/fstabon laptop:UUID=1234-5678 /osshare vfat utf8,auto,rw,user 0 0
Source: filesystem – How do I avoid the “S to Skip” message on boot? – Ask Ubuntu
Source: FAQ — ZoneMinder documentation
About LAMP
LAMP stack is a group of open source software used to get web servers up and running. The acronym stands for Linux, Apache, MySQL, and PHP. Since the virtual private server is already running Ubuntu, the linux part is taken care of. Here is how to install the rest.
Set Up
The steps in this tutorial require the user to have root privileges on your VPS. You can see how to set that up in the Initial Server Setup in steps 3 and 4.
Step 1: Install Apache
Apache is a free open source software which runs over 50% of the world’s web servers.
To install apache, open terminal and type in these commands:
sudo apt-get update
sudo apt-get install apache2
That’s it. To check if Apache is installed, direct your browser to your server’s IP address (eg. http://12.34.56.789). The page should display the words “It works!” like this.
How to Find your Server’s IP address
You can run the following command to reveal your server’s IP address.
ifconfig eth0 | grep inet | awk '{ print $2 }'Step 2: Install MySQL
MySQL is a powerful database management system used for organizing and retrieving data
To install MySQL, open terminal and type in these commands:
sudo apt-get install mysql-server libapache2-mod-auth-mysql php5-mysqlDuring the installation, MySQL will ask you to set a root password. If you miss the chance to set the password while the program is installing, it is very easy to set the password later from within the MySQL shell.
Once you have installed MySQL, we should activate it with this command:
sudo mysql_install_dbFinish up by running the MySQL set up script:
sudo /usr/bin/mysql_secure_installationThe prompt will ask you for your current root password.
Type it in.
Enter current password for root (enter for none):

OK, successfully used password, moving on...
Then the prompt will ask you if you want to change the root password. Go ahead and choose N and move on to the next steps.
It’s easiest just to say Yes to all the options. At the end, MySQL will reload and implement the new changes.
By default, a MySQL installation has an anonymous user, allowing anyone
to log into MySQL without having to have a user account created for
them.  This is intended only for testing, and to make the installation
go a bit smoother.  You should remove them before moving into a
production environment.

Remove anonymous users? [Y/n] y
 ... Success!

Normally, root should only be allowed to connect from 'localhost'.  This
ensures that someone cannot guess at the root password from the network.

Disallow root login remotely? [Y/n] y
... Success!

By default, MySQL comes with a database named 'test' that anyone can
access.  This is also intended only for testing, and should be removed
before moving into a production environment.

Remove test database and access to it? [Y/n] y
 - Dropping test database...
 ... Success!
 - Removing privileges on test database...
 ... Success!

Reloading the privilege tables will ensure that all changes made so far
will take effect immediately.

Reload privilege tables now? [Y/n] y
 ... Success!

Cleaning up...
Once you’re done with that you can finish up by installing PHP.
Step 3: Install PHP
PHP is an open source web scripting language that is widely use to build dynamic webpages.
To install PHP, open terminal and type in this command.
sudo apt-get install php5 libapache2-mod-php5 php5-mcryptAfter you answer yes to the prompt twice, PHP will install itself.
It may also be useful to add php to the directory index, to serve the relevant php index files:
sudo nano /etc/apache2/mods-enabled/dir.confAdd index.php to the beginning of index files. The page should now look like this:
<IfModule mod_dir.c>

          DirectoryIndex index.php index.html index.cgi index.pl index.php index.xhtml index.htm

</IfModule>
PHP Modules
PHP also has a variety of useful libraries and modules that you can add onto your virtual server. You can see the libraries that are available.
apt-cache search php5-Terminal will then display the list of possible modules. The beginning looks like this:
php5-cgi - server-side, HTML-embedded scripting language (CGI binary)
php5-cli - command-line interpreter for the php5 scripting language
php5-common - Common files for packages built from the php5 source
php5-curl - CURL module for php5
php5-dbg - Debug symbols for PHP5
php5-dev - Files for PHP5 module development
php5-gd - GD module for php5
php5-gmp - GMP module for php5
php5-ldap - LDAP module for php5
php5-mysql - MySQL module for php5
php5-odbc - ODBC module for php5
php5-pgsql - PostgreSQL module for php5
php5-pspell - pspell module for php5
php5-recode - recode module for php5
php5-snmp - SNMP module for php5
php5-sqlite - SQLite module for php5
php5-tidy - tidy module for php5
php5-xmlrpc - XML-RPC module for php5
php5-xsl - XSL module for php5
php5-adodb - Extension optimising the ADOdb database abstraction library
php5-auth-pam - A PHP5 extension for PAM authentication
[...]
Once you decide to install the module, type:
sudo apt-get install name of the moduleYou can install multiple libraries at once by separating the name of each module with a space.
Congratulations! You now have LAMP stack on your droplet!
Step 4: RESULTS — See PHP on your Server
Although LAMP is installed, we can still take a look and see the components online by creating a quick php info page
To set this up, first create a new file:
sudo nano /var/www/info.phpAdd in the following line:
<?php
phpinfo();
?>
Then Save and Exit.
Restart apache so that all of the changes take effect:
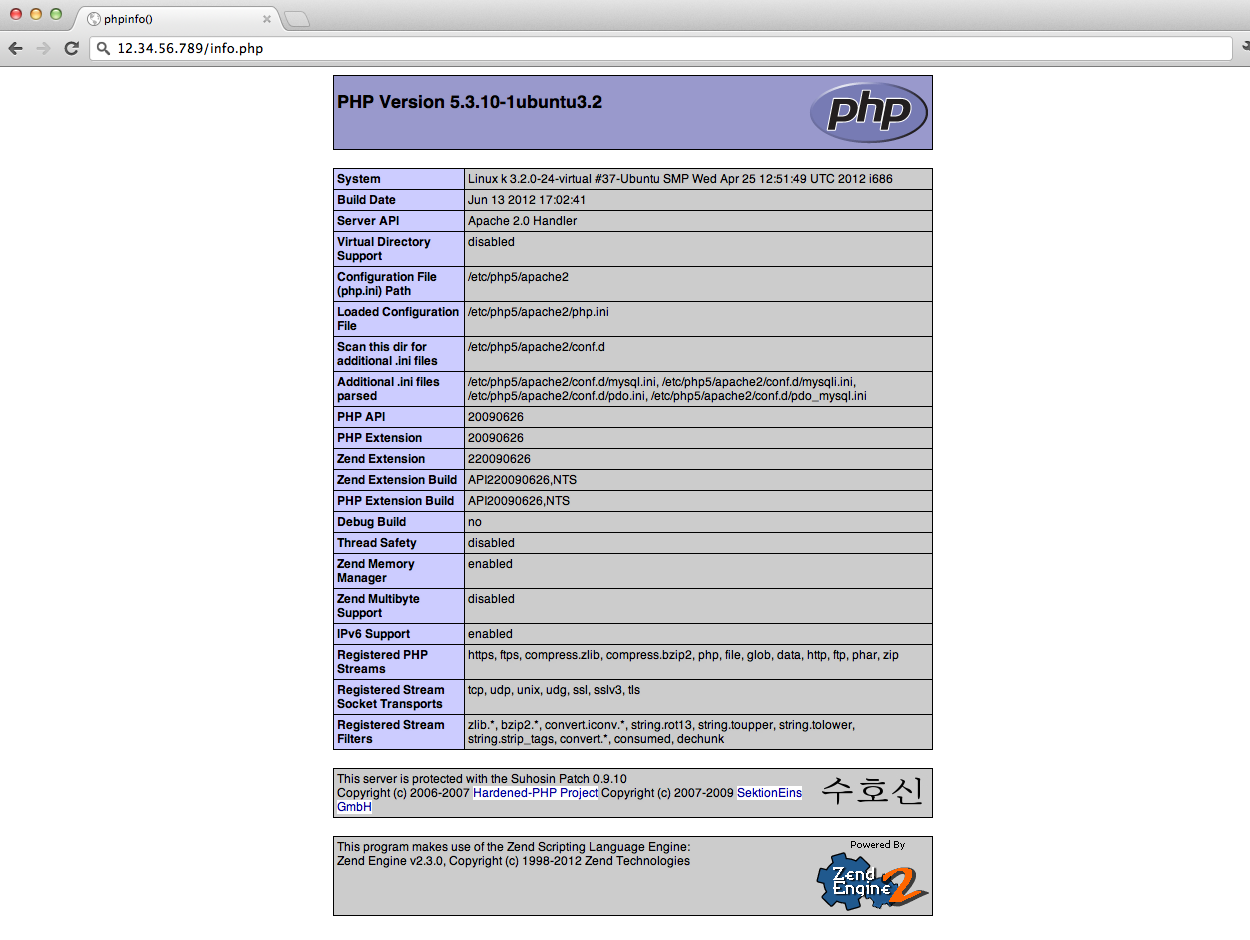
sudo service apache2 restartFinish up by visiting your php info page (make sure you replace the example ip address with your correct one): http://12.34.56.789/info.php
It should look similar to this.
Source: How To Install Linux, Apache, MySQL, PHP (LAMP) stack on Ubuntu | DigitalOcean
On Linux distributions, fdisk is the best tool to manage disk partitions. fdisk is a text based utility.Using fdisk you can create a new partition, delete an existing partition, or change existing partition.Using fidsk you are allowed to create a maximum of four primary partition, and any number of logical partitions, based on the size of the disk.Keep in mind that any single partition requires a minimum size of 40MB.In this article, let us review how to use fdisk command using practical examples.
Source: 7 Linux fdisk Command Examples to Manage Hard Disk Partition