Engineering and technology notes
Windows 7 32bit PAE
http://www.pallab.net/2009/12/30/enable-more-than-4gb-memory-in-windows-vista-7/
NodeMCU ESP-32S — Zerynth Docs documentation
Power
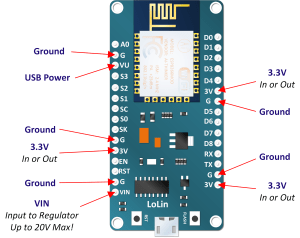
Power to the NodeMCU ESP-32S is supplied via the on-board USB Micro B connector or directly via the “VIN” pin. The power source is selected automatically.
The device can operate on an external supply of 6 to 20 volts. If using more than 12V, the voltage regulator may overheat and damage the device. The recommended range is 7 to 12 volts.

How to Power NodeMCU ESP-12E Board
NodeMCU Development Board Power Supplies The low cost NodeMCU can be powered a variety ways. The neat thing about the boards being offered on the internet is that they are largely the same. This…
How to Stop Wakelocks from Any Android App Without Root
Microscopes for SMD Soldering || $15 VS $45 VS $189
How to add webdav share in thunar
// My owncloud installation domain.com/owncloud
davs://user@domain.com/owncloud/remote.php/webdav/files/userCircuitPython
CircuitPython[8] is an open source derivative of the MicroPython programming language targeted towards the student and beginner. Development of CircuitPython is supported by Adafruit Industries. It is a software implementation of the Python 3 programming language, written in C.[3] It has been ported to run on several modern microcontrollers.
CircuitPython is a full Python compiler and runtime that runs on the microcontroller hardware. The user is presented with an interactive prompt (the REPL) to execute supported commands immediately. Included are a selection of core Python libraries. CircuitPython includes modules which give the programmer access to the low-level hardware of Adafruit compatible products as well as higher level libraries for beginners.[9]
CircuitPython is a fork of MicroPython, originally created by Damien George.[10] The MicroPython community continues to discuss[11] forks of MicroPython into variants such as CircuitPython.
CircuitPython is targeted to be compliant with CPython, the reference implementation of the Python programming language.[12] Programs written for CircuitPython compatible boards may not run unmodified on other platforms such as the Raspberry Pi.[13]
https://en.wikipedia.org/wiki/CircuitPython
STM32
STM32 is a family of 32-bit microcontroller integrated circuits by STMicroelectronics. The STM32 chips are grouped into related series that are based around the same 32-bit ARM processor core, such as the Cortex-M7F, Cortex-M4F, Cortex-M3, Cortex-M0+, or Cortex-M0. Internally, each microcontroller consists of the processor core, static RAM memory, flash memory, debugging interface, and various peripherals.
MicroPython
MicroPython is a software implementation of the Python 3 programming language, written in C, that is optimized to run on a microcontroller. MicroPython is a full Python compiler and runtime that runs on the micro-controller hardware. The user is presented with an interactive prompt (the REPL) to execute supported commands immediately. Included are a selection of core Python libraries; MicroPython includes modules which give the programmer access to low-level hardware.
MicroPythonMicropython-logo.svgOriginal author(s)Damien GeorgeInitial releaseMay 3, 2014; 4 years agoStable release1.9.4 / May 11, 2018; 6 months agoRepositorygithub.com/micropython/micropythonEdit this at WikidataWritten inCPlatformMicro Bit, Arduino, ESP8266, ESP32,STM32TypePython implementationLicenseMIT license Websitehttps://micropython.org[2]MicroPython was originally created by the Australian programmer and physicist Damien George, after a successful Kickstarter backed campaign in 2013.[6] While the original Kickstart campaign released MicroPython with a pyboard microcontroller, MicroPython supports a number of ARM based architectures. MicroPython has since been run on Arduino platform based products, ESP8266, ESP32, and Internet of things hardware. In 2016 a version of MicroPython for the BBC Micro Bit was created as part of the Python Software Foundation’s contribution to the Micro Bit partnership with the BBC.[16]
The source code for the project is available on GitHub.
Check hard disk for Bad Sectors by command-line in Ubuntu, Linux Mint, and elementary OS
Step 1: Next, let’s find if there are any Bad Sectors on the hard disk. We shall use badblocks command. Make sure to enter your hard disk info instead of /dev/sda in below command. My test PC has /dev/sda for the hard disk. This command will scan for bad blocks in the hard disk and then export the result to the file badsectors.txt in the ‘scan_result’ directory.
sudo badblocks -v /dev/sda > /scan_result/badsectors.txt
Step 2: Finally we shall use fsck command to tell Ubuntu not to use the bad sectors mentioned in the badsectors.txt file. That way life of the hard disk is increased a bit until you get a new one for replacement.
sudo fsck -l /scan_result/badsectors.txt /dev/sda