Pluggable authentication module – Wikipedia

pluggable authentication module (PAM) is a mechanism to integrate multiple low-level authentication schemes into a high-level application programming interface (API). It allows programs that rely on authentication to be written independent of the underlying authentication scheme. PAM was first proposed by Sun Microsystems in an Open Software Foundation Request for Comments (RFC) 86.0 dated October 1995. It was adopted as the authentication framework of the Common Desktop Environment. As a stand-alone open-source infrastructure, PAM first appeared in Red Hat Linux 3.0.4 in August 1996 in the Linux PAM project. PAM is currently supported in the AIX operating systemDragonFly BSD,[1] FreeBSDHP-UXLinuxmacOSNetBSD and Solaris.

Since no central standard of PAM behavior exists, there was a later attempt to standardize PAM as part of the X/Open UNIX standardization process, resulting in the X/Open Single Sign-on (XSSO) standard. This standard was not ratified, but the standard draft has served as a reference point for later PAM implementations (for example, OpenPAM).

Source: Pluggable authentication module – Wikipedia

Pluggable authentication module – Wikipedia was last modified: April 11th, 2020 by Jovan Stosic

Name Service Switch – Wikipedia

The Name Service Switch (NSS) is a facility in Unix-like operating systems that provides a variety of sources for common configuration databases and name resolution mechanisms. These sources include local operating system files (such as /etc/passwd/etc/group, and /etc/hosts), the Domain Name System (DNS), the Network Information Service (NIS), and LDAP.

nsswitch.conf

system administrator usually configures the operating system’s name services using the file /etc/nsswitch.conf. This lists databases (such as passwdshadow and group) and one or more sources for obtaining that information. Examples for sources are files for local files, ldap for the Lightweight Directory Access Protocolnis for the Network Information Servicenisplus for NIS+, and wins for Windows Internet Name Service.


Source: Name Service Switch – Wikipedia

Name Service Switch – Wikipedia was last modified: April 11th, 2020 by Jovan Stosic

How to Install and Configure OpenLDAP Server on Ubuntu 16.04 Step by Step

In this tutorial, we are going to take a look at installing and Configuring OpenLDAP server on Ubuntu 16.04 LTS. We will also install the phpLDAPadmin web-based management tool.

What is OpenLDAP

OpenLDAP is an open-source and fast directory server that provides network client with directory services. Client applications connect to OpenLDAP server using the Lightweight Directory Access Protocol (LDAP) to access organizational information stored on that server.  Given the appropriate access, clients can search the directory, modify and manipulate records in the directory. OpenLDAP is efficient on both reading and modifying data in the directory.

OpenLDAP servers are most commonly used to provide centralized management of user accounts. For example, you can create an account in OpenLDAP and if it is connected with mail server, FTP server, Samba server, or any other server, you can use the account to log in to these servers without creating a new account for each server.

How to Install OpenLDAP Server on Ubuntu 16.04

Run the following command to install OpenLDAP server and the client command-line utilities from Ubuntu 16.04 package repository. slapd stands for the Stand-Alone LDAP Daemon.

sudo apt install slapd ldap-utils

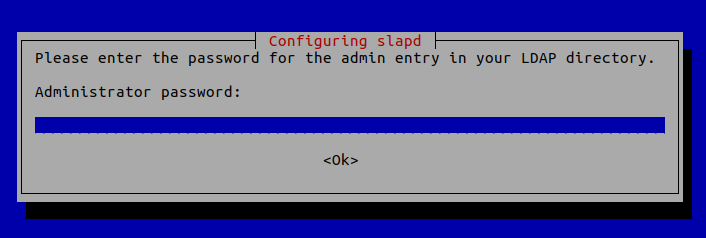
You will be asked to set a password for the admin entry in the LDAP directory.
Once it’s done, slapd will be automatically started. You can check out its status with:

systemctl status slapd

Be default, it runs as the openldap user as is defined in /etc/default/slapd file.

Basic Post-Installation Configuration

The installation process installs the package without any configurations. To have our OpenLDAP server running properly, we need to do some basic post-installation configuration. Run the following command to start the configuration wizard.

sudo dpkg-reconfigure slapd

You will need to answer a series of questions. Answer these questions as follows:

Omit LDAP server configuration: NO.

openldap ubuntu

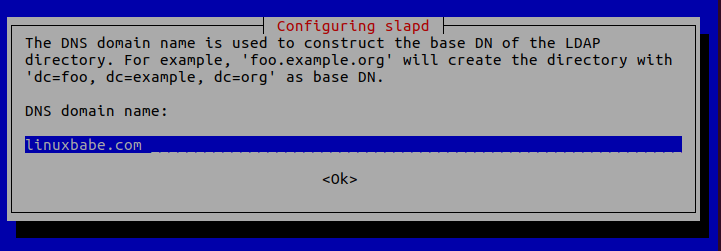
DNS domain name: Enter your domain name like linuxbabe.com. You will need to set a correct A record for your domain name. You can also use a subdomain like directory.linuxbabe.com. This information is used to create the base DN (distinguished name) of the LDAP directory.
install openldap ubuntu

Organization name: Enter your organization name like LinuxBabe.

ldap server configuration in ubuntu 16.04 step by step

Administrator password: Enter the same password set during installation.

openldap server ubuntu 16.04

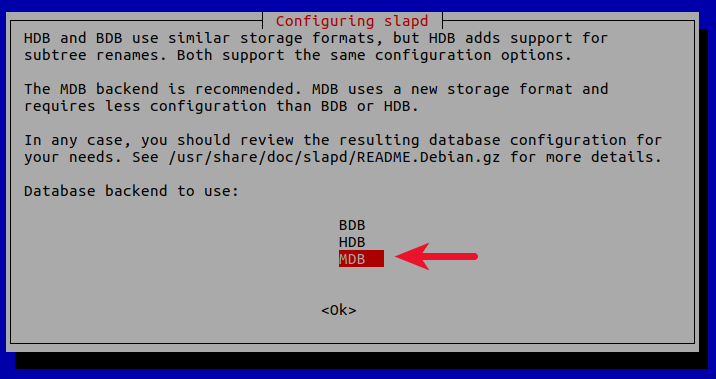
Database backend: MDB.

BDB (Berkeley Database) is slow and cumbersome. It is deprecated and support will be dropped in future OpenLDAP releases. HDB (Hierarchical Database) is a variant of the BDB backend and will also be deprecated.

MDB reads are 5-20x faster than BDB. Writes are 2-5x faster. And it consumes 1/4 as much RAM as BDB. So we choose MDB as the database backend.
openldap mdb

Do you want the database to be removed when slapd is purged? No.

install openldap server on ubuntu 16.04 LTS

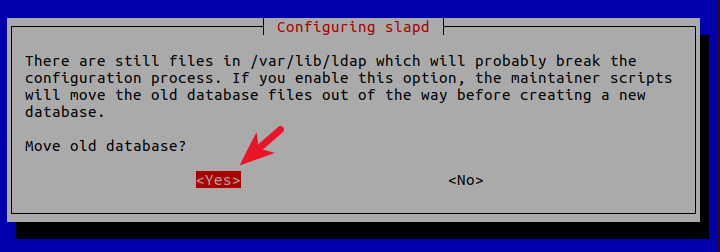
Move old database? Yes.

openldap server configuration

Allow LDAPv2 protocol? No. The latest version of LDAP is LDAP v.3, developed in 1997. LDAPv2 is obsolete.
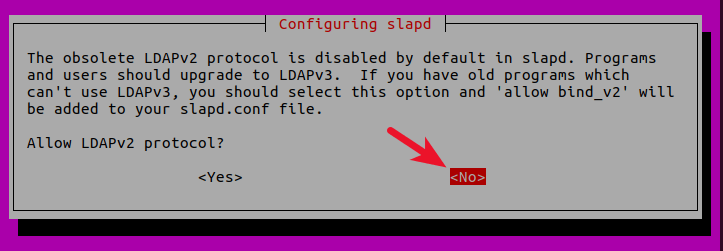
install ldap ubuntu

Now the process will reconfigure the OpenLDAP service according to your answers. Your OpenLDAP server is now ready to use.

openldap ubuntu 16.04 configuration

Configuring the LDAP Clients

/etc/ldap/ldap.conf is the configuration file for all OpenLDAP clients. Open this file.

sudo nano /etc/ldap/ldap.conf

We need to specify two parameters: the base DN and the URI of our OpenLDAP server. Copy and paste the following text at the end of the file. Replace your-domain and com as appropriate.

BASE     dc=your-domain,dc=com
URI      ldap://localhost

The first line defines the base DN. It tells the client programs where to start their search in the directory. If you used a subdomain when configuring OpenLDAP server, then you need to add the subdomain here like so

BASE      dc=subdomain,dc=your-domain,dc=com

The second line defines the URI of our OpenLDAP server. Since the LDAP server and client are on the same machine, we should set the URI to ldap://localhost.

Testing OpenLDAP Server

Now that OpenLDAP server is running and client configuration is done, run the following command to make test connections to the server.

ldapsearch -x

Output:

# extended LDIF
#
# LDAPv3
# base <dc=linuxbabe,dc=com> (default) with scope subtree
# filter: (objectclass=*)
# requesting: ALL
#

# linuxbabe.com
dn: dc=linuxbabe,dc=com
objectClass: top
objectClass: dcObject
objectClass: organization
o: LinuxBabe

# admin, linuxbabe.com
dn: cn=admin,dc=linuxbabe,dc=com
objectClass: simpleSecurityObject
objectClass: organizationalRole
cn: admin
description: LDAP administrator

# search result
search: 2
result: 0 Success

# numResponses: 3
# numEntries: 2

Result: 0 Success indicates that OpenLDAP server is working. If you get the following line, then it’s not working.

result: 32 No such object

Installing phpLDAPadmin

phpLDAPadmin is a web-based program for managing OpenLDAP server. The command-line utilities can be used to manage our OpenLDAP server, but for those who want an easy-to-use interface, you can install phpLDAPadmin.

Run the following command to install phpLDAPadmin from Ubuntu package repository.

sudo apt install phpldapadmin

If your Ubuntu server doesn’t have a web server running, then the above command will install the Apache web server as a dependency. If there’s already a web server such as Nginx, then Apache won’t be installed.

If you use Apache

The installation will put a configuration file phpldapadmin.conf under /etc/apache2/conf-enabled/ directory. Once the installation is done, you can access phpLDAPadmin web interface at

your-server-ip/phpldapadmin

or

your-domain.com/phpldapadmin

To enable HTTPS, you can obtain and install a free TLS certificate issued from Let’s Encrypt.

If you use Nginx

Nginx users will need to manually create a server block file for phpLDAPadmin.

sudo nano /etc/nginx/conf.d/phpldapadmin.conf

Copy the following text and paste it to the file. Replace ldap.your-domain.com with your preferred domain name.

server {
        listen 80;
        server_name ldap.your-domain.com;

        root /usr/share/phpldapadmin/htdocs;
        index index.php index.html index.htm;

        error_log /var/log/nginx/phpldapadmin.error;
        access_log /var/log/nginx/phpldapadmin.access;

        location ~ \.php$ {
            fastcgi_pass unix:/run/php/php7.0-fpm.sock;
            fastcgi_index index.php;
            fastcgi_param SCRIPT_FILENAME  $document_root/$fastcgi_script_name;
            include fastcgi_params;
        }
}

Save and close the file. Then text Nginx configurations.

sudo nginx -t

If the test is successful, reload Nginx for the changes to take effect.

sudo systemctl reload nginx

Now you can access phpLDAPadmin web interface at ldap.your-domain.com. To enable HTTPS, you can obtain and install a free TLS certificate issued from Let’s Encrypt.

Configuring phpLDAPadmin

We need to do some configurations just like we did with the command-line client. The phpLDAPadmin configuration file is at /etc/phpldapadmin/config.php .

sudo nano /etc/phpldapadmin/config.php

Since OpenLDAP and phpLDAPadmin are running on the same machine, so we will configure phpLDAPadmin to connect to localhost on the default LDAP port 389 without SSL/TLS encryption.

Line 293 specifies that phpLDAPadmin will connect to localhost.

$servers->setValue('server','host','127.0.0.1');

Line 296 is commented out by default, which means the standard port 389 will be used.

// $servers->setValue('server','port',389);

Line 335 is commented out by default, which means TLS encryption is not enabled.

// $servers->setValue('server','tls',false);

Then go to line 300.

$servers->setValue('server','base',array('dc=example,dc=com'));

Change it to:

$servers->setValue('server','base',array());

This will let phpLDAPadmin automatically detect the base DN of your OpenLDAP server. Next, you can disable anonymous login. Go to line 453.

// $servers->setValue('login','anon_bind',true);

By default, anonymous login is enabled. To disable it, you need to remove the comment character (the two slashes) and change true to false.

$servers->setValue('login','anon_bind',false);

You will probably want to disable template warnings because these warnings are annoying and unimportant. Go to line 161.

// $config->custom->appearance['hide_template_warning'] = false;

Remove the comment character and change false to true.

$config->custom->appearance['hide_template_warning'] = true;

Save and close the file.

Accessing phpLDAPadmin Web Interface

We can now test out the phpLDAPadmin tool with our web browser. When phpLDAPadmin first loads, it looks something like this.
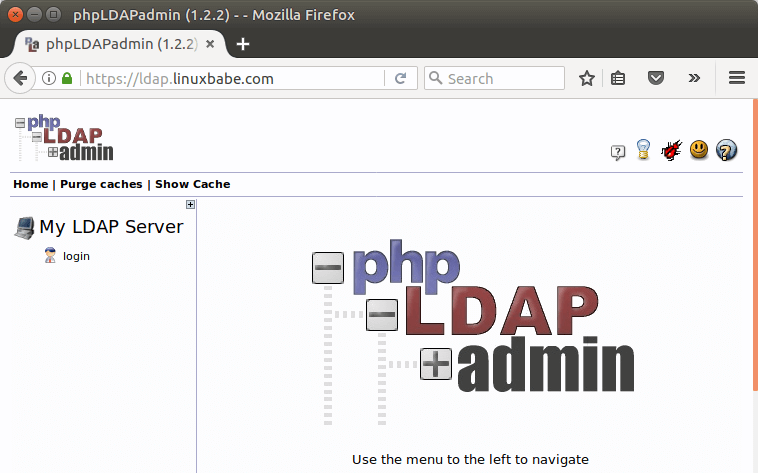
phpldapadmin

To log into our OpenLDAP server, click on the login link. You will see the login dialog box. The default login DN is cn=admin,dc=example,dc=com. You may need to change dc=example. In my case, I need to change the login DN to cn=admin,dc=linuxbabe,dc=com.
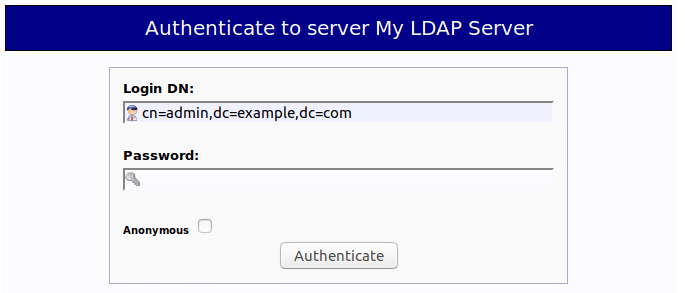
openldap web interface

The password is the admin password you set during the configuration of OpenLDAP server. Once you log into phpLDAPadmin, you can manage this directory server.
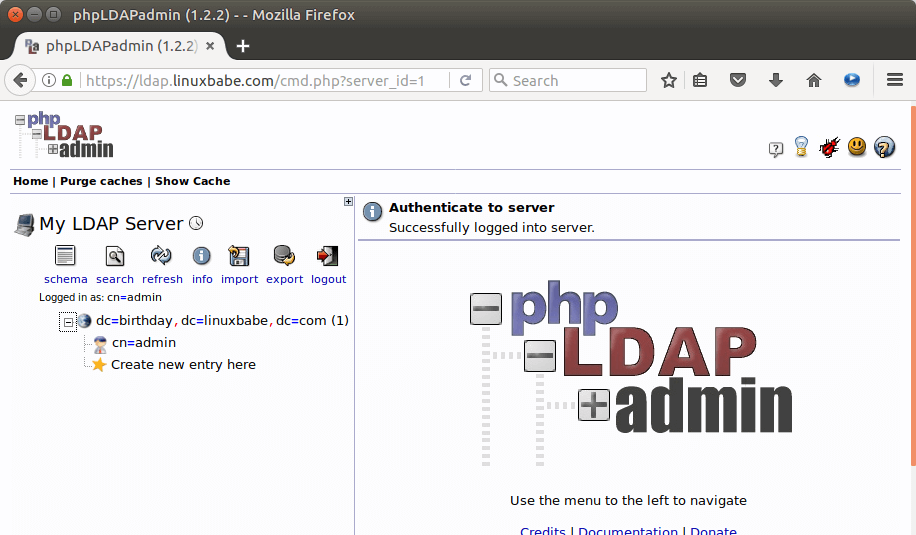
phpldapadmin configuration

That’s it! I hope this tutorial helped you install and configure both OpenLDAP server and phpLDAPadmin on Ubuntu 16.04. In the next tutorial, we will see how to configure Ubuntu to authenticate user logins with OpenLDAP.

Source: How to Install and Configure OpenLDAP Server on Ubuntu 16.04 Step by Step

How to Install and Configure OpenLDAP Server on Ubuntu 16.04 Step by Step was last modified: April 11th, 2020 by Jovan Stosic

How to populate an LDAP server with users and groups via phpLDAPadmin

Creating Organizational Units

LDAP breaks everything into very specific pieces, and we’re going to focus on two of those pieces: people and groups. Because we’re creating fairly generic Organizational Units (OUs), we’ll use the Generic Organizational Unit Template. To get there, log into phpLDAPadmin, click to expand your server listing (in my example it’s dc=monkeypantz,dc=net) and then click Create New Entry Here (Figure A).


Figure A

Figure A

Creating a new entry with phpLDAPadmin.

In the right pane (Figure B), select Generic: Organizational Unit.

Figure B

Figure B

Selecting from the many available objects on the LDAP server.

Let’s first create an OU named “groups”. In the next window type groups and click Create Object. Commit the group by clicking Commit in the next window (Figure C).

Figure C

Figure C

Committing your changes to LDAP.

You’ll see a new entry in the left pane called ou=groups (Figure D).

Figure D

Figure D

Our new OU ready to be used.

Let’s create a new OU named “users”. Walk through the same process as above, though name the OU “users” instead of “groups”. You’ll see “ou=groups” and “ou=users” in the left pane.

Creating groups

Now that we have an OU created for groups, we can add the necessary groups. Let’s create groups for “admin”, “developers”, and “users”. Here’s how.

  1. Click the groups OU in the left pane.
  2. In the resulting window, click Create Child Entry (Figure E).
  3. Click Generic: Posix Group.
  4. Type admin into the group text area.
  5. Click Create Object.
  6. Click Commit.
  7. Repeat the process for “developers” and “users”.

Figure E

Figure E

Creating a new group under the groups OU.

Creating users

Now that we have our groups created, we want to create users. To do this, follow these steps.

  1. Click ou=users from the left pane.
  2. In the resulting window, click Create A Child Entry.
  3. Select Generic: User Account.
  4. Fill out the required information- note that Common Name must be unique (Figure F).
  5. Click Create Object.
  6. Click Commit.
  7. Repeat this process until you have added your necessary users added.

Figure F

Figure F

Creating a new user.

Adding users to groups

To add a user to a group, you must know the user’s UID (named User ID in the user creation window). To find a UID go to ou=users | View X child (where X is the number of users) and then locate the user to be added and make note of their associated UID. Once you have that UID, let’s add that user to the developers group. Here’s how.

  1. Expand ou=groups.
  2. Click the developers group.
  3. Click Add New Attribute.
  4. From the drop-down, select memberUID.
  5. Enter the UID for the user in the memberUID section (Figure G).
  6. Click Update Object.

Figure G

Figure G

Adding a user to a group.

After you add the first user, adding subsequent users is much simpler. If you click the group name (under ou=groups in the left pane), you can click Modify Group Members (under memberUID) and then add the users from a list.

Source: How to populate an LDAP server with users and groups via phpLDAPadmin – TechRepublic

How to populate an LDAP server with users and groups via phpLDAPadmin was last modified: April 30th, 2020 by Jovan Stosic

CSS Selectors Reference

CSS Selectors

In CSS, selectors are patterns used to select the element(s) you want to style.

Use our CSS Selector Tester to demonstrate the different selectors.

Selector Example Example description
.class .intro Selects all elements with class=”intro”
.class1.class2 .name1.name2 Selects all elements with both name1 and name2 set within its class attribute
.class1 .class2 .name1 .name2 Selects all elements with name2 that is a descendant of an element with name1
#id #firstname Selects the element with id=”firstname”
* * Selects all elements
element p Selects all <p> elements
element.class p.intro Selects all <p> elements with class=”intro”
element,element div, p Selects all <div> elements and all <p> elements
element element div p Selects all <p> elements inside <div> elements
element>element div > p Selects all <p> elements where the parent is a <div> element
element+element div + p Selects all <p> elements that are placed immediately after <div> elements
element1~element2 p ~ ul Selects every <ul> element that are preceded by a <p> element
[attribute] [target] Selects all elements with a target attribute
[attribute=value] [target=_blank] Selects all elements with target=”_blank”
[attribute~=value] [title~=flower] Selects all elements with a title attribute containing the word “flower”
[attribute|=value] [lang|=en] Selects all elements with a lang attribute value starting with “en”
[attribute^=value] a[href^=”https”] Selects every <a> element whose href attribute value begins with “https”
[attribute$=value] a[href$=”.pdf”] Selects every <a> element whose href attribute value ends with “.pdf”
[attribute*=value] a[href*=”w3schools”] Selects every <a> element whose href attribute value contains the substring “w3schools”
:active a:active Selects the active link
::after p::after Insert something after the content of each <p> element
::before p::before Insert something before the content of each <p> element
:checked input:checked Selects every checked <input> element
:default input:default Selects the default <input> element
:disabled input:disabled Selects every disabled <input> element
:empty p:empty Selects every <p> element that has no children (including text nodes)
:enabled input:enabled Selects every enabled <input> element
:first-child p:first-child Selects every <p> element that is the first child of its parent
::first-letter p::first-letter Selects the first letter of every <p> element
::first-line p::first-line Selects the first line of every <p> element
:first-of-type p:first-of-type Selects every <p> element that is the first <p> element of its parent
:focus input:focus Selects the input element which has focus
:hover a:hover Selects links on mouse over
:in-range input:in-range Selects input elements with a value within a specified range
:indeterminate input:indeterminate Selects input elements that are in an indeterminate state
:invalid input:invalid Selects all input elements with an invalid value
:lang(language) p:lang(it) Selects every <p> element with a lang attribute equal to “it” (Italian)
:last-child p:last-child Selects every <p> element that is the last child of its parent
:last-of-type p:last-of-type Selects every <p> element that is the last <p> element of its parent
:link a:link Selects all unvisited links
:not(selector) :not(p) Selects every element that is not a <p> element
:nth-child(n) p:nth-child(2) Selects every <p> element that is the second child of its parent
:nth-last-child(n) p:nth-last-child(2) Selects every <p> element that is the second child of its parent, counting from the last child
:nth-last-of-type(n) p:nth-last-of-type(2) Selects every <p> element that is the second <p> element of its parent, counting from the last child
:nth-of-type(n) p:nth-of-type(2) Selects every <p> element that is the second <p> element of its parent
:only-of-type p:only-of-type Selects every <p> element that is the only <p> element of its parent
:only-child p:only-child Selects every <p> element that is the only child of its parent
:optional input:optional Selects input elements with no “required” attribute
:out-of-range input:out-of-range Selects input elements with a value outside a specified range
::placeholder input::placeholder Selects input elements with the “placeholder” attribute specified
:read-only input:read-only Selects input elements with the “readonly” attribute specified
:read-write input:read-write Selects input elements with the “readonly” attribute NOT specified
:required input:required Selects input elements with the “required” attribute specified
:root :root Selects the document’s root element
::selection ::selection Selects the portion of an element that is selected by a user
:target #news:target Selects the current active #news element (clicked on a URL containing that anchor name)
:valid input:valid Selects all input elements with a valid value
:visited a:visited Selects all visited links

Source: CSS Selectors Reference

CSS Selectors Reference was last modified: April 9th, 2020 by Jovan Stosic

Transmission Apache proxy setup

First enable the proxy modules in Apache:

sudo a2enmod proxy
sudo a2enmod proxy_http
sudo /etc/init.d/apache2 restart

Then you will have to edit /etc/apache2/mods-available/proxy.conf file. But before that backup your proxy.conf file:

cd /etc/apache2/mods-available
sudo mv proxy.conf proxy.conf.default

Now create a new file called proxy.conf using your favorite text editor and add the following lines to it:

<ifmodule mod_proxy.c>
  #turning ProxyRequests on and allowing proxying from all may allow
  #spammers to use your proxy to send email.

  ProxyRequests Off
  <proxy *>
    AddDefaultCharset off
    Order Allow,Deny
    Allow from all
  </proxy>

  ProxyPass /transmission http://localhost:9091/transmission
  ProxyPassReverse /transmission http://localhost:9091/transmission
  # Line below is optional
  Redirect permanent /transmission https://myserver.com/transmission/web/

  # Enable/disable the handling of HTTP/1.1 "Via:" headers.
  # ("Full" adds the server version; "Block" removes all outgoing Via: headers)
  # Set to one of: Off | On | Full | Block

  ProxyVia On
</ifmodule>

Source: Transmission Apache proxy setup

Transmission Apache proxy setup was last modified: April 6th, 2020 by Jovan Stosic