Month: August 2019
C’est si bon
https://translate.google.com/#view=home&op=translate&sl=fr&tl=en&text=C’est%20si%20bon
How to install a dash cam to fuse box Skoda Octavia 2012-2018
Shimano Alivio RD-M410 6/7/8 Speed MTB Bicycle Rear Derailleur Black New

PCB making, PCB prototyping – UV solder mask STEP by STEP
Sales presentation
In selling technique, a sales presentation or sales pitch is a line of talk that attempts to persuade someone or something, with a planned sales presentation strategy of a product or service designed to initiate and close a sale of the product or service.
A sales pitch is essentially designed to be either an introduction of a product or service to an audience who knows nothing about it, or a descriptive expansion of a product or service that an audience has already expressed interest in. Sales professionals prepare and give a sales pitch, which can be either formal or informal, and might be delivered in any number of ways.
https://en.wikipedia.org/wiki/Sales_presentation
Clonezilla – How to copy larger to smaller disk
1) Boot in Ubutu live cd and start gparted.
2) Shrink the source disk’s data partition (e.g. sdb2). From the free space create a new partition (e.g. sdb4).
3) On destination disk create sda1, sda2 and sda3 (swap) with same size and type as in original disk. From the free space create sda4 (smaller than sdb4).
4) Boot in Conezilla.
5) Chose beginer, disk to disk and copy partition to partition (sdb1 to sda1, sdb2 to sda2). Skip the sdb4.
CloneZilla Big to Small Disk Tutorial
Сафари низ дивите беспаќа на Јабланица – Нова Македонија
Clonezilla Clone Larger Disk to Smaller Disk – Workaround
Make Clonezilla clone to smaller drive possible
Officially, Clonezilla requires the destination partition to receive the clone to be equal or larger than the source one. Therefore, the only way to get this done is to shrink the source partition to fit the destination partition.
Clonezilla clone to smaller disk:
1. Open Disk Management in Windows 10/8/7. If you are running Linux system, you can boot your computer from GParted media.
2. Right click the source partition and click “Shrink Volume” and follow the wizard to shrink the partition.
3. When you get that done, reboot to Clonezilla.
4. Select the source disk and destination disk.
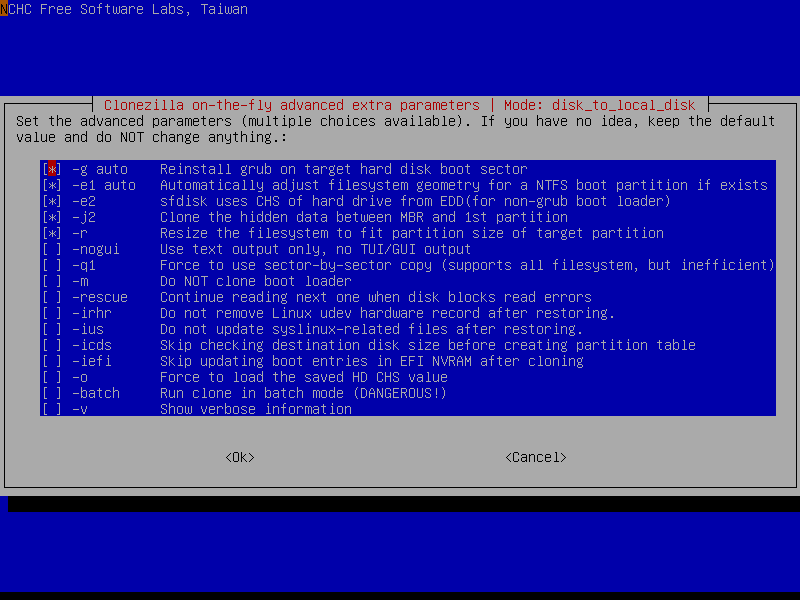
5. Choose EXPERT mode and enable the “-icds” option. You need to also choose the option”Resize partitional table proportionally” in one of the following menus.
6. Configure other Clonezilla options if needed and then type in “y” to confirm and start the clone.
https://www.backup-utility.com/articles/clonezilla-clone-larger-disk-to-smaller-disk-4348.html
Recovering Ubuntu After Installing Windows
Using the Ubuntu CD (Recommended)
The graphical way
- Insert your Ubuntu CD, reboot your computer and set it to boot from CD in the BIOS and boot into a live session. You can also use a LiveUSB if you have created one in the past.
-
Install and run Boot-Repair
- Click “Recommended Repair”.
- Now reboot your system. The usual GRUB boot menu should appear. If it does not, hold Left Shift while booting. You will be able to choose between Ubuntu and Windows.
The terminal way
* Open a terminal. As of Ubuntu 11.10 and 11.04, this can be done by opening the Unity Dash (you can click the Ubuntu logo in the top panel or use the Windows key on your keyboard) and typing in “Terminal”, and clicking what comes up. On earlier versions, you can achieve this by going to Applications -> Accessories -> Terminal. Alternately use the Keyboard Shortcut: CTRL + ALT + T.
For full details on using terminal to fix grub on hard drive from Live Installer DVD or Flash: https://help.ubuntu.com/community/Grub2/Installing#via_the_LiveCD_terminal
- You are then presented with a standard bash prompt, type – this only works to reinstall to MBR of a working system:
sudo grub-install /dev/XXX
where XXX is the device of your Ubuntu install. (eg: grub-install /dev/sdb). Hint: You can also use /dev/disk/by-label/ if the partition you installed on has a label. You can determine the /dev node for such a device by running:
ls -l /dev/disk/by-label/
This will give the output of something like:
lrwxrwxrwx 1 root root 10 Oct 16 10:27 data -> ../../sdb2
lrwxrwxrwx 1 root root 10 Oct 16 10:27 data2 -> ../../sda2
lrwxrwxrwx 1 root root 10 Oct 16 10:27 fat -> ../../sda6
lrwxrwxrwx 1 root root 10 Oct 16 10:27 home -> ../../sda7
lrwxrwxrwx 1 root root 10 Oct 16 10:27 root -> ../../sda1
lrwxrwxrwx 1 root root 10 Oct 16 10:27 swap -> ../../sda5
lrwxrwxrwx 1 root root 10 Oct 16 10:27 windows -> ../../sdb1
You can also use fdisk if you do not see the /dev/disk/by-label:
$ sudo fdisk -l

Disk /dev/sda: 160.0 GB, 160041885696 bytes
255 heads, 63 sectors/track, 19457 cylinders
Units = cylinders of 16065 * 512 = 8225280 bytes
Sector size (logical/physical): 512 bytes / 512 bytes
I/O size (minimum/optimal): 512 bytes / 512 bytes
Disk identifier: 0x0001bc54

   Device Boot      Start         End      Blocks   Id  System
/dev/sda1   *           1       18725   150403072   83  Linux
/dev/sda2           18725       19458     5884929    5  Extended
/dev/sda5           18725       19458     5884928   82  Linux swap / Solaris
From here, find only the drive name, ignore the partition number, that is, for partitions labeled “root”, “data2”, “fat”, “home” and “swap” it’s all still just sda. This is due to the fact that GRUB is installed in the MBR of the drive, and not on a partition.
Trouble? If other things are messed up, e.g. if you have deleted the partition from where Grub was previously installed, grub-install may return an error message such as “cannot find a device for /… (is /dev mounted?)”. You may have to do grub-install a bit differently. Refer to the handy guide on fixing a broken system
Now reboot your system. The usual GRUB boot menu should appear. If it does not, hold Left Shift while booting. You will be able to choose between Ubuntu and Windows.
https://help.ubuntu.com/community/RecoveringUbuntuAfterInstallingWindows
Watch “ASUS X501A – Disassembly and cleaning”
