Source: ZoneMinder Wiki – Wiki – Ubuntu Server 12.04 64-bit with Zoneminder 1.25.0 the easy way
Month: March 2017
How To Install Linux, Apache, MySQL, PHP (LAMP) stack on Ubuntu | DigitalOcean
About LAMP
LAMP stack is a group of open source software used to get web servers up and running. The acronym stands for Linux, Apache, MySQL, and PHP. Since the virtual private server is already running Ubuntu, the linux part is taken care of. Here is how to install the rest.
Set Up
The steps in this tutorial require the user to have root privileges on your VPS. You can see how to set that up in the Initial Server Setup in steps 3 and 4.
Step 1: Install Apache
Apache is a free open source software which runs over 50% of the world’s web servers.
To install apache, open terminal and type in these commands:
sudo apt-get update
sudo apt-get install apache2
That’s it. To check if Apache is installed, direct your browser to your server’s IP address (eg. http://12.34.56.789). The page should display the words “It works!” like this.
How to Find your Server’s IP address
You can run the following command to reveal your server’s IP address.
ifconfig eth0 | grep inet | awk '{ print $2 }'Step 2: Install MySQL
MySQL is a powerful database management system used for organizing and retrieving data
To install MySQL, open terminal and type in these commands:
sudo apt-get install mysql-server libapache2-mod-auth-mysql php5-mysqlDuring the installation, MySQL will ask you to set a root password. If you miss the chance to set the password while the program is installing, it is very easy to set the password later from within the MySQL shell.
Once you have installed MySQL, we should activate it with this command:
sudo mysql_install_dbFinish up by running the MySQL set up script:
sudo /usr/bin/mysql_secure_installationThe prompt will ask you for your current root password.
Type it in.
Enter current password for root (enter for none):

OK, successfully used password, moving on...
Then the prompt will ask you if you want to change the root password. Go ahead and choose N and move on to the next steps.
It’s easiest just to say Yes to all the options. At the end, MySQL will reload and implement the new changes.
By default, a MySQL installation has an anonymous user, allowing anyone
to log into MySQL without having to have a user account created for
them.  This is intended only for testing, and to make the installation
go a bit smoother.  You should remove them before moving into a
production environment.

Remove anonymous users? [Y/n] y
 ... Success!

Normally, root should only be allowed to connect from 'localhost'.  This
ensures that someone cannot guess at the root password from the network.

Disallow root login remotely? [Y/n] y
... Success!

By default, MySQL comes with a database named 'test' that anyone can
access.  This is also intended only for testing, and should be removed
before moving into a production environment.

Remove test database and access to it? [Y/n] y
 - Dropping test database...
 ... Success!
 - Removing privileges on test database...
 ... Success!

Reloading the privilege tables will ensure that all changes made so far
will take effect immediately.

Reload privilege tables now? [Y/n] y
 ... Success!

Cleaning up...
Once you’re done with that you can finish up by installing PHP.
Step 3: Install PHP
PHP is an open source web scripting language that is widely use to build dynamic webpages.
To install PHP, open terminal and type in this command.
sudo apt-get install php5 libapache2-mod-php5 php5-mcryptAfter you answer yes to the prompt twice, PHP will install itself.
It may also be useful to add php to the directory index, to serve the relevant php index files:
sudo nano /etc/apache2/mods-enabled/dir.confAdd index.php to the beginning of index files. The page should now look like this:
<IfModule mod_dir.c>

          DirectoryIndex index.php index.html index.cgi index.pl index.php index.xhtml index.htm

</IfModule>
PHP Modules
PHP also has a variety of useful libraries and modules that you can add onto your virtual server. You can see the libraries that are available.
apt-cache search php5-Terminal will then display the list of possible modules. The beginning looks like this:
php5-cgi - server-side, HTML-embedded scripting language (CGI binary)
php5-cli - command-line interpreter for the php5 scripting language
php5-common - Common files for packages built from the php5 source
php5-curl - CURL module for php5
php5-dbg - Debug symbols for PHP5
php5-dev - Files for PHP5 module development
php5-gd - GD module for php5
php5-gmp - GMP module for php5
php5-ldap - LDAP module for php5
php5-mysql - MySQL module for php5
php5-odbc - ODBC module for php5
php5-pgsql - PostgreSQL module for php5
php5-pspell - pspell module for php5
php5-recode - recode module for php5
php5-snmp - SNMP module for php5
php5-sqlite - SQLite module for php5
php5-tidy - tidy module for php5
php5-xmlrpc - XML-RPC module for php5
php5-xsl - XSL module for php5
php5-adodb - Extension optimising the ADOdb database abstraction library
php5-auth-pam - A PHP5 extension for PAM authentication
[...]
Once you decide to install the module, type:
sudo apt-get install name of the moduleYou can install multiple libraries at once by separating the name of each module with a space.
Congratulations! You now have LAMP stack on your droplet!
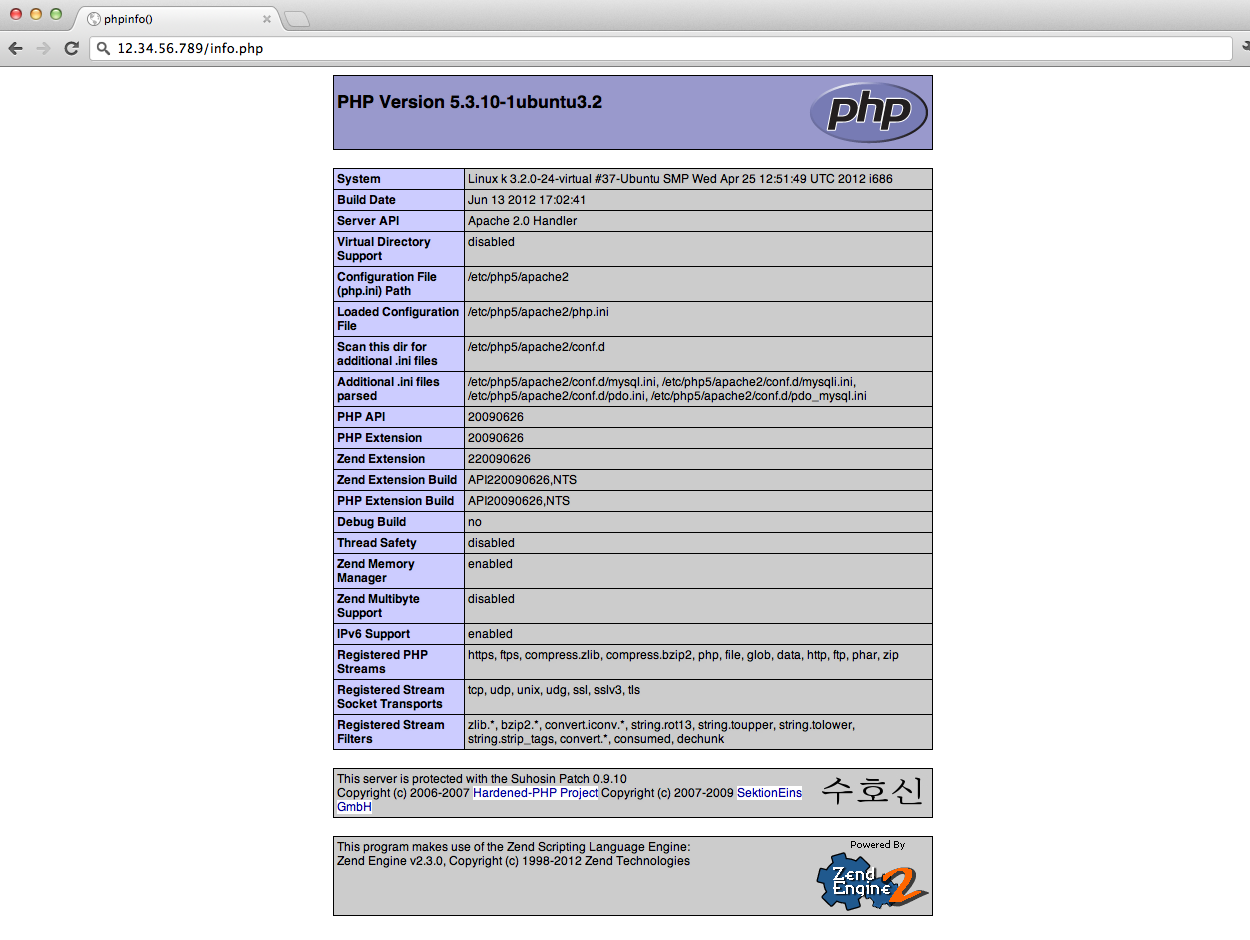
Step 4: RESULTS — See PHP on your Server
Although LAMP is installed, we can still take a look and see the components online by creating a quick php info page
To set this up, first create a new file:
sudo nano /var/www/info.phpAdd in the following line:
<?php
phpinfo();
?>
Then Save and Exit.
Restart apache so that all of the changes take effect:
sudo service apache2 restartFinish up by visiting your php info page (make sure you replace the example ip address with your correct one): http://12.34.56.789/info.php
It should look similar to this.
Source: How To Install Linux, Apache, MySQL, PHP (LAMP) stack on Ubuntu | DigitalOcean
7 Linux fdisk Command Examples to Manage Hard Disk Partition
On Linux distributions, fdisk is the best tool to manage disk partitions. fdisk is a text based utility.Using fdisk you can create a new partition, delete an existing partition, or change existing partition.Using fidsk you are allowed to create a maximum of four primary partition, and any number of logical partitions, based on the size of the disk.Keep in mind that any single partition requires a minimum size of 40MB.In this article, let us review how to use fdisk command using practical examples.
Source: 7 Linux fdisk Command Examples to Manage Hard Disk Partition
Grub2/Troubleshooting – Community Help Wiki
This page provides the user with information on options available for repairing GRUB 2 boot issues and specific instructions on how to use the GRUB 2 terminal. The instructions are written for GRUB 1.99, which is the version of GRUB 2 which is included on Ubuntu 11.04, Natty Narwhal, and later. Differences for version 1.98 (Ubuntu 10.4, Lucid Lynx) are noted when the procedures differ.
GRUB 2’s ability to fix boot problems is greatly improved over the original GRUB bootloader. In addition to an automatic fallback mode if booting from a menuentry in a submenu, GRUB 2 allows the user to edit its menu before the operating system is loaded. The rescue mode GRUB 2 terminal can help boot an operating system so that permanent repairs to system files can be made.
The instructions on this page are written for a fully-installed Ubuntu operating system. WUBI boot problems are not covered in detail although they are addressed in several sections.

grub2 – After update, get “error: file not found.” followed by “grub rescue> _” – Ask Ubuntu
Use Boot Repair to fix your bootloader.
- Boot Ubuntu from a LiveCD or Live USB
- Connect to the internet
- Open a terminal, and add the Boot Repair PPA
sudo add-apt-repository ppa:yannubuntu/boot-repair && sudo apt-get update- Install Boot Repair
sudo apt-get install -y boot-repair && boot-repair- Launch and use, see https://help.ubuntu.com/community/Boot-Repair#Using_Boot-Repair for more details
Source: grub2 – After update, get “error: file not found.” followed by “grub rescue> _” – Ask Ubuntu
installation – How to fix ‘grub error file not found’ when installing 12.04? – Ask Ubuntu

i’m trying to install Ubuntu. I don’t know if it is important, but i’m trying to install it on external HDD.
In the end i have external bootable HDD which only displays:
error: file not found
grub recovery>
From the beginning:
- I’ve downloaded ubuntu-12.04-desktop-i386.iso
- I’ve used LiLi USB Creator (LinuxLive) to create bootable pendrive from that image
- I’ve bootet from it, it works
- I’ve clicked “Try ubuntu”, it works too.
I’ve used GParted to look over drivers (disks)
My primary embedded disk is seen as /dev/sda
My attached external disk as /dev/sdb
My PenDrive as /dev/sdc
- I’ve created partitions on /dev/sdb
- Fist partition for system (over 200GiB)
- Second was there already (it’s xsf, and i don’t want to touch it :P)
- Third is extended partition, with 1 locital partiton (10GiB) for swap
- I’ve started installation
- i’ve choose “somethin else” in … i belive secound screeb
- then is selected /dev/sdb as boot disk
- for first partiton of /dev/sdb i set i want ext3 file system, i’ve check “formattin” checkbox, and mount path set to “/”
- firs logical partiton set as swap partition
After installation finished, i restarted my computer. When i boot from my primary disc it’s work ok, my previous operating system – vista – works ok. When i set my BIOS to boot from my external disc, i only get that message:
error: file not found
grub recovery>
- I’ve try to reinstall it, but didn’t help…
In desperation, i’ve try to read a bit about that “grub recovery>” command-line and experiment a bit… I’m not sure if this has had any point, or if it give you some information (notice, that i don’t know what i’m doing 😛 )
when i’ve type command:
insmod (hd1,1)/boot/grub/linux.modi’ve get message:
unknown filesystemthe same with:
insmod (hd1,msdos1)/boot/grub/linux.modthe same with:
insmod ext3but i get no message after command:
insmod ext2…
notice that i really don’t know what this command exactly do, but than i thought that maybe if i reinstall ubuntu with ext2 filesystem, it will work. I’ve done that, but symptoms are the same.
I’ve go back to that Live version of ubuntu, filesystem and basics directories seems to be present on /dev/sdb1 … i’m completely unfamiliar with GRUB. I’m also don’t know which wersion of GRUB it is, i hope there is only one version on ubuntu-12.04-desktop-i386.iso
Any help? Thax
======================= edit 17.06.2012 22:05 =========================
This is RESULTS.txt from bootinfoscript
sda is my in-build HDD
sdb is external HDD (disk-destination for Ubuntu)
sdc is PenDrive with Live Ubuntu
                  Boot Info Script 0.61      [1 April 2012]


============================= Boot Info Summary: ===============================

 => Windows is installed in the MBR of /dev/sda.
 => Grub2 (v1.99) is installed in the MBR of /dev/sdb and looks at sector 1 of
    the same hard drive for core.img. core.img is at this location and looks
    for (,msdos1)/boot/grub on this drive.
 => Syslinux MBR (4.04 and higher) is installed in the MBR of /dev/sdc.

sda1: __________________________________________________________________________

    File system:       vfat
    Boot sector type:  Windows 7: FAT32
    Boot sector info:  No errors found in the Boot Parameter Block.
    Operating System:
    Boot files:        /bootmgr /boot/bcd

sda2: __________________________________________________________________________

    File system:       ntfs
    Boot sector type:  Windows Vista/7: NTFS
    Boot sector info:  No errors found in the Boot Parameter Block.
    Operating System:  Windows Vista
    Boot files:        /bootmgr /Boot/BCD /Windows/System32/winload.exe

sda3: __________________________________________________________________________

    File system:       Extended Partition
    Boot sector type:  -
    Boot sector info:

sda5: __________________________________________________________________________

    File system:       ntfs
    Boot sector type:  Windows Vista/7: NTFS
    Boot sector info:  According to the info in the boot sector, sda5 starts
                       at sector 63.
    Operating System:
    Boot files:

sdb1: __________________________________________________________________________

    File system:       ext2
    Boot sector type:  -
    Boot sector info:
    Operating System:  Ubuntu 12.04 LTS
    Boot files:        /boot/grub/grub.cfg /etc/fstab /boot/grub/core.img

sdb3: __________________________________________________________________________

    File system:       xfs
    Boot sector type:  -
    Boot sector info:
    Mounting failed:   mount: /dev/sdb3: can't read superblock

sdb4: __________________________________________________________________________

    File system:       Extended Partition
    Boot sector type:  -
    Boot sector info:

sdb5: __________________________________________________________________________

    File system:       swap
    Boot sector type:  -
    Boot sector info:

sdc1: __________________________________________________________________________

    File system:       vfat
    Boot sector type:  SYSLINUX 4.04 2011-04-18
    Boot sector info:  Syslinux looks at sector 3250552 of /dev/sdc1 for its
                       second stage. SYSLINUX is installed in the  directory.
                       The integrity check of the ADV area failed. No errors
                       found in the Boot Parameter Block.
    Operating System:
    Boot files:        /syslinux/syslinux.cfg /ldlinux.sys

============================ Drive/Partition Info: =============================

Drive: sda _____________________________________________________________________

Disk /dev/sda: 160.0 GB, 160041885696 bytes
16 heads, 63 sectors/track, 310101 cylinders, total 312581808 sectors
Units = sectors of 1 * 512 = 512 bytes
Sector size (logical/physical): 512 bytes / 512 bytes

Partition  Boot  Start Sector    End Sector  # of Sectors  Id System

/dev/sda1               2,048    20,482,047    20,480,000  1c Hidden W95 FAT32 (LBA)
/dev/sda2    *     20,482,048   176,771,071   156,289,024   7 NTFS / exFAT / HPFS
/dev/sda3         176,771,072   312,580,095   135,809,024   f W95 Extended (LBA)
/dev/sda5         176,773,120   312,580,095   135,806,976   7 NTFS / exFAT / HPFS


Drive: sdb _____________________________________________________________________

Disk /dev/sdb: 640.1 GB, 640135028736 bytes
255 heads, 63 sectors/track, 77825 cylinders, total 1250263728 sectors
Units = sectors of 1 * 512 = 512 bytes
Sector size (logical/physical): 512 bytes / 512 bytes

Partition  Boot  Start Sector    End Sector  # of Sectors  Id System

/dev/sdb1    *          2,048   574,773,569   574,771,522  83 Linux
/dev/sdb3         574,773,570 1,208,315,584   633,542,015   7 NTFS / exFAT / HPFS
/dev/sdb4       1,208,317,950 1,229,289,471    20,971,522   f W95 Extended (LBA)
/dev/sdb5       1,208,317,952 1,229,289,471    20,971,520  82 Linux swap / Solaris


Drive: sdc _____________________________________________________________________

Disk /dev/sdc: 1971 MB, 1971322880 bytes
129 heads, 40 sectors/track, 746 cylinders, total 3850240 sectors
Units = sectors of 1 * 512 = 512 bytes
Sector size (logical/physical): 512 bytes / 512 bytes

Partition  Boot  Start Sector    End Sector  # of Sectors  Id System

/dev/sdc1    *             40     3,850,239     3,850,200   6 FAT16


"blkid" output: ________________________________________________________________

Device           UUID                                   TYPE       LABEL

/dev/loop0                                              squashfs
/dev/loop1       7aa47a24-93a0-d54f-a03c-495cf2ee0927   ext2
/dev/sda1        3C98-AC5D                              vfat       RECOVERY
/dev/sda2        94CA2D3CCA2D1BCC                       ntfs       VistaOS
/dev/sda5        A2F09F72F09F4B83                       ntfs       DATA
/dev/sdb1        a4befd4a-f91f-4f09-9d5f-a44991ed6a2e   ext2
/dev/sdb3        973a36d7-5828-4291-b455-db286cd69668   xfs
/dev/sdb5        9ce43dea-fd93-4343-969d-1243397724bd   swap
/dev/sdc1        7232-C522                              vfat       GOODDRIVE

================================ Mount points: =================================

Device           Mount_Point              Type       Options

/dev/loop0       /rofs                    squashfs   (ro,noatime)
/dev/sdc1        /cdrom                   vfat       (rw,relatime,fmask=0022,dmask=0022,codepage=cp437,iocharset=iso8859-1,shortname=mixed,errors=remount-ro)


=========================== sdb1/boot/grub/grub.cfg: ===========================

--------------------------------------------------------------------------------
#
# DO NOT EDIT THIS FILE
#
# It is automatically generated by grub-mkconfig using templates
# from /etc/grub.d and settings from /etc/default/grub
#

### BEGIN /etc/grub.d/00_header ###
if [ -s $prefix/grubenv ]; then
  set have_grubenv=true
  load_env
fi
set default="0"
if [ "${prev_saved_entry}" ]; then
  set saved_entry="${prev_saved_entry}"
  save_env saved_entry
  set prev_saved_entry=
  save_env prev_saved_entry
  set boot_once=true
fi

function savedefault {
  if [ -z "${boot_once}" ]; then
    saved_entry="${chosen}"
    save_env saved_entry
  fi
}

function recordfail {
  set recordfail=1
  if [ -n "${have_grubenv}" ]; then if [ -z "${boot_once}" ]; then save_env recordfail; fi; fi
}

function load_video {
  insmod vbe
  insmod vga
  insmod video_bochs
  insmod video_cirrus
}

insmod part_msdos
insmod ext2
set root='(hd1,msdos1)'
search --no-floppy --fs-uuid --set=root a4befd4a-f91f-4f09-9d5f-a44991ed6a2e
if loadfont /usr/share/grub/unicode.pf2 ; then
  set gfxmode=auto
  load_video
  insmod gfxterm
  insmod part_msdos
  insmod ext2
  set root='(hd1,msdos1)'
  search --no-floppy --fs-uuid --set=root a4befd4a-f91f-4f09-9d5f-a44991ed6a2e
  set locale_dir=($root)/boot/grub/locale
  set lang=pl_PL
  insmod gettext
fi
terminal_output gfxterm
if [ "${recordfail}" = 1 ]; then
  set timeout=-1
else
  set timeout=10
fi
### END /etc/grub.d/00_header ###

### BEGIN /etc/grub.d/05_debian_theme ###
set menu_color_normal=white/black
set menu_color_highlight=black/light-gray
if background_color 44,0,30; then
  clear
fi
### END /etc/grub.d/05_debian_theme ###

### BEGIN /etc/grub.d/10_linux ###
function gfxmode {
    set gfxpayload="$1"
    if [ "$1" = "keep" ]; then
        set vt_handoff=vt.handoff=7
    else
        set vt_handoff=
    fi
}
if [ ${recordfail} != 1 ]; then
  if [ -e ${prefix}/gfxblacklist.txt ]; then
    if hwmatch ${prefix}/gfxblacklist.txt 3; then
      if [ ${match} = 0 ]; then
        set linux_gfx_mode=keep
      else
        set linux_gfx_mode=text
      fi
    else
      set linux_gfx_mode=text
    fi
  else
    set linux_gfx_mode=keep
  fi
else
  set linux_gfx_mode=text
fi
export linux_gfx_mode
if [ "$linux_gfx_mode" != "text" ]; then load_video; fi
menuentry 'Ubuntu, za pomocą systemu Linux 3.2.0-23-generic-pae' --class ubuntu --class gnu-linux --class gnu --class os {
    recordfail
    gfxmode $linux_gfx_mode
    insmod gzio
    insmod part_msdos
    insmod ext2
    set root='(hd1,msdos1)'
    search --no-floppy --fs-uuid --set=root a4befd4a-f91f-4f09-9d5f-a44991ed6a2e
    linux   /boot/vmlinuz-3.2.0-23-generic-pae root=/dev/sdb1 ro   quiet splash $vt_handoff
    initrd  /boot/initrd.img-3.2.0-23-generic-pae
}
menuentry 'Ubuntu, za pomocą systemu Linux 3.2.0-23-generic-pae (tryb ratunkowy)' --class ubuntu --class gnu-linux --class gnu --class os {
    recordfail
    insmod gzio
    insmod part_msdos
    insmod ext2
    set root='(hd1,msdos1)'
    search --no-floppy --fs-uuid --set=root a4befd4a-f91f-4f09-9d5f-a44991ed6a2e
    echo    'Wczytywanie systemu Linux 3.2.0-23-generic-pae...'
    linux   /boot/vmlinuz-3.2.0-23-generic-pae root=/dev/sdb1 ro recovery nomodeset
    echo    'Wczytywanie początkowego dysku RAM...'
    initrd  /boot/initrd.img-3.2.0-23-generic-pae
}
### END /etc/grub.d/10_linux ###

### BEGIN /etc/grub.d/20_linux_xen ###
### END /etc/grub.d/20_linux_xen ###

### BEGIN /etc/grub.d/20_memtest86+ ###
menuentry "Memory test (memtest86+)" {
    insmod part_msdos
    insmod ext2
    set root='(hd1,msdos1)'
    search --no-floppy --fs-uuid --set=root a4befd4a-f91f-4f09-9d5f-a44991ed6a2e
    linux16 /boot/memtest86+.bin
}
menuentry "Memory test (memtest86+, serial console 115200)" {
    insmod part_msdos
    insmod ext2
    set root='(hd1,msdos1)'
    search --no-floppy --fs-uuid --set=root a4befd4a-f91f-4f09-9d5f-a44991ed6a2e
    linux16 /boot/memtest86+.bin console=ttyS0,115200n8
}
### END /etc/grub.d/20_memtest86+ ###

### BEGIN /etc/grub.d/30_os-prober ###
menuentry "Windows Recovery Environment (loader) (on /dev/sda1)" --class windows --class os {
    insmod part_msdos
    insmod fat
    set root='(hd0,msdos1)'
    search --no-floppy --fs-uuid --set=root 3C98-AC5D
    drivemap -s (hd0) ${root}
    chainloader +1
}
menuentry "Windows Vista (loader) (on /dev/sda2)" --class windows --class os {
    insmod part_msdos
    insmod ntfs
    set root='(hd0,msdos2)'
    search --no-floppy --fs-uuid --set=root 94CA2D3CCA2D1BCC
    chainloader +1
}
### END /etc/grub.d/30_os-prober ###

### BEGIN /etc/grub.d/40_custom ###
# This file provides an easy way to add custom menu entries.  Simply type the
# menu entries you want to add after this comment.  Be careful not to change
# the 'exec tail' line above.
### END /etc/grub.d/40_custom ###

### BEGIN /etc/grub.d/41_custom ###
if [ -f  $prefix/custom.cfg ]; then
  source $prefix/custom.cfg;
fi
### END /etc/grub.d/41_custom ###
--------------------------------------------------------------------------------

=============================== sdb1/etc/fstab: ================================

--------------------------------------------------------------------------------
# /etc/fstab: static file system information.
#
# Use 'blkid' to print the universally unique identifier for a
# device; this may be used with UUID= as a more robust way to name devices
# that works even if disks are added and removed. See fstab(5).
#
# <file system> <mount point>   <type>  <options>       <dump>  <pass>
proc            /proc           proc    nodev,noexec,nosuid 0       0
# / was on /dev/sdb1 during installation
UUID=a4befd4a-f91f-4f09-9d5f-a44991ed6a2e /               ext2    errors=remount-ro 0       1
# swap was on /dev/sdb5 during installation
UUID=9ce43dea-fd93-4343-969d-1243397724bd none            swap    sw              0       0
--------------------------------------------------------------------------------

=================== sdb1: Location of files loaded by Grub: ====================

           GiB - GB             File                                 Fragment(s)

               =                boot/grub/core.img                             1
               =                boot/grub/grub.cfg                             1
               =                boot/initrd.img-3.2.0-23-generic-pae           6
               =                boot/vmlinuz-3.2.0-23-generic-pae              3
               =                initrd.img                                     6
               =                vmlinuz                                        3

========================= sdc1/syslinux/syslinux.cfg: ==========================

--------------------------------------------------------------------------------
# D-I config version 2.0
include menu.cfg
default vesamenu.c32
prompt 0
timeout 50
ui gfxboot bootlogo
--------------------------------------------------------------------------------

================= sdc1: Location of files loaded by Syslinux: ==================

           GiB - GB             File                                 Fragment(s)

            ?? = ??             ldlinux.sys                                    1
            ?? = ??             syslinux/chain.c32                             1
            ?? = ??             syslinux/gfxboot.c32                           1
            ?? = ??             syslinux/syslinux.cfg                          1
            ?? = ??             syslinux/vesamenu.c32                          1

============== sdc1: Version of COM32(R) files used by Syslinux: ===============

 syslinux/chain.c32                 :  COM32R module (v4.xx)
 syslinux/gfxboot.c32               :  COM32R module (v4.xx)
 syslinux/vesamenu.c32              :  COM32R module (v4.xx)

=============================== StdErr Messages: ===============================

xz: (stdin): Compressed data is corrupt
awk: cmd. line:36: Math support is not compiled in
awk: cmd. line:36: Math support is not compiled in
awk: cmd. line:36: Math support is not compiled in
awk: cmd. line:36: Math support is not compiled in
awk: cmd. line:36: Math support is not compiled in
awk: cmd. line:36: Math support is not compiled in
/home/ubuntu/Pobrane/bootinfoscript-061/bootinfoscript: line 1646: [: 2.73495e+09: integer expression expected
I have to say that script print on terminal:
Boot Info Script 0.61      [1 April 2012]


"gawk" could not be found, using "busybox awk" instead.
This may lead to unreliable results.

Identifying MBRs...
Computing Partition Table of /dev/sda...
Computing Partition Table of /dev/sdb...
Computing Partition Table of /dev/sdc...
Searching sda1 for information...
Searching sda2 for information...
Searching sda3 for information...
Searching sda5 for information...
Searching sdb1 for information...
Searching sdb3 for information...
Searching sdb4 for information...
Searching sdb5 for information...
Searching sdc1 for information...

Finished. The results are in the file "RESULTS.txt"
located in "/home/ubuntu/Pobrane/bootinfoscript-061/".
============== edit 18.06.2012 18:38 ===============
ok, this is more or less copy of my grub recovery session:
error: file not found
grub recovery> set
prefix=(hd0,msdos1)/boot/grub
root=hd0,msdos1
grub recovery> ls
(hd0) (hd0,msdos3) (hd0,msdos1) (hd1) (hd1,msdos5) (hd1,msdos2) (hd1,msdos1)
grub recovery> ls $prefix

error: file not found
grub recovery>
then i’ve used ‘ls’ cmd on few path, results are strange (i think):
grub recovery> ls (hd0,msdos1)/boot

grub recovery> ls (hd0,msdos1)/boot/grub

error: file not found
grub recovery> ls (hd0,msdos1)/lib

grub recovery> ls (hd0,msdos1)/bin

grub recovery> ls (hd0,msdos1)/sys
./ ../
grub recovery> ls (hd0,msdos1)/sbin

grub recovery> ls (hd0,msdos1)/usr
./ ../ local/ (and some other things)
is this normal? i can see /boot/grub and its content when i mount this external HDD by Live Ubuntu
The symptom of being able to see some files but not all on a filesystem with grub usually means that your BIOS is buggy and can’t properly handle large drives ( http://tldp.org/HOWTO/Large-Disk-HOWTO-4.html ). What happens is that the BIOS can’t read blocks past a certain point in the drive, and so if your root filesystem starts before that limit, but ends after that limit, then some files will be accessible at boot through the BIOS and others won’t. The standard way to work around this problem is to create a small /boot/ partition near the beginning of the drive, to ensure that everything that needs to be read through the BIOS, can be.
I would normally expect “out of disk” errors from grub were this the case, and I don’t know why we’re not seeing those. One way to confirm that the problem is a BIOS limit is to go into your BIOS menus and see what size it lists the drive as being, if it lists it as being less that the actual size, you know your BIOS is buggy. Another way, if your BIOS doesn’t list sizes anywhere in its menus, is to run “ls -l” from grub and look at the size listed there. Unfortunately, you can’t run “ls -l” from the rescue shell, so you’d need to boot from a grub CD, or have already fixed the problem with a small /boot/ partition, before you could do the check from within grub.
Change your booting preferences to boot from the external hard disk. The computer is trying to find grub on your in- built HDD but its actually in the external HDD. So you will have to change your booting options to use that external HDD for booting as the first preference and then the in – built HDD the second preference. So if your insert your external HDD then it will automatically boot ubuntu and if you don’t then it will boot up the system that you have installed it in the in – built HDD.
If your still having issues with this try the “GRUB Customizer”
sudo apt-get grub-customizer
PLUG IN YOUR PENDRIVE or external USB
start it from the gui Administrator tools Admin->grub-Customizer or Q!
After it starts it will read your boot script similar to bootinfoscript so wait a few seconds for it to finish then the boot information window will change color from grey to normal.
You can then edit the boot information for each drive as it was found.
to Add a new entry just press edit->Add then select Linux. using the tab button verify that the disk UUID matches the disk you want to boot from.
click finish.
click save button
verify your edits manual view the grub-boot menu to ensure edits were saved. I am assuming your grub boot loader is on hd0 or sda0. cat out
/hd0/boot/grub/grub.cfg # don’t edit this file just view or verify it. or run your bootinfoscript again.
if this doesn’t fix the problem then you could be having issues with the kernel. I had to reinstall my Ubuntu-LTS this way because another Linux 64bit install diddled with the boot loader too much. If your using a 64bit machine then verify that the usb-drive /pendrive is also 64-bit OS. Otherwise the USB driver will fork when it tries to load the USB drive.
It was a good idea that the new OS be kept small about 6-10MB so you don’t hit the upper bound limits on Large GB-HDs. You also need to verify that any external USB drivers are installed before grub runs. To do this press the down-arrow key on the purple screen to see what modules are being installed and which ones fork.
If this didn’t help you try using a rescue disk to pick up the missing kernel/files. I use bootrecovery-CD (sourceforge:boot-repair-diskx64) or Linux-remix-CD (www.ubuntu-rescue-remix.org) when things go wrong with Grub-Customizer.
Source: installation – How to fix ‘grub error file not found’ when installing 12.04? – Ask Ubuntu
Elektor

Elektor is a monthly magazine about all aspects of electronics, first published as Elektuur in the Netherlands in 1960, and now published worldwide in many languages including English, German, Dutch, French, Greek, Spanish, Swedish, Portuguese (European and Brazilian) and Italian with distribution in over 50 countries. The English language edition of Elektor was launched in 1975 and is read worldwide.
Elektor publishes a vast range of electronic projects, background articles and designs aimed at engineers, enthusiasts, students and professionals. To help readers build featured projects, Elektor also offer PCBs (printed circuit boards) of many of their designs, as well as kits and modules. If the project employs a microcontroller and/or PC software, as is now often the case, Elektor normally supply the source code and files free of charge via their website. Most PCB artwork is also available from their website.
Elektor also publish books, CDs and DVDs about audio, microprocessors, software, programming languages and general purpose electronics.
Elektor is published by Elektor International media, headquartered in Limbricht, The Netherlands.
In December 2009 Elektor announced that for the American market a strategic cooperation would be entered with Steve Ciarcia‘s Circuit Cellar magazine [1][2]
It also features articles about vintage electronics e.g. from the 1960s called retronics.
The English edition of Elektor is distributed in North America (USA and Canada) with ISSN 1947-3753 and in the UK and elsewhere with ISSN 1757-0875.
Source: Elektor – Wikipedia
Steve Ciarcia
Steve Ciarcia is an embedded control systems engineer. He became popular through his Ciarcia’s Circuit Cellar column in BYTE magazine, and later through the Circuit Cellar magazine that he published. He is also the author of Build Your Own Z80 Computer, edited in 1981 and Take My Computer…Please!, published in 1978. He has also compiled seven volumes of his hardware project articles that appeared in BYTE magazine.
In 1982 and 1983 he published a series of articles on building the MPX-16, a 16-bit single-board computer that was hardware-compatible with the IBM PC.[1][2][3]
In December 2009, Steve Ciarcia announced that for the American market a strategic cooperation would be entered between Elektor and his Circuit Cellar magazine.[4] In November 2012, Steve Ciarcia announced that he is quitting Circuit Cellar and Elektor would take it over.[5]
In October, 2014, Ciarcia purchased Circuit Cellar, audioXpress, Voice Coil, Loudspeaker Industry Sourcebook, and their respective websites, newsletters, and products from Netherlands-based Elektor International Media. The aforementioned magazines will continue to be published by Ciarcia’s US-based team.
Source: Steve Ciarcia – Wikipedia
Download Circuit Cellar 2014 archive free
Free online library on electronics. All issues of Circuit Cellar mazagine and more
HOWTO: Repair a broken Ext4 Superblock in Ubuntu | Linux Expresso
HOWTO: Repair a broken Ext4 Superblock in Ubuntu
31mar10This has happened to me a few times, and it’s not a nice problem to find yourself in. You computer won’t boot, all your filesystem checks tell you you’ve a bad superblock, but you cant seem to find how to fix it. Well, here goes
This guide is for ext4 , though I’ll explain how other filesystems can be cured along the way. The easiest way to carry all this out, seeing as your computer probably won’t boot at this stage, is to download and burn a copy of Parted Magic. Boot from that, and you’ll access to a number of useful tools.
First, figure out what partition we’re dealing with.
sudofdisk-lThe above will list all the partitions on all the drives in your computer. To recover a lost partition, your going to need Testdisk. Testdisk is included in Parted Magic, and there’s a great guide on their site. For this though, we just need the partition number, such as /dev/sda3 or /dev/hdb1.
Now, make sure your superblock is the problem, by starting a filesystem check, replacing xxx with your partition name. Here, you can change ext4 to ext3, or ext2 to suit the filesystem.
sudofsck.ext4 -v/dev/xxxIf your superblock is corrupt, the output will look like this

Source: HOWTO: Repair a broken Ext4 Superblock in Ubuntu | Linux Expresso
php pass data to html form – Stack Overflow

I have php file that contains variables:$t1 = $_POST[‘t1’];$t2 = $_POST[‘t2’];and I need to pass these variables into the respective html form fields:form is located in different page than php file with variables. it’s url is “form.php”I guess I need to create php post command in my php file that redirects to url “form.php” and loads $t1 and $t2 into respective form fields “field_1” and “field_2”?Trying around but can not find right solution..Any ideas appreciated Brgds, Raivis
html – How to call a JavaScript function, declared in , in the body when I want to call it – Stack Overflow

I have a working JavaScript function declared in the head of an HTML page. I know how to create a button and call the function when the user clicks the button. I want to call it myself some where on the page:myfunction();How do I do it?