PHP: random_bytes – Manual

(PHP 7)

random_bytesGenerates cryptographically secure pseudo-random bytes

Description

string random_bytes ( int $length )

Generates an arbitrary length string of cryptographic random bytes that are suitable for cryptographic use, such as when generating salts, keys or initialization vectors.

The sources of randomness used for this function are as follows:

  • On Windows, » CryptGenRandom() will always be used.
  • On Linux, the » getrandom(2) syscall will be used if available.
  • On other platforms, /dev/urandom will be used.
  • If none of the aforementioned sources are available, then an Exception will be thrown.

Source: PHP: random_bytes – Manual

PHP: random_bytes – Manual was last modified: July 13th, 2017 by Jovan Stosic

Expanding a Linux disk with gparted (and getting swap out of the way) | mwpreston.net

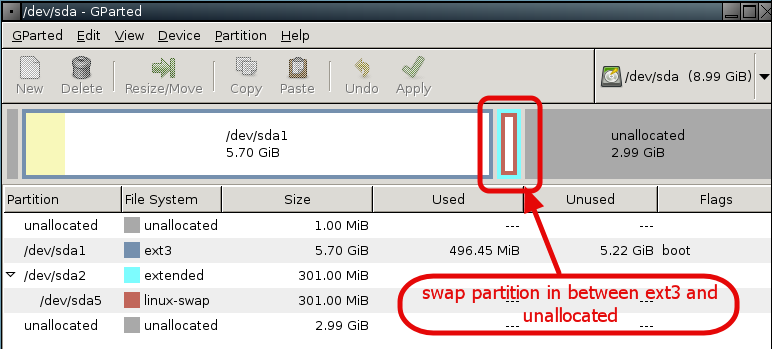
Over the past year or so there have been a few times where I’ve need to expand a disk attached to a Debian system.  Now this isn’t a hard task by any means, and may not even warrant a blog post, but the matter of it is that I always seem to forget the steps I need to take to get that unallocated space that I’ve added next to my actual EXT3 partition since the swap partition is always in the way!  So, I thought I would just throw up how I’ve done it in the past in hopes to maybe help a few others that visit, but more-so for myself and my memory (or lack there of).  Now keep in mind I’m sure there are ways to perform this exact same thing without taking the VM online, or I’m sure there are other ‘better’ ways to achieve the same results, but this way has worked for me consistently so it’s what I chose to do.  Any other suggestions are certainly welcome in the comment box below.First off, you will need to expand your drive from within the vSphere Client, not rocket science here, pretty simple to do.  Next, get yourself a copy of gparted and mount the ISO to your VM and reboot booting into the gparted interface (accept all defaults for keymap, X, and resolutions, unless of course you like playing…).  So the first thing you will notice inside gparted is that the swap partition is right smack in the middle of your EXT3 partition and the unallocated space. Normally, you could just resize the EXT3 partition and consume the unallocated space, but with swap there you can’t.

Source: Expanding a Linux disk with gparted (and getting swap out of the way) | mwpreston.net

Expanding a Linux disk with gparted (and getting swap out of the way) | mwpreston.net was last modified: July 13th, 2017 by Jovan Stosic

jquery – Wrapping HTML in an app for Android – Stack Overflow

I have an existing site (social in nature) and it already has a mobile web version too, so what I basically want to do is wrap that view in an Android app and maybe add a nice splash screen to it. So essentially a “branded” browser window.Any advice would be appreciated.

Source: jquery – Wrapping HTML in an app for Android – Stack Overflow

jquery – Wrapping HTML in an app for Android – Stack Overflow was last modified: July 13th, 2017 by Jovan Stosic

System Architecture Evolution

System Architecture Evolution (SAE) is the core network architecture of 3GPP‘s LTE wireless communication standard.

SAE is the evolution of the GPRS Core Network, with some differences:

  • simplified architecture
  • all-IP Network (AIPN)
  • support for higher throughput and lower latency radio access networks (RANs)
  • support for, and mobility between, multiple heterogeneous access networks, including E-UTRA (LTE and LTE Advanced air interface), 3GPP legacy systems (for example GERAN or UTRAN, air interfaces of GPRS and UMTS respectively), but also non-3GPP systems (for example WiFi, WiMAX or cdma2000)

Source: System Architecture Evolution – Wikipedia

System Architecture Evolution was last modified: September 25th, 2017 by Jovan Stosic

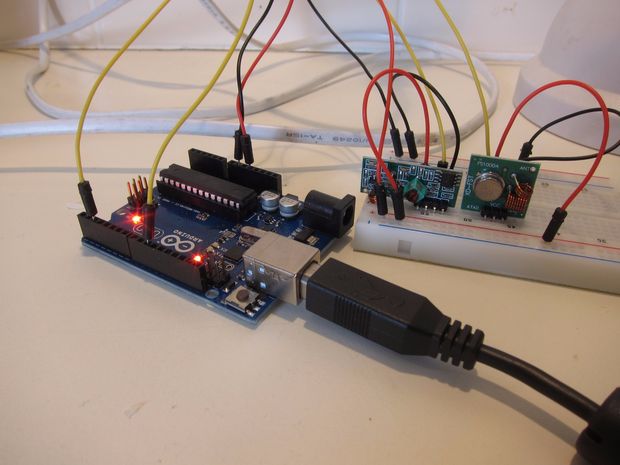
Decoding and sending 433MHz RF codes with Arduino and rc-switch

In this tutorial I’ll show you how to use an Arduino to decode signals from RF remotes, and re-send them to remotely control some mains switches and a garage door.Note: This guide was written for Australia, where it’s legal to operate low powered devices (25mW) in the 433MHz band without a licence. Check what’s legal in your own country. If you’re transmitting to (or on the same frequency as) a garage door opener / RC toy etc that you bought in your own country, it should be fine, provided you stick to the power limit.

Source: Decoding and sending 433MHz RF codes with Arduino and rc-switch

Decoding and sending 433MHz RF codes with Arduino and rc-switch was last modified: July 13th, 2017 by Jovan Stosic

Inserting, updating, and deleting data in MySQL

Inserting, updating, and deleting data in MySQLIn this part of the MySQL tutorial, we will insert, update and delete data from MySQL tables. We will use the INSERT, DELETE and UPDATE statements. These statements are part of the SQL Data Manipulation Language, DML.

Source: Inserting, updating, and deleting data in MySQL

Inserting, updating, and deleting data in MySQL was last modified: July 13th, 2017 by Jovan Stosic

Restart loop after interrupt?

Does anyone know if it is possible to start a program from the beginning of the loop() function after an external interrupt has been executed instead of picking up where it left off?
I have a program which checks the speed of the car, distance traveled, average speed etc.. and when the interrupt is activated, it is supposed to toggle through the different modes. The problem I have is that if the car is standing still and the magnets are not passing the reed switch, I need to wait 6 seconds for each screen to advance. I would like to make it so that it advances instantaneously and causing the program to start from the beginning of the loop after the interrupt has been tripped would do this. If anyone knows of another solution that would work, please let me know and so I could try that.

Source: Restart loop after interrupt?

Restart loop after interrupt? was last modified: July 13th, 2017 by Jovan Stosic

Adi Roiban – Monitor the UPS in Ubuntu with Network UPS Tools

Monitor the UPS in Ubuntu with Network UPS Tools

I just found this great project called Network UPS Tools or nut . It comes with fully loaded with tools for monitoring local UPS, remote UPS and displaying the status via a weg page. My installation is using an Must PowerAgent 1060, connected via USB.

Installing the software is easy, just use the magic words:

sudo apt-get install nut nut-cgi

To configure nut on Ubuntu I start by reading this guide by a mysterious person named Shady Pixel.

First I checked my driver suitable for my model in the Hardware Compatibility List. The model I use is not in the list, but Must is related to Mustek and all Mustek models were using blazer_usb driver. So I went for blazer_usb.

I added the following section in /etc/nut/ups.conf (you can replace must-pa-1060 with your preferred name for the UPS):

# /etc/nut/ups.conf
[must-pa-1060]
    driver = blazer_usb
    port = auto

I looked for the Bus and Device number together with Vendor and Product in lsusb.

I changed the permission to 666 for /dev/bus/usb/BID/DID (replace BID with your USB bus ID, and DID with device ID). To automatically set the permission for future connections I added the following udev rule:

#/etc/udev/rules.d/10-must-pa-1060.rules
SYSFS{idVendor}=='0665', SYSFS{idProduct}=='5161', MODE='0666'

Then I started the UPS driver via:

$ sudo upsdrvctl start

If you get some errors like the one below, check the USB device permissions:

Can't claim USB device [0665:5161]: could not detach kernel driver from
interface 0: Operation not permitted
Driver failed to start (exit status=1)

Now that the UPS driver is started, lets monitor it and export the status via the CGI script.

You will have to configure the mode in which nut will run. Edit /etc/nut/nut.conf and add your preferred mode:

# /etc/nut/nut.conf
MODE=standalone

Add an UPS daemon user via /etc/nut/upsd.users:

# /etc/nut/upsd.users
[ups_admin]
password = a password here
upsmon master

Configure the monitor to connect to this daemon via /etc/nut/upsmon.conf:

# /etc/nut/upsmon.conf
MONITOR must-pa-1060@localhost 1 ups_admin the_password_here master

Now you can start the nut daemon and ups monitor via nut service:

sudo service nut start

To monitor the UPS via the web CGI script I added the following line to/etc/nut/hosts.conf:

# /etc/nut/hosts.conf
MONITOR must-pa-1060@localhost 'Must PowerAgent 1060'

Now you can access the CGI script via:

http://HOSTNAME/cgi-bin/nut/upsstats.cgi

Enjoy!
Source: Adi Roiban – Monitor the UPS in Ubuntu with Network UPS Tools

Adi Roiban – Monitor the UPS in Ubuntu with Network UPS Tools was last modified: July 13th, 2017 by Jovan Stosic

Modifying NUT UPS shutdown delay.

Hello All!

I’ve recently configured a new Power Shield Defender 650VA UPS on my home SME server and it is working well. I would, however, like to change the shutdown behavior of the server.

At the moment, when the UPS goes to battery, the server continues to operate until the UPS sends the “battery low” warning, at which point it auto-shuts down. I would like to change the configuration so that the server will shut down 2 minutes after receiving the “on battery” signal.

What is the best way to achieve this?

Thanks in advance.

P.S. For those Aussies who are thinking about getting one of these UPS’, I configured NUT to use the megatec_usb driver and set the port to “auto”.

Source: Modifying NUT UPS shutdown delay.

Modifying NUT UPS shutdown delay. was last modified: July 13th, 2017 by Jovan Stosic

Symphony No. 1 (Brahms)

Symphony No. 1 in C minor, Op. 68, is a symphony written by Johannes Brahms. Brahms spent at least fourteen years completing this work, whose sketches date from 1854. Brahms himself declared that the symphony, from sketches to finishing touches, took 21 years, from 1855 to 1876. The premiere of this symphony, conducted by the composer’s friend Felix Otto Dessoff, occurred on 4 November 1876, in Karlsruhe, then in the Grand Duchy of Baden. A typical performance lasts between 45 and 50 minutes.

Source: Symphony No. 1 (Brahms) – Wikipedia

Symphony No. 1 (Brahms) was last modified: September 25th, 2017 by Jovan Stosic

Johannes Brahms

Johannes Brahms (German: [joˈhanəs ˈbʁaːms]; 7 May 1833 – 3 April 1897) was a German composer and pianist. Born in Hamburg into a Lutheran family, Brahms spent much of his professional life in Vienna, Austria. His reputation and status as a composer is such that he is sometimes grouped with Johann Sebastian Bach and Ludwig van Beethoven as one of the “Three Bs” of music, a comment originally made by the nineteenth-century conductor Hans von Bülow.

Brahms composed for symphony orchestra, chamber ensembles, piano, organ, and voice and chorus. A virtuoso pianist, he premiered many of his own works. He worked with some of the leading performers of his time, including the pianist Clara Schumann and the violinist Joseph Joachim (the three were close friends). Many of his works have become staples of the modern concert repertoire. An uncompromising perfectionist, Brahms destroyed some of his works and left others unpublished.[1]

Brahms has been considered, by his contemporaries and by later writers, as both a traditionalist and an innovator. His music is firmly rooted in the structures and compositional techniques of the Classical masters. While many contemporaries found his music too academic, his contribution and craftsmanship have been admired by subsequent figures as diverse as Arnold Schoenberg and Edward Elgar. The diligent, highly constructed nature of Brahms’s works was a starting point and an inspiration for a generation of composers. Within his meticulous structures is embedded, however, a highly romantic nature.

Source: Johannes Brahms – Wikipedia

Johannes Brahms was last modified: September 25th, 2017 by Jovan Stosic